BSOD 0x000000f4 when I'm playing games and happens randomly often


  1. Posts : 3
    Microsoft Windows 7 Ultimate 64-bit 7601 Multiprocessor Free Service Pack 1
       #1

    BSOD 0x000000f4 when I'm playing games and happens randomly often


    Yesterday my computer started BlueScreening often. It can't go three full hours without BlueScreening. Windows Explorer often stops working causing my home screen to disappear, which makes me have to restart my computer in order to get it to start working again. After it blue screens or Windows Explorer stops working I have to wait a little while in order for it to start properly again or it just says "disk read error" or something. It says press Ctrl+Alt+Del in order to restart the computer. I don't know what caused this or why this started, any and all help will be appreciated. Thank you!
      My Computer


  2. Posts : 3,056
    Windows 10
       #2

    Based on what you posted it sounds like your HDD is dying, that coincides with the facts that no dumps are being recorded and the bug check code.

       Warning
    The Following Method Should NOT Be Performed On An SSD!


    Testing the HDD:


    1. Perform a Disk Check | Disk Check
    2. Then Post the results following | THIS METHOD
    3. Download SeaTools for DOS if you don't want to use a CD to test the HDD you can use YUMI – Multiboot USB Creator to create a bootable USB (instructions are found at the bottom of both pages).
    4. If SeaTools for Windows is unable to recognize your HDD visit HDDdiag and follow the instructions.

    If SeaTools For DOS does not recognize the drive;
    Boot into the BIOS using the *Fx key.
    Look for an entry called SATA Mode (or something similar), it should be set to IDE / AHCI.
    It's probably set to AHCI which is why SeaTools doesn't recognize them in the DOS environment.
    Set it to IDE then save and exit usually by pressing the F10 key.
    Now boot into SeaTools and it should detect the drives.
    Start the Long Test and let it run.
    Upon completion don't try to boot into Windows as it will only result in a BSOD, go back into the BIOS
    and change the SATA setting back to what it was in the first place.


    Post back with the results.
      My Computer


  3. Posts : 3
    Microsoft Windows 7 Ultimate 64-bit 7601 Multiprocessor Free Service Pack 1
    Thread Starter
       #3

    Chkdsk results


    Here's what I found in event viewer -
      My Computer


  4. Posts : 3,056
    Windows 10
       #4

    I'm sorry but the disk check wasn't carried out correctly, the C: partition is in use so you need
    to jump to execute OPTION 2 of the tutorial and using the /R switch.

    Please try again and continue with the rest of the tests :) .

    Also follow this tutorial to make sure you have a Kernel dump configured (which is the default setting).


    Free up at least 5GB of space in your C:\ partition, you only have 1.36GB of free space.

    May I ask what is partition A:\ used for?


    Your page file needs to be reset to the default size again in order to generate a dump file.

    Reset your Page File:

    1. Start Menu> Run >type control.exe system
    and press the Enter key.
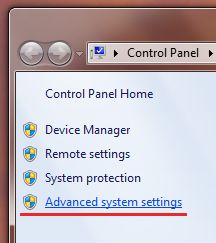
    A windows will open and on the Left hand side you will see Advanced system settings, click it.


    2.
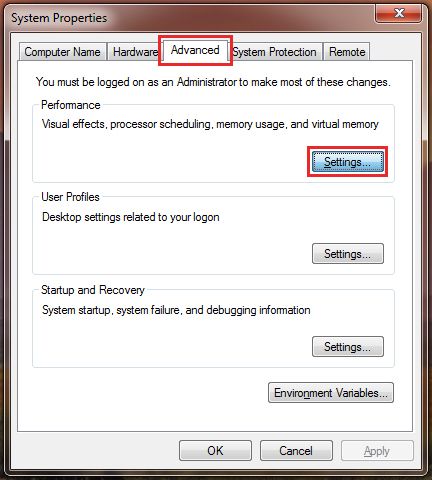
    Next click on the Advanced tab and Settings which correspond to the Performance section;


    3. Then the Advanced tab once more and click on the Change button;


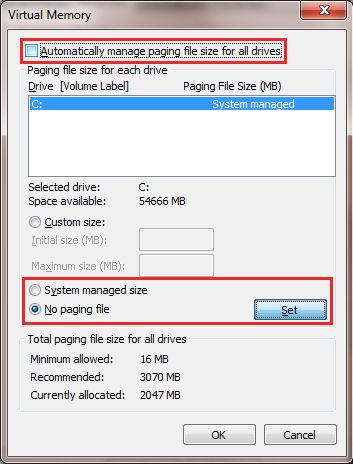
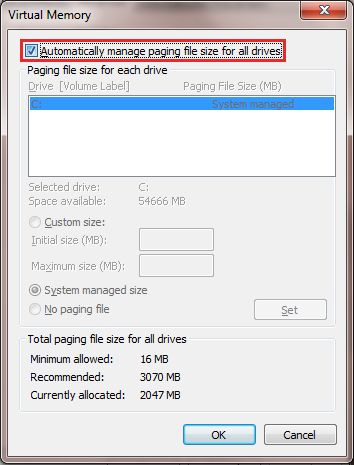
    4. Untick the checkbox next to Automatically manage paging file size for all drives;


    5. Select No paging file and Click on the Set button;


    6. Confirm all the windows.

    7.
    Restart the PC.

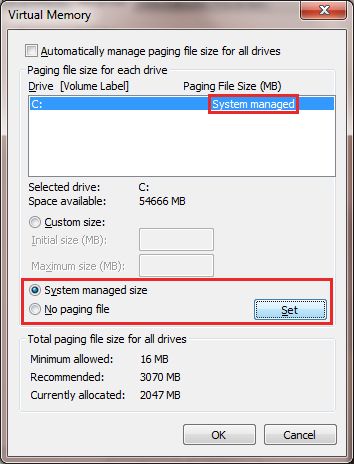
    8. Reverse the procedure, by following steps 1-3, only this time select System managed size
    and click the Set button;


    9. Recheck the box next to Automatically manage paging file size for all drives
    and exit the windows by clicking the OK button;


    10. Confirm all of the remaining windows by click the OK button
    and restart once again to take affect.
      My Computer


  5. Posts : 3
    Microsoft Windows 7 Ultimate 64-bit 7601 Multiprocessor Free Service Pack 1
    Thread Starter
       #5

    Thanks for all the help mate. I'll get to this as soon as I can, my computer is acting up a lot now. I just tried starting it again to do everything but I got another blue screen error this time, 0x0000007A. My brother said when he tried starting the computer before as well it said "missing OS." So again, I'll try to get to this if I can and if it's not too late for my HDD. Also, the reason I have two partitions is because my old hard drive was small and it began failing so my brother bought a 500GB and transferred all the files we had on the old drive to a C: partition and made a separate partition to hold any extra files we wanted. A: is used mostly for just big file downloads that aren't being able to be held in partition C:. Also, when I tried to do option 2 when the computer still functioned semi-decently it just gave me an error so I used option 1.
      My Computer


  6. Posts : 3,056
    Windows 10
       #6

    Code:
    STOP 0x0000007A: KERNEL_DATA_INPAGE_ERROR    (go to top of page)
    Usual causes:  Memory, Paging file corruption, File system, Hard drive, Cabling, Virus infection, Improperly seated cards, BIOS, Bad motherboard, Missing Service Pack
    Did you use an elevated command prompt to execute the CHKDSK command?

    YoYo155 said:
    C: partition is in use so you need
    to jump to execute OPTION 2 of the tutorial and using the /R switch.

    Please try again and continue with the rest of the tests :) .

    Free up at least 5GB of space in your C:\ partition, you only have 1.36GB of free space.


    Reset your Page File:

    1. Start Menu> Run >type control.exe system
    and press the Enter key.
    A windows will open and on the Left hand side you will see Advanced system settings, click it.


    2.
    Next click on the Advanced tab and Settings which correspond to the Performance section;


    3. Then the Advanced tab once more and click on the Change button;


    4. Untick the checkbox next to Automatically manage paging file size for all drives;

    Select No paging file and Click on the Set button;


    5. Confirm all the windows.

    6.
    Restart the PC.

    7. Reverse the procedure, by following steps 1-3, only this time select System managed size
    and click the Set button;


    8. Recheck the box next to Automatically manage paging file size for all drives
    and exit the windows by clicking the OK button;


    9. Confirm all of the remaining windows by click the OK button
    and restart the PC once again to take affect.
      My Computer


  Related Discussions
Our Sites
Site Links
About Us
Windows 7 Forums is an independent web site and has not been authorized, sponsored, or otherwise approved by Microsoft Corporation. "Windows 7" and related materials are trademarks of Microsoft Corp.

© Designer Media Ltd
All times are GMT -5. The time now is 16:16.
Find Us