Trouble formatting hd, system partition

Page 1 of 2 12 LastLast

  1. Posts : 5
    Windows 7 Ultimate x64
       #1

    Trouble formatting hd, system partition


    I've got three HD's: c: is windows, g: is a storage drive, and e: is an external storage drive.

    In the last month or so at startup, windows has tried to run a checkdisk on G: but it fails every time. I'm trying to figure out how to format G: because its giving me endless trouble.

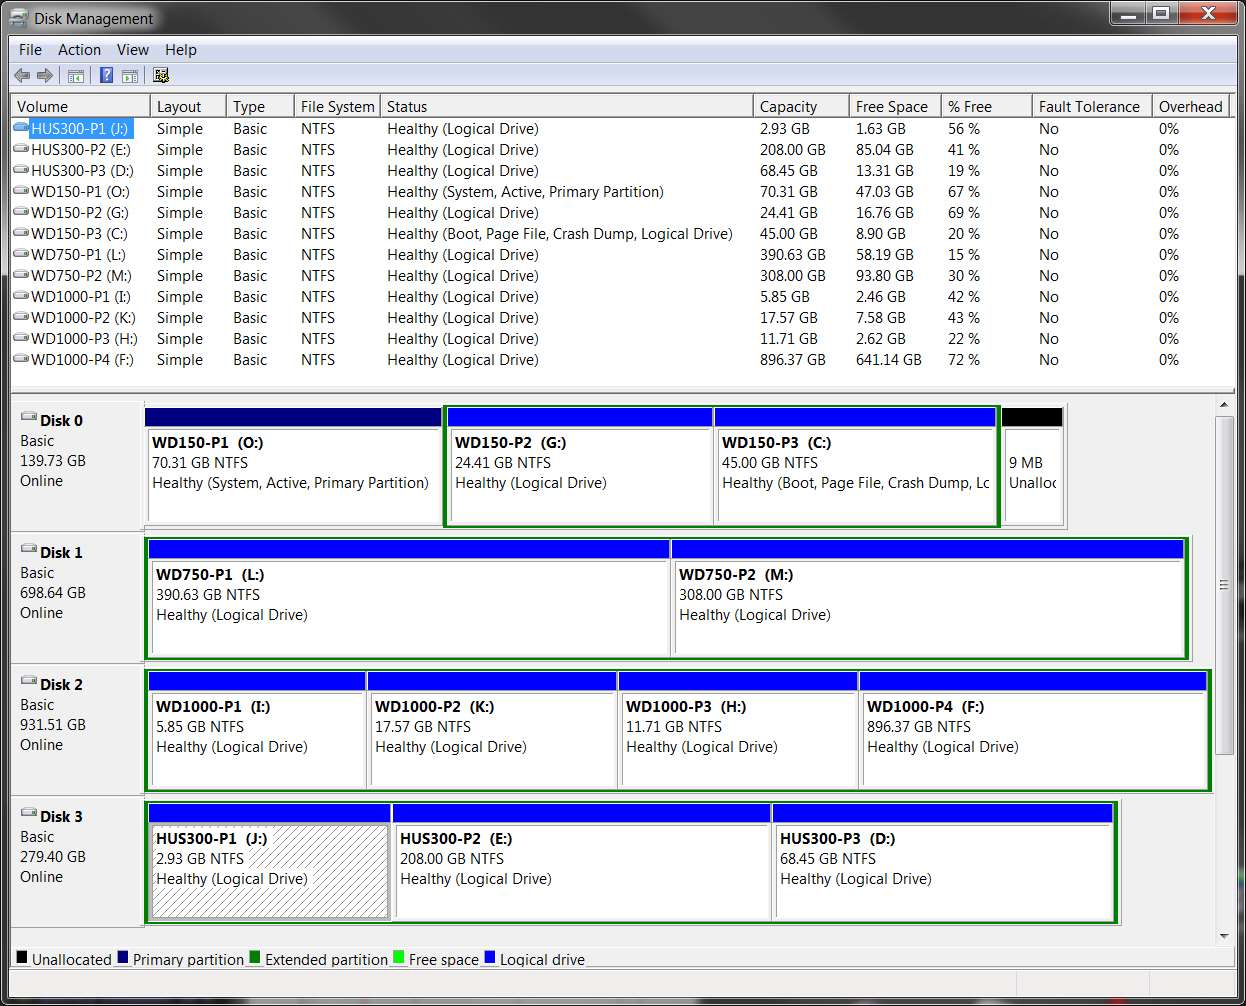
    I backed it up, went to computer management, and was given the "Windows cannot format the system partition on this disk" error.


    How do I move the system partition to c: so I can format g:?

    I've read some threads that seem similar where people suggest using BCDEDIT--is that what I should be doing?


    thanks for the help!
    joe


    EDIT: Also, I'm no expert, so I have no idea how in the hell system files got onto my storage drive in the first place...
    Attached Thumbnails Attached Thumbnails Trouble formatting hd, system partition-hds.png  
      My Computer


  2. Posts : 7,730
    Windows 7 Ultimate SP1 64-Bit
       #2

    Welcome to Windows Seven Forums.

    You have two partitions (C and G) marked as active when only your Windows drive C should be active as it is the boot partition.

    You need to deactivate the G drive: How to deactivate an active partition?

    Once you've done that you should be able to format your G drive.
      My Computer


  3. Posts : 5
    Windows 7 Ultimate x64
    Thread Starter
       #3

    Wonderful, that did it! Thank you!!

    Joe
      My Computer


  4. Posts : 5
    Windows 7 Ultimate x64
    Thread Starter
       #4

    Ooops never mind, that didn't solve it at all. It did make it so that I could format, but I decided to reboot first just in case, and now it won't boot at all.... is there a way to undo what I just did?
      My Computer


  5. Posts : 7,730
    Windows 7 Ultimate SP1 64-Bit
       #5

    Either of these will repair your boot record.

    You can also boot into your Windows DVD and choose the Repair option, you may need to do it three times.

    There's no need to undo what you just did, once you've rebuilt the master boot record you'll be good to go.
      My Computer

  6.    #6

    This is why Win7 HD should always be plugged into DISK0. The installer looks for the first Active partition to place the boot files, in this case a data HD.

    Boot your Win7 DVD Repair console or REpair CD, accept any offered Repair. If Win7 doesn't start, boot back in to run Startup Repair repeatedly to start Win7 if it remains marked Active. If not, check it is still active using free Partition Wizard bootable CD, or Diskpart from the DVD/Repair CD Command Prompt. Partition - Mark as Active

    System Repair Disc - Create
      My Computer


  7. Posts : 5
    Windows 7 Ultimate x64
    Thread Starter
       #7

    Ok so I'm back into my computer, I got it to boot by using the repair DVD. But now I'm back to where I was--the repair switched G: back to "active".

    Maybe this is a dumb question, but is it possible to change the system volume from G: to C: without reinstalling windows?

    That's really all I want--I'll reinstall windows if that's the only option, but I'd rather not if I don't have to.

    Thanks for all the help
    Joe
      My Computer

  8.    #8

    Yes, the procedure is to unplug G and swap it's data cable to C, while keeping it set as first HD to boot in BIOS setup.

    Next mark C active using methods I posted earlier, then run Startup Repair repeatedly with reboots until Win7 starts on its own. It should now be System Active in DIsk Mgmt.

    Power down to plug the cable previously plugged into C into G so it is now Disk1 instead of DIsk0. Use the same method used to mark C Active to instead mark G Inactive, making sure G doesn't get set first to boot in BIOS.
      My Computer


  9. Posts : 2,752
    Windows 7 Pro x64 (1), Win7 Pro X64 (2)
       #9

    jklein said:
    Ok so I'm back into my computer, I got it to boot by using the repair DVD. But now I'm back to where I was--the repair switched G: back to "active".

    Maybe this is a dumb question, but is it possible to change the system volume from G: to C: without reinstalling windows?
    There is only supposed to be one "active" partition on any given hard drive. That is THE partition on THAT drive which the BIOS will boot to is asked to boot to THAT drive. And how does the BIOS know which hard drive should be booted to? To whichever of your hard drives is specified as "hard disk #1" in the hard drive list in the BIOS setup.

    There is a second list present in BIOS setup, for "boot device sequence", which for example might specify (1) USB device, (2) floppy diskette, (3) CD/DVD drive, and then (4) hard disk, or something like that, as the "boot device sequence". If you have a bootable media inserted into any of those bootable devices, then they will be examined by the BIOS at machine boot time and whichever bootable media is encountered first, using the prescribed search "boot sequence" list order, that will be the device from which booting actually occurs on that particular boot. That's how you can boot from a recovery CD or the Win7 installation DVD, or a standalone bootable USB drive or Partition Wizard's standalone bootable CD, or a floppy disk DOS, etc.


    Ok, if you don't have a bootable USB drive inserted, and you don't have a bootable floppy diskette inserted, and you don't have a bootable CD/DVD inserted, then the BIOS WILL BOOT TO HARD DISK #1, specifically the "active partition" on that hard drive.

    In your case, there's nothing wrong with actually having both C and G marked as "active". That isn't your problem. Your problem is that your BIOS setup needs to have the Win7 C drive set to be the "hard disk #1". And yes, that partition on that drive must also be marked "active" as it currently is. So what you do with your other G partition (also currently marked "active") is really irrelevant, if your BIOS points to the drive containing C as the "hard disk #1". This is the ultimate setup you want: the drive containing C as "hard disk #1" in the BIOS, and the C partition marked "active". Whatever else you have on any other drive and/or partitions is not significant, although having other partitions marked as "active" accomplishes nothing.

    In your case this probably came from a machine that "evolved" over time, perhaps with WinXP installed at one time on what now is just a G "data" drive for you. Since WinXP was on it and thus had to be bootable, it had to be (a) "hard disk #1" at that time so that the BIOS went there at boot time, and (b) was "active" so that WinXP would be booted. I'm guessing this is what it used to be like, and the additions we now see (i.e. that you have a second internal hard drive plus an external drive) came later... when you installed Win7.

    That's precisely why the Win7 boot manager files got placed onto your now-G drive/partition when you installed Win7, because (a) that drive was still "hard disk #1 for the BIOS, and (b) that partition was the "active" partition on the drive. Once the Win7 boot managers placed here are kicked off at boot time, they know that the real Win7 is over on the other now-C drive and go there to finish the Win7 boot process. If you had first changed "hard disk #1" in the BIOS to the now-C drive before you installed Win7 on what I am guessing was a brand new empty hard drive purchased and added as part of your Win7 upgrade project, the Win7 installation would have created a 100MB "system reserved" primary/"active" partition on this new now-C drive for use in housing the boot manager files, and then created a second primary partition into which it then installed the real Win7 OS. Your G-drive would have been gone from the boot-related picture and you would not have been prevented it from being formatted.


    Now, the story's not over quite yet.

    Since you had your current G drive as "hard disk #1" and that partition (which I'm guessing used to be WinXP, and thus the "active" partition on that drive), when you installed Win7 as a second OS on the new second drive (what is now C, on the "active partition" on that hard drive), Win7 placed its boot manager files on what currently is the G partition, which used to be the WinXP bootable OS partition... because (a) that hard drive was still set as "hard disk #1" in the BIOS, and (b) that partition was still marked as "active".

    And that's how booting occurs on your system currently. BIOS boots to G where boot manager files are, and the boot manager knows the real Win7 is over on C, so that's where it goes to complete the boot process and initiate Win7.

    So you are currently using that G partition on that hard drive as if it were the little "100MB system reserved partition" Win7 normally creates on a single-drive machine. Same effect, except that instead of having a little 100MB "system reserved" partition (marked "active", on "hard disk #1" of the BIOS) for the boot manager files to start the boot process, you're using a 2GB partition to hold those boot manager files as well as data.

    And unless (1) you move the boot manager files off of G and over to C (using the triple-repair method alluded to by others, or EasyBCD), and then also (2) change "hard disk #1" in the BIOS to point to your hard drive containing C, you will not really eliminate G as the current BOOT PARTITION (i.e. (a) "active partition" on (b) "hard disk #1 in the BIOS") which makes it illegal to be FORMAT'ed.


    To summarize, given your current setup you want to make your C partition "bootable" directly, both the "active" partition on that hard drive and also containing the Win7 boot manager files. This can be done using triple-repair, or EasyBCD. In other words, it is possible to place the boot manager files WITHIN the Win7 partition itself... you don't actually need the small "100MB system reserved" partition, although a from-scratch Win7 install will do that.

    And you want to make that hard drive containing C be "hard disk #1" in the BIOS.

    This will free your G partition on that hard drive to be fully formatted back to zero. It will no longer be part of the system boot process, which is why it currently cannot be formatted.


    ===>> boot manager files go into the "active" partition on "hard disk #1" per the BIOS. Only that one single "active" partition MUST BE PRIMARY. All other partitions can either be "logical" (inside of the one allowed "extended partition" on a drive) or "primary".

    A hard drive is allowed to have up to four "primary" partitions total (including that one tiny 100MB "system reserved" partition, is you have it). No more than four "primary" partitions are allowed.

    If one of those four allowed "primary" partitions is instead configured to be an "extended partition" (thus now limiting the other real "primary" partitions to just three), then inside of that "extended partition" you can now define ANY NUMBER OF "LOGICAL" PARTITIONS. ANY NUMBER OF LOGICAL PARTITIONS inside of the one "extended partition" (which itself is one of the four allowed "primary" partitions on the drive)!!

    Only the "active" partition on "hard disk #1" MUST be "primary", and that's where boot manager files go.

    All other partitions (including bootable OS partitions for Win7 and WinXP) can themselves be "logical" partitions (with no limit on number inside of the one "extended partition" allowed on a hard drive), or "primary" partitions subject to the maximum of four total on a hard drive . There are no functional differences between "logical" and "primary" partitions, other than what I've explained above as far as location and number. In fact, other than on the "hard disk #1" which needs at least one "primary" partition marked "active", no other hard drives require ANY "primary" partitions.

    If you want, you can even define nothing but "logical" partitions on all secondary internal and external hard drives, which means their total drive capacity will be set up simply as one single "extended partition" (i.e. the only partition on the drive, which will be "primary" and used as the "extended partition" for that drive), where every one of your L1, L2, ..., Ln "logical" partitions will be sub-defined inside of that one "extended partition" using 100% of the drive.

    Obviously, because all "logical" partitions are within the one single "extended partition" allowed on a hard drive, all "logical" partitions must be adjacent to each other... although obviously unallocated free space between "logical" partitions is also allowed WITHIN the interior of the "extended partition". Unallocated free space within the "extended partition" that separates defined "logical" partitions within the "extended partition" has nothing to do with any other unallcoated free space outside of the "extended partition", thus separating the up-to three remaining other "primary" partitions on the drive.

    For example, here's my machine setup (from the perspective of Win7). Note that there is only one "primary" partition, which is "active" and also "hard disk #1" for the BIOS (and shows as Disk 0 and drive letter "O" to DISKMGMT and Win7). That is actually my WinXP partition, where the Win7 boot manager files live (actually, I've replaced them with the EasyBCD boot manager files), which then boots to Win7 which is on the "logical" partition C (partition P3 on the same physical drive).


    ==>> you can use Disk Management to do most basic partition work and reconfiguring. But for absolute maximum flexibility, reliability, and capability, you should absolutely use Partition Wizard.

    You should also download the ISO for standalone bootable PW, and burn it to bootable CD. The standalone version is required for certain operations involving the "active" or bootable partitions, and for other very significant "surgery" operations on drives and partitions.
    Last edited by dsperber; 25 May 2011 at 17:43.
      My Computer


  10. Posts : 5
    Windows 7 Ultimate x64
    Thread Starter
       #10

    Got it!!

    Thanks everyone for all the valuable info and suggestions.


    Here's how I did it step-by-step:


    1. Use BCDedit to move Bootmgr to C
      Code:
      bcdedit /set {bootmgr} device partition=C:
    2. Change the HD# of C: to "1" in BIOS
    3. Shutdown and unplug G:
    4. Boot and check disk management to make sure C: is now "system" volume
    5. Shutdown and reattach G:
    6. Restart and voila!


    Thanks again!
      My Computer


Page 1 of 2 12 LastLast

  Related Discussions
Our Sites
Site Links
About Us
Windows 7 Forums is an independent web site and has not been authorized, sponsored, or otherwise approved by Microsoft Corporation. "Windows 7" and related materials are trademarks of Microsoft Corp.

© Designer Media Ltd
All times are GMT -5. The time now is 21:13.
Find Us