How can I reassign drive letters w/o being able to fully boot into OS?


  1. Posts : 9
    Win 7, 64bit
       #1

    How can I reassign drive letters w/o being able to fully boot into OS?


    I tried upgrading my dual boot 1.5TB Vista/Win7 drive to a to a larger 2.0TB hard drive and even the original drive got botched up. All my data is fine, but Windows somehow reassigned the drive letters to my partitions making so I cannot fully boot.
    How can I reassign the drive letters back?

    BEFORE UPGRADE
    CURRENT NAME OF PARTITION INSTALLED OS
    DRIVE "Label"
    C:\ "Partition_1" Vista32bit
    I:\ "Partition_1NEWWin7(I)" Win7 64Bit
    E:\ "DVD RW"

    AFTER ATTEMPTED UPGRADE
    CURRENT NAME OF PARTITION INSTALLED OS
    DRIVE "Label"
    C:\ "Partition_1NEWWin7(I)" Win7 64Bit
    F:\ "Partition_1" Vista32bit
    E:\ "DVD RW"

    The problem for me started when I tried using HDClone Standard Version to upgrade my 1.5TB drive to a 2TB drive. After I got an error where 7 would not load.
    I then used the Windows 7 disk to recover the boot loader which partially allowed it to boot but lead to where I'm currently stuck. After entering the system password it says "preparing your desktop", and after a longer than normal wait it brings me to a blue screen that says "Windows 7; Build 7600; This copy of Windows is not genuine" in the lower right corner. It does nothing from this point, it just hangs on this screen without loading the start bar or anything. I can still access the task manager if I Ctrl,alt,del but cannot solve this genuine error. (This is 100% genuine!!!)

    I have always upgraded to larger drives by cloning and expanding the new partitions to take advantage of the new space. It's ideal because if anything goes wrong, all I have to do is go back to the original hard drive which should be untouched.

    That's what makes this latest attempt so frustrating, because not only did the new drive fail to work, the original drive partitions got reassigned leading to the current problem.

    I'm not sure if this will be of any help, but I do still have an old 2009 hard drive which I am able to boot from and I can access the other two drives that way and can see my data is there. This copy is 100% genuine. And now I am completely stuck.

    I followed Keljackson's instructions from here
    Booting Problem related to Windows not genuine error
    but unfortunately when I right click on Computer and select "Open"
    A message pops up titled "explorer.exe" that says "No such interface supported."

    I know this is a long entry, but I wanted to be specific in case any detail was helpful.
    Any assistance would be greatly appreciated.
      My Computer

  2.    #2

    FREE Rescue Kit Express | PARAGON Software Group

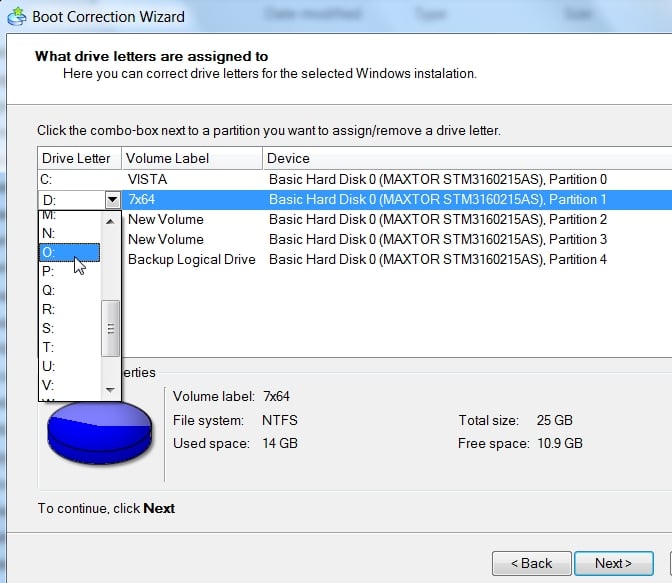
    Boot the Paragon CD, select Normal Mode, then Boot Corrector.

    Correct drive letters in the system registry.

      My Computer


  3. Posts : 9
    Win 7, 64bit
    Thread Starter
       #3

    Thank you for your response.

    So I used FREE Rescue Kit Express | PARAGON Software Group as you described. I correctly reassigned the partitions, but when I rebooted the computer, once again I got the longer than normal boot where it said "Preparing your desktop..." and the "This copy of Windows is not genuine."
    I just checked and somehow windows changed all the drives letters back to the incorrect one. Now I'm really stumped. Any ideas now?
      My Computer

  4.    #4

    Wipe the target HD with Diskpart Clean All Command: Disk - Clean and Clean All with Diskpart Command
    DISKPART : At PC Startup

    Try cloning again using Acronis's superior program available free if you have a WD or Seagate HD on either end, from the drive model's Support>Downloads webpage

    Or use Win7 backup imaging, free Macrium Reflect or Paragon to image over only Win7 partition first, recover it's System boot files by marking Active and running Startup Repair 3 times, then after it starts either copy your other partitions using free Partition Wizard bootable CD or imaging app.

    I'm not sure why you are including Vista as Win7 is a vastly superior replacement. What I would do is recover Win7's System boot files by marking Active and running Startup Repair 3 times after imaging/cloning, then image Vista to another HD to use its own bootloader via BIOS and not a Windows-managed Dual Boot which can be removed using EasyBCD 2.0.

    If you want to post up your source HD's full maximized Disk Management drive map, we can look it over more closely to make other suggestions.

    The app you are using is not recommended by anyone here that I have seen.
      My Computer


  5. Posts : 9
    Win 7, 64bit
    Thread Starter
       #5

    I like this suggestion a lot, but it is only just slightly beyond my understanding. I would like to try what you suggest if you could help me walk through the process.
    Coincidentially, I have both WD & Seagate Harddrives on this computer. The only reason I have Vista as a dual boot is because that was my original OS. I learned a long time ago, not to upgrade without a way of going back should something go wrong. In actuality, I never boot to the Vista OS & it would be great if there was a way to "port" the whole Vista install off this disk and onto a separate harddrive (did I understand you correctly?) and just shelve it for safe keeping if I ever needed to go back to it for some reason.

    I really did not follow you on the steps I would need to take in order to do that. But I am a quick study if you can point me in the right direction. Thanks.
      My Computer

  6.    #6

    I'd use the Acronis app to image the Win7 partition to one HD, then after it is up and running unplug it's HD to image Vista to the other one.

    if either won't start, then make sure it is marked Active and run Startup Repair up to 3 separate times from the Win7 or Vista DVD repair console.
    Partition - Mark as Active
    Startup Repair - Run 3 Separate Times

    If Vista is already marked System Active then it may well start up on its own and may still have the Dual Boot menu, which needs to be deleted using EasyBCD 2.0 Edit OS tab.

    Then set Win7 as first HD to boot in BIOS setup, boot Vista when needed using one-time BIOS Boot Menu key.

    The Acronis WD app has a Manual on its Download page which is quite easy to understand: WD Support
      My Computer


  Related Discussions
Our Sites
Site Links
About Us
Windows 7 Forums is an independent web site and has not been authorized, sponsored, or otherwise approved by Microsoft Corporation. "Windows 7" and related materials are trademarks of Microsoft Corp.

© Designer Media Ltd
All times are GMT -5. The time now is 09:36.
Find Us