My Dual Boot setup has the boot mgr on the wrong drive

Page 1 of 2 12 LastLast

  1. Posts : 12
    Microsoft Windows 7 Home Premium 64-bit 7601 Multiprocessor Free Service Pack 1
       #1

    My Dual Boot setup has the boot mgr on the wrong drive


    I have managed to get myself into a situation where the "System Reserved" partition is on a different physical drive from my current C drive. This is, I presume, as a result of creating a dual boot system without fully understanding the consequences.

    I need to correct this because I intend to wipe out the older drive (which contains the System Reserved partition which, I guess, is where the boot manager is located.)

    Since I'm somewhat confused about the difference between a "system reserved" partition and a bootmgr and which is required where, I thought the easiest way to describe my problem is to describe the steps that got me here with screen grabs where appropriate.


    At the start of this process I had a plain vanilla 32 bit install of Windows 7. The system resided on an OCZ 60 GB SSD, that contained both a 100 MB "System Reserved" partition and a second 55 GB partition that represented the C Drive as shown below.

    My Dual Boot setup has the boot mgr on the wrong drive-c-drive-ocz-.jpg

    When I periodically created a system image (using "Create a system image" from the Backup and Restore Control Panel) it would require me to include both the "system reserved" partition and the C partition, which was fine and what I expected.

    A few weeks ago I decided that I wanted to move to the 64 bit version of Windows 7 and decided upon installing it on a new second SSD (a Samsung 830) using a dual boot setup to go back and forth between the two OS's during the time required to get all my applications installed and running in the new 64 bit environment. My intention was, after the 64 bit install was complete and working, I would remove the old 32 bit installation and repurpose the OCZ drive for the Windows 8 consumer preview.

    I installed EasyBCD in the Windows 32 environment, then physically installed the Samsung SSD in an available SATA slot and proceeded to do a fresh install of Windows 7 64 bit on the Samsung drive. I then started re-installing all the apps that I use in the new 64 bit environment. As part of that process I also installed EasyBCD on the 64 bit OS.

    Everything was going fine until I attempted to create a backup system image of the new 64 bit OS. It was at that point that I discovered that creating that system image required both the C partition from the Samsung Drive and the "System Reserved" partition from the OCZ drive, something I probably should have expected but didn't.

    Looking at the Disk Management utility in the 64 bit environment the two SSD's looked as follows:

    My Dual Boot setup has the boot mgr on the wrong drive-c-drive-samsung-.jpg

    My Dual Boot setup has the boot mgr on the wrong drive-v-w-drive-ocz-.jpg

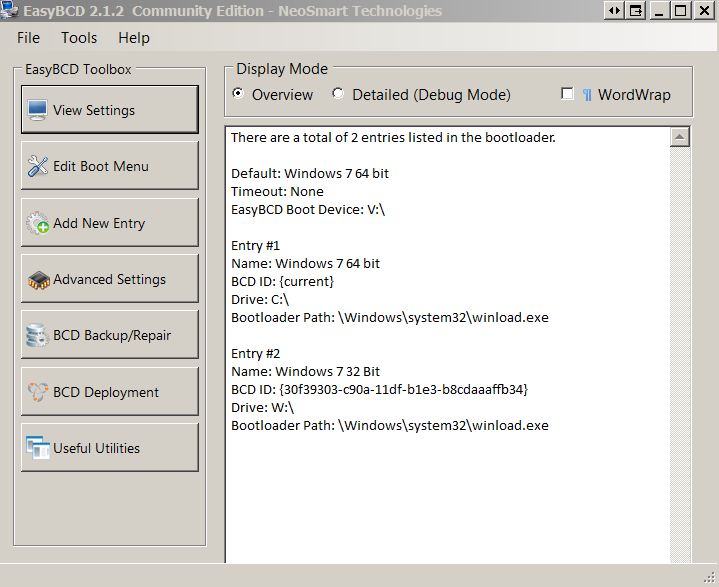
    Looking at the "view settings" display from EasyBCD confirms that I've got my "Easy Boot Device" set to the Drive V (the letter that the 64 bit Windows install gave to the "system reserved" partition of the OCZ SSD.)

    My Dual Boot setup has the boot mgr on the wrong drive-easybcd-info.jpg

    In an abortive attempt to diagnose the problem I phsyically disconnected the OCZ drive and booted the system. The system booted fine but appears to have turned a 2 TB single partitioned hard drive into an Active drive (which I "think" means that it now contains a bootmgr as well).

    My Dual Boot setup has the boot mgr on the wrong drive-f-drive.jpg

    Confirming this, if I attempt to create a system image backup under this scenario it insists on including both the entire C drive and the entire 2 TB F drive.

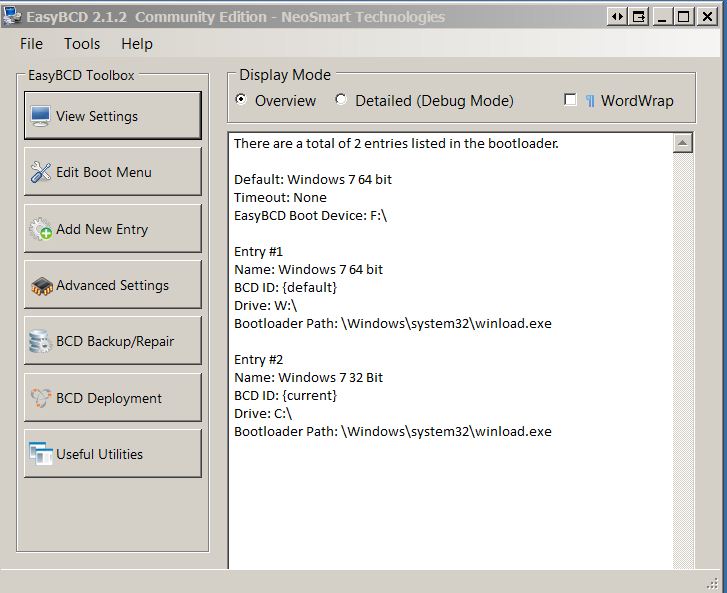
    And, when "viewing settings" from EasyBCD from the old 32 bit OS, EasyBCD now indicates that IT'S boot device is drive F.

    My Dual Boot setup has the boot mgr on the wrong drive-easybcd-view-settings-32-bit.jpg

    I have reconnected the OCZ dirve and all is operating well, but I need to straighten this all out before proceeding further.

    Where I want to end up is with the system capable of booting exclusively from the Samsung 830 drive without partitions from other drives being needed to boot. I would then want to delete (or uninstall) the 32 bit installation. I'd also like to remove whatever was done to the F drive that made it a system partition.

    I've read this tutorial:Dual Boot - Delete a OS and this post: Bootmgr - Move to C:\ with EasyBCD.

    They seem to point the way, but I would like to confirm the exact steps I would need to do and/or make sure that there isn't some better more foolproof alternative, as I'm not particularly comfortable that I know what all the implications really are of each of these steps, and fear that a wrong step could leave me in a very difficult situation.

    Thanks in advance for any guidance offered.
      My Computer


  2. Posts : 2,573
    Win7 Ultimate X64
       #2

    Hi hwilker, welcome to SF

    I think your half way there, all you need to understand is the boot manager resides at present in sys reserved partition so any backup will require the OS (whichever one your backing up) + boot manager & that can be on either drive.

    You can use easyBCD to move boot manager and if you want delete sys reserve partition altogether BUT remember that windows keeps some recovery help in there also so make sure you have win install/recovery disks incase needed and always where possible take backups if your not sure

    Hope this helps
      My Computer


  3. Posts : 2,573
    Win7 Ultimate X64
       #3

    Just to clarify you will need to boot into the OS you want to keep that will make the current drive you booted off of default to C drive you can then follow the tutorial above to relocate boot manager to the C drive this will enable you to free up other drive and you will no longer have sys reserve partition
      My Computer

  4.    #4

    If you move the System boot files to 64 bit install using EasyBCD you will lose the F8 Advanced Boot Options hotlink to System Recovery Options.

    Instead Mark Win7 Partition Active, power down to unplug all other HD's except target, make sure target SSD is set as first drive to boot in BIOS setup, then run Startup Repair - Run 3 Separate Times
    until Win7 starts and holds the System Active flags.

    In your case also mark the F and any other data drive partitions Inactive: Partition - Mark as Inactive - Windows 7 Forums

    Afterwards plug back in the old Win7 SSD and boot it when needed using the one-time BIOS Boot Menu key.
      My Computer


  5. Posts : 12
    Microsoft Windows 7 Home Premium 64-bit 7601 Multiprocessor Free Service Pack 1
    Thread Starter
       #5

    gregrocker said:
    If you move the System boot files to 64 bit install using EasyBCD you will lose the F8 Advanced Boot Options hotlink to System Recovery Options.

    Instead Mark Win7 Partition Active, power down to unplug all other HD's except target, make sure target SSD is set as first drive to boot in BIOS setup, then run Startup Repair - Run 3 Separate Times
    until Win7 starts and holds the System Active flags.

    In your case also mark the F and any other data drive partitions Inactive: Partition - Mark as Inactive - Windows 7 Forums

    Afterwards plug back in the old Win7 SSD and boot it when needed using the one-time BIOS Boot Menu key.
    gregrocker,

    Thanks for the warning. I definitely don't want to lose the recovery environment, so I'm inclined to go through the steps you outline. But I have a few questions before trying it.

    First, when it says run startup repair three separate times, do they mean to allow it to do the required restarts required by the repair process, or does it mean to allow the process to complete, and then, even though it reports that it has repaired the problem , to start over from scratch. It just sounds confusing and having not done it before the instructions provided by the link seem imprecise.

    Second, regarding marking the F drive as an "inactive partition" does it matter when in the process this is done. In other words, should I do this at the same time that I mark the C drive as active and before running the recovery, do I do it at the end, or does it not matter when I do it.

    Third, I understand your suggestion of switching OS's via the Boot Menu in the BIOS. In retrospect I wish I had done it that way to begin with. But should I uninstall EasyBCD before beginning this process or wait until after the process has completed. Will it's presence interfere with what I'm trying to accomplish.

    Thanks for your help.
      My Computer

  6.    #6

    Run Startup Repair from start to finish as many times as it takes to get Win7 to boot on its own.

    Mark all partitions except the OS partitions Inactive and keep them that way.

    You can leave EasyBCD until after operations are completed to see if it is needed to undo any mess that was made with it. Hopefully Win7 was not corrupted by whatever was done earlier before you asked.
      My Computer


  7. Posts : 12
    Microsoft Windows 7 Home Premium 64-bit 7601 Multiprocessor Free Service Pack 1
    Thread Starter
       #7

    gregrocker said:
    Run Startup Repair from start to finish as many times as it takes to get Win7 to boot on its own.

    Mark all partitions except the OS partitions Inactive and keep them that way.

    You can leave EasyBCD until after operations are completed to see if it is needed to undo any mess that was made with it. Hopefully Win7 was not corrupted by whatever was done earlier before you asked.
    Well, I did as you suggested and it appears to have worked. I can now boot from the 64 bit OS and only the C drive is involved. I've already done a system image backup and only the C drive was backed up. Setting the Samsung SSD as the highest priority from the bios boots directly to the the 64 bit OS (no EasyBCD involvement or options). Making the OCZ SSD the highest priority drive in the bios boots to the the EasyBCD screen and then, after choosing the 32 bit OS boots properly to that OS (haven't tried to select the 64 bit choice and don't intend to try it. If it ain't broke and all that.)

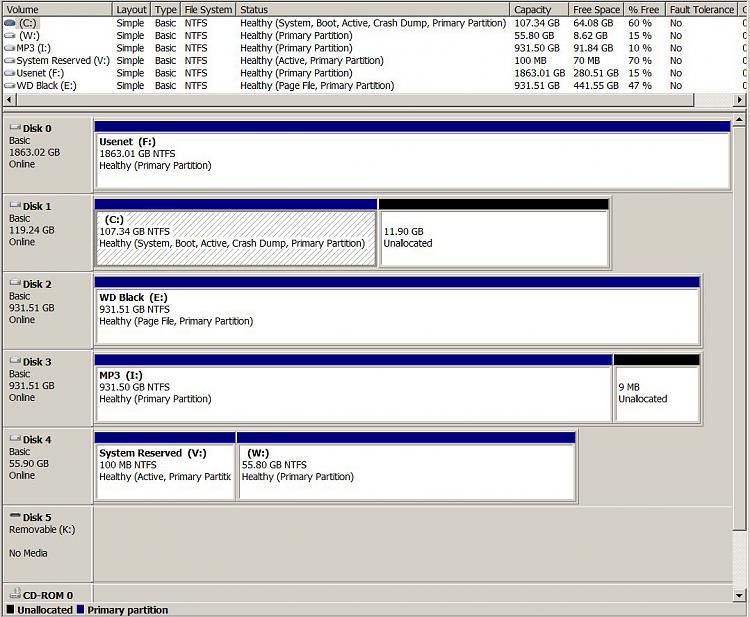
    I also successfully marked the F drive as inactive. Here's an image of Disk Management with everything as it now stands:

    My Dual Boot setup has the boot mgr on the wrong drive-disk-management-after-repair.jpg

    One question remains for me. I note that this process did not create a System Reserved partition on the C drive. I assume the Advanced Boot Options and System Recovery Options have been installed directly into the C partition, but is there an easy way to confirm this?

    In any event, thanks for your help.
      My Computer

  8.    #8

    The System Reserved drive has now lost its System boot files and is instead booting off of C as shown in Disk Management screenshot. You must have missed the step about unplugging all other HD's so that Repair wrote a Dual Boot menu placing System boot files on the first Active partition as it will when other OS drives remained plugged in.

    If you want to continue booting 32 bit WIn7 independently of C it needs to have the System flag returned to it. But if you plan to delete 32 bit you can leave it the same which will make it easier to delete later in Disk Mgmt.

    Otherwise to write the System boot files to System Reserved so that it can boot independently of C, unplug all other HD's, make sure System Reserved HD is now set as first drive to boot in BIOS setup (after DVD drive).

    Then boot into DVD to run Startup Repair - Run 3 Separate Times until it rewrites the System boot files to SysReserved partition and starts on its own holding the System Active flags.

    Now plug back in the other Win7 SSD, set it first drive to boot in BIOS setup, after DVD drive, Boot into it, Open EasyBCD, on Edit Boot Menu tab delete the other Win7 listing and uncheck Display Boot Menu box.

    You can confirm Recovery options are on the 64 bit Win7 F8 Advanced Boot Options by booting into it.
      My Computer


  9. Posts : 12
    Microsoft Windows 7 Home Premium 64-bit 7601 Multiprocessor Free Service Pack 1
    Thread Starter
       #9

    "The System Reserved drive has now lost its System boot files and is instead booting off of C as shown in Disk Management screenshot. If you want to continue booting 32 bit Windows 7 independently of C it needs to have the System flag returned to it. But if you plan to delete 32 bit you can leave it the same which will make it easier to delete later in Disk Mgmt."

    I see what you're saying but have no idea how that happened, as when doing the startup repair on the Samsung disk containing the 64 bit OS, the OCZ drive, containing the 32 bit OS was physically offline (SATA data disconnected.) But curiousity aside, I don't really care since, as you implied, I intend to remove the entire 32 bit installation shortly.

    "You can confirm Recovery options are on the 64 bit Windows 7 F8 Advanced Boot Options by booting into it.'

    I did this and indeed these options have been installed. Thanks.

    So, here are the steps I intend to take next, unless there is something I'm missing.

    1. Do a few final checks just to make sure I've re-installed and re-connected everything I need in the new environment.

    2. Activate Windows in the 64 bit environment.

    3. Delete the 32 bit OS and partitions on the OCZ SSD which contained the 32 bit OS. (Haven't researched how best to do this yet, but my objective is to wind up with a blank disk with, I presume, no partitions.)

    4. Uninstall EasyBCD on the 64 bit side as it now isn't doing anything and seems designed for managing a permanent dual boot environment, particularly one where two OS's boot off the same physical disk. (As far as I'm concerned this application caused me far more trouble than its worth. It seems fine for a permanent dual boot situation but, I suspect, far too many people use it for purposes similar to mine where it can create problems.)

    5. Install Windows 8 consumer preview on the OCZ disk using the BIOS disk order to manage which OS boots. A question here: will managing this process via the BIOS boot order be enough or do I need to physically disconnect the other drives while installing Windows 8 to be sure that it doesn't affect the 64 bit Windows installation. The last thing I want is to re-establish the inter-dependencies that I created here.

    6. Once Windows 8 is installed I want each OS to have everything it needs to boot from their own drive with no requirement for the other disk to be present and without, of course, having to continually disconnect drives when booting into one or the other environment. Re-configuring the boot order from the bios to switch environments is fine with me (only takes a moment.) physically connecting and disconnecting drives each time is not, and inadvertently creating a situation where both drives must be present for one or the other OS to boot is most definitely not acceptable.

    Do these steps make sense and will I wind up where I want to go? Thanks again for your help.
      My Computer

  10.    #10

    You can delete Win7 32 bit SysReserved and OS partitions in Disk management, then repartition the HD as you wish. An even cleaner wipe using Diskpart Clean Command will clear the boot sector so it has no chance of interfering going forward.
    Partition or Volume - Delete
    Partition or Volume - Create New

    With Win8 i would actually leave the Win7 HD plugged in during install because it configures a very impressive Metro-style Dual Boot menu during install which is worth having.

    If you then need Win7 to boot independently you can run the Repairs on it alone while marked Active as you now well know.

    Did you delete the other OS listing in EasyBCD "Edit OS Menu" tab? This is important so you're not bothered with a Dual Boot menu after unisntalling Easy which wasn't needed here.
      My Computer


Page 1 of 2 12 LastLast

  Related Discussions
Our Sites
Site Links
About Us
Windows 7 Forums is an independent web site and has not been authorized, sponsored, or otherwise approved by Microsoft Corporation. "Windows 7" and related materials are trademarks of Microsoft Corp.

© Designer Media Ltd
All times are GMT -5. The time now is 17:54.
Find Us