Install sys image Win7 home prem 64bit in Dell Inspiron 5748

Page 2 of 2 FirstFirst 12
  1.    #11

    You can Make Windows 7 bootable after motherboard swap
    which we've been helping do here successfully for five years.

    Sometimes it requires confirming the Active partition to run Startup Repair.

    It will then swap out all drivers requesting several reboots.

    Be sure to then run all Important and Optional Updates until there are no more.

    After transfer reactivate with the Key you were provided
      My Computer


  2. Posts : 12
    Windows 7 Home Premium 64bit SP1
    Thread Starter
       #12

    Thanks for those tips Gregrock.

    It didn't boot initially but after running Paragon Adaptive Restore it did.

    I've been restoring drivers and downloading Windows updates for a while now.

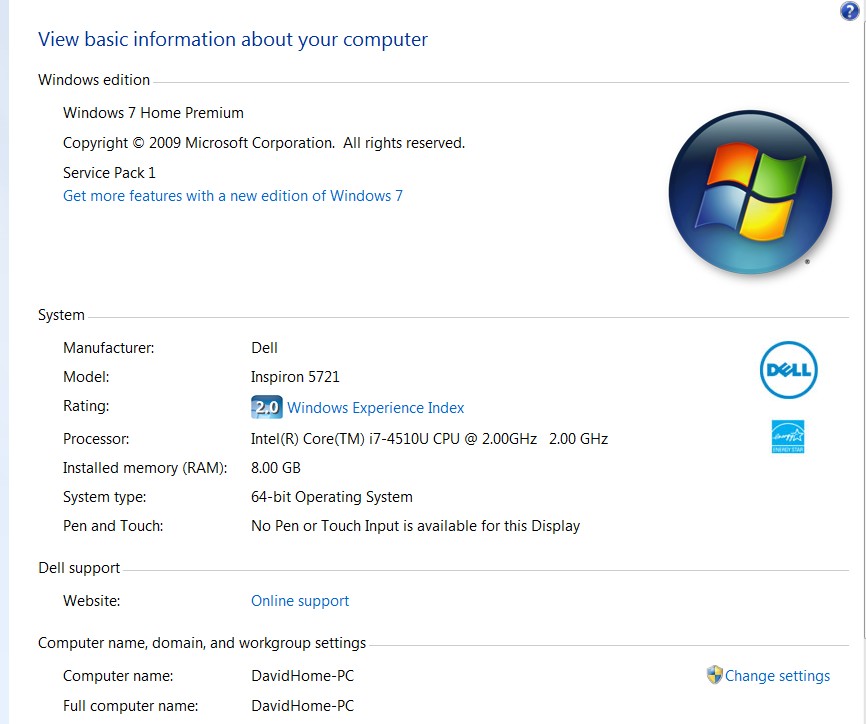
    Here's one odd thing. When I go to "about your computer" it Identifies the model as Inspiron 5721, which is the computer the system image sourced from. It is actually a 5748. Any ideas about this?

    When I go to the Dell site it does correctly identify the Service Tag number.

    Thanks...
      My Computer

  3.    #13

    Is that the Computer Name? Just change it.
      My Computer


  4. Posts : 12
    Windows 7 Home Premium 64bit SP1
    Thread Starter
       #14

    No, it's not the computer name.


    My Windows Experience index is 2, so I guess I still have some tweaking to do, but it sure is nice to have all my programs installed.

    I was never asked for my license key either, which is a little confusing?
      My Computer


  5. Posts : 12
    Windows 7 Home Premium 64bit SP1
    Thread Starter
       #15

    And ignatzatsonic, thanks a million for the lead on Paragon Adaptive Restore.
    I don't think I would have gotten this working without it.
    Appreciate it.
      My Computer

  6.    #16

    Run the WEI again from link.

    The model number there on System page along with the branding are from the Dell Factiry install or clean Dell Reinstallation DVD they provide. It isn't removed by PAR because it's OEM branding.

    Scroll down the System page to see the Activation status and change to the new PC's COA key.

    Just so there isn't any confusion the OEM license for the old PC is not transferred along with the OS. You should reactivate at the System page link ASAP with the new PC's OEM Product Key as it may not hold activation once it realizes it is not on the same hardware config. The time it takes for this to occur varies depending on whether this was the original factory install or whether the COA key had already been used in a Clean Reinstall.

    I don't know why Dell didn't ship the PC with COA sticker attached unless it was Win8 PC specially ordered with Win7 but it still should have been provided any time Win7 is pre-installed.
    Last edited by gregrocker; 25 Dec 2014 at 01:26.
      My Computer


  7. Posts : 12
    Windows 7 Home Premium 64bit SP1
    Thread Starter
       #17

    Since I migrated this system from my old Dell, Inspiron 5721, at the moment it thinks it's activated and there is no option to click to insert a license key.

    The new computer Inspiron 5748 is a certified refurb shipping to me a few days ago by Dell to replace the 5721. The computer chasis doesn't have a license key on it anywhere. Not even under the batter - which is where it is on the old one. They did provide a Windows 7 home premium 64bit disc with the License key on it.

    I just used the Forum's guidance to input the new product key number with Elevated Command Prompts
    Here's hoping.

    Is there any way to get properties to display the model of the new Dell properly?
      My Computer


  8. Posts : 12
    Windows 7 Home Premium 64bit SP1
    Thread Starter
       #18

    Just rebooted and the new Product ID # displays.
    Also the proper CPU displays - i7-4510U
    It does still Display the wrong Model number, which might be an issue if I were to try to sell it.

    I'll make up a synopsis of what I did that worked and post that shortly.

    Thanks again for all your help - happy holidays!
      My Computer


  9. Posts : 12
    Windows 7 Home Premium 64bit SP1
    Thread Starter
       #19

    Synopsis of what finally worked to migrate my system to a new laptop.

    Backed up all my files. Moved my Documents Folder to an external hard drive to limit image size.
    I also downloaded all drivers from Dell for the target computer. I stored these on a USB drive and also put them in a file on the C drive of the source computer.

    Used Macrium Reflect free version to save system images on both source computer and target computer.
    If this didn’t work I wanted to be able to return the target computer to factory system.

    This good person on the forum, “whs” had a link to the WinPE disc needed to restore Macrium image files.
    That was essential as I have a very slow DSL line and Macrium wants you to download 1.7 gig WAIK to create it.

    Macrium WinPE .iso download

    I had some trouble getting restore software to locate the image file as it couldn't "see" my hard drive.
    Turned out it was plugged into a USB3 port. When I switched to a USB2 port it became visible.

    Followed the Macrium prompts to migrate the image to the target computer.

    When it tried to boot it flashed a blue screen and went to a System Repair choices screen.
    I expected this would happen.

    Per instructions on this SEVEN thread:

    Make Windows 7 bootable after motherboard swap

    I downloaded an .iso of Pargon Adaptive Restore 2010 and burned it to disk using Windows software.

    I ran it in Adjust OS mode, first on Automatic and then on manual where I directed it to the file with the drivers on it.

    This allowed the system to boot. I then still needed to install drivers I got from Dell in the recommended order.

    I also did all Windows updates and as many restarts as required.

    The new machine was nearly identical to the old machine at this point.
    In fact it was TOO identical. It showed the same model number and software license.

    For some reason my System Property page didn’t have the clickable link to change that product key.

    Of course you can’t run two computers on one OEM license so I used this forum page:

    Product Key Number - Change

    It showed how to change Product Key with Elevated Command prompts, which made me nervous but it was easier than I anticipated.

    I now have my new computer as replica of my old one complete with about 120 programs that I DID NOT have to reinstall because of the generous sharing of the folks on this forum.

    Almost every other place I visited on the web told me what I was trying to do was impossible.

    I completed this happy ending on Christmas day which was a very welcome gift.
    I am a very happy camper!!

    Thanks again to everyone who helped!
      My Computer

  10.    #20

    I recall that when removing OEM logo the Model number is located nearby to change. Remove OEM branding from windows 7 | Windows 7 Forums

    Sorry I am on my phone todsy so can't explore exactly which key but it is pretty easy to find when you dig into it.
      My Computer


Page 2 of 2 FirstFirst 12

  Related Discussions
Our Sites
Site Links
About Us
Windows 7 Forums is an independent web site and has not been authorized, sponsored, or otherwise approved by Microsoft Corporation. "Windows 7" and related materials are trademarks of Microsoft Corp.

© Designer Media Ltd
All times are GMT -5. The time now is 21:11.
Find Us