Transfering Windows XP and 7 to one hdd

Page 2 of 2 FirstFirst 12
  1.    #11

    I would have cloned to larger partitions for each OS, but we have a tool we use here a lot that can do just what you want.

    I would use the Boot Disk which is safest, although you can use the installed version in Win7 since you have the original source drives in the rare case it fails.

    Download CD version of Partition Wizard to burn to CD using WIndows Image Burner.

    Boot into CD, rightclick on C, choose Extend, add as much of the Unallocated Space to C as you want, click OK.

    Then rightlick D to do the same, click OK. Preview what you've done. If you want to change it then click Undo. If not then Apply.

    If you want to create a data partition save some of the Unallocated Space toCreate Partition - Partition Wizard Video Help
      My Computer


  2. Posts : 2,752
    Windows 7 Pro x64 (1), Win7 Pro X64 (2)
       #12

    ziro1337 said:
    Thank you! I make it.I clone 7, then clone xp,boot into 7 use easybcd and make Dual boot!
    Excellent! Mission accomplished.

    You used the word "clone", so does that mean you actually used the "clone" function of Macrium Reflect that I offered you? Or did you actually use the "copy partition" function of Partition Wizard? I'd like to know which approach you actually used.

    Both of these programs (and EasyBCD as well) are easy to use and intuitive and contain superb functionality, so I'm glad you had success with whatever tools you ended up using.


    Now i have few other questions-

    1.Now i have 2 drives-one with xp-20gb and one with 7-40gb,how to make them bigger?
    I don't quite follow. Are you asking about resizing the partitions in their new locations on your large 500GB drive as shown in your final screenshot from DISKMGMT.MSC?

    You can use Partition Wizard to "resize" any partition, and you can also use it to "move" (i.e. to slide a partition to the left or right making use of adjacent freespace), and you can also use it to "extend" (i.e. to enlarge it by taking freespace from anywhere on the drive and sliding whatever is necessary left or right in order to enlarge the partition you are trying to enlarge).

    Personally, I like to do it simply and very straightforward. Since the GUI picture of the drive shows exactly what you have specified before you push the APPLY button, you really can't make a mistake if you do it one step at a time and understand exactly what you're doing by looking at the GUI picture which is being redrawn for you.

    So, if you select a partition or unallocated space with Partition Wizard, and then right-click on it, you can select the appropriate operation from the resulting popup context menu. You can also specify a sequence of operations to accomplish what you want. For example, if you right-click on the 389GB unallocated space at the right side of the drive, and you select "create" from the popup menu, and you'll be presented with a dialog to specify the type of partition you want to create (i.e. primary or logical), format (i.e. NTFS, FAT32, etc.), label for the partition, and size of the partition. If you don't want to use the entire space for the new partition, you can specify how big you want the partition to be and how large a remaining unallocated free space you want either in front of or following your new partition. Specifying 0 for the freespace on either side means that partition boundary edge will start at the extreme left or extreme right of the free space. Completely intuitive.

    You can then again right click on either this newly created partition (which remember, hasn't actually been created yet until you push the APPLY button, at which time the entire sequence of steps you're building up in a queue will be performed) or any other partition, and specify another operation. For example, you can choose "move/resize". You'll be presented with another GUI dialog that allows you to move the mouse to one edge or the other of the GUI partition, and then click-and-drag that edge left or right to shrink or enlarge the partition as appropriate. If you shrink the partition on left or right, you'll generate some new unallocated freespace there, thus making your partition smaller. If you enlarge the partition left or right where unallocated freespace currently exists, you'll use up some or all of that freespace thus making your partition larger by using up currently unallocated freespace. Again, completely intuitive.

    Again, as you add another process to the accumulating queue of operations, the GUI presentation of your drives and partitions is changed accordingly to correspond to what you've specified so far. You can always UNDO stepping backward one operation at a time if you want to change or eliminate a previously entered operation. And nothing will happen for real until you finally push the APPLY button.

    That's how you create partitions from unallocated freespace, and also slide the partitions left or right, and also enlarge/shrink partitions to be however small or large you want.


    2.When i boot into XP i see system reserved drive,can i hide it?
    I haven't been into WinXP for a while, but I know for a fact that you can "remove a drive letter" in Win7 using DISKMGMT.MSC.

    Just run DISKMGMT.MSC while you are booted to WinXP, and then right-click on that "system reserved" drive and select "change drive letter and paths..." from the popup menu. On the resulting window, in Win7 there is a "remove" button which if you push it will eliminate the drive letter for that partition. In WinXP if there is a "remove" button, push it. Or, perhaps there is simply a "change" button, in which case you select the drive letter shown in the window and push the "change" button, and then select "none" which hopefully is there for WinXP.

    Note that you can also use Partition Wizard to accomplish this un-lettering, and I believe this should work in WinXP as well as Win7. Just run Partition Wizard while booted to WinXP (you'll have to install it in WinXP, if you haven't already done so), select the "system reserved" partition and right-click on it, select "change letter" from the popup menu, and then choose "NONE" to un-letter it.


    and last
    3.How to fix drive letters-i want xp to be c:,7 - d: , e: for data?now when i boot win7 7 is c;xp is g: ; when boot in xp xp is c:.I want everywhere xp to be c:,7 to be d:,and make up new drive e: for data
    First, you cannot change the boot partition from being C from the perspective of the specific Windows you are booted to. So if you're booted to WinXP, then that system partition will always be C. If you are instead booted to Win7, then that system partition will again always be C. You can't change that.

    So it's just the other partitions (and CD drives) where you can change letters, which I recommend doing for consistency to make it easiest for your brain to keep track of. Again you can use Partition Wizard or DISKMGMT.MSC to change drive letters. But PW can only change drive letters for your hard drive partitions, whereas DISKMGMT.MSC can also change drive letters on your CD drives.

    Just select the partition or CD drive you want to change the letter of, and right-click on it. Then select "change drive letter" from the popup menu. Then select the drive and push the CHANGE button, and select an available drive letter from the dropdown list and push the OK button. And OK to confirm the change.

    You can change all drive letters other than C which cannot be changed. Personally, my own multi-boot setups have all CD drive letters and other-than-C partitions lettered consistently no matter which Windows I am booted to. So for example, my CD drive is always changed to be letter N. Since you have two CD drives, you might change them to be M and N... in both WinXP and Win7. Once you change those letters then their existing letters of D and E become available for use in re-lettering your hard drive partitions.

    Next, I always letter P to be the "other Windows partition", no matter which Windows I'm booted to. So if you're booted to WinXP then C is the WinXP system partition and P is the "other Windows partition", i.e. the Win7 system partition. If you're booted to Win7, then P is again the "other Windows partition", i.e. the WinXP system partition. You need to do something like this since you can't change C. C will always be the system partition for the currently operational Windows partition, so you have to come up with some other letter for all other partitions... so why not just always choose P for "the other Windows partition".

    And finally, it's easy to remember that your "data" partition will always be D no matter which Windows you're booted to. So if you make that 389GB space all one partition, why not just letter it D for both WinXP and Win7. Or, if you create two data partitions, why not letter them D and E for both WinXP and Win7. That way no matter which Windows you're booted to, at least your data partitions will always have the identical drive letter... making things at least that much easier to remember. And of course, P is your "other Windows" no matter which Windows you're booted to, and M/N are your CD drives no matter which Windows you're booted to.


    Questions?

    Remember that as long as you're not resizing or moving the C partition, you can use Partition Wizard running under either WinXP or Win7 to do anything you want to other partitions. If you do want to work on the C partition you can start it under windows but you'll need to OK its prompt for reboot when you push the APPLY button, so that it can finish the maintenance on C while Windows is re-booting and not yet operational.

    Or, you can always use that standalone boot CD for Partition Wizard to do whatever you want all at one time, and only exit the program to re-boot to Windows when you're all finished.
      My Computer


  3. Posts : 13,576
    Windows 10 Pro x64
       #13

    Agreed, now he still has 2 tiny partitions he has to fix. As I said earlier, I would have pre partitioned the large drive. Even if I was cloning to it.

    Of course you can hide the partitions you don`t want to see, just remove the drive letters in disk management.

    The Operating system you are booted into will always be C, you can`t change that and you don`t want to, trust me, leave it alone. It`s supposed to be C

    To free up the D and E letters you have to re letter your dvd/cd drives, I always re name them to the last letters of the alphabet X, Y, or Z depending on how many you have, in your case you have 2, so re name the 1st Y and the 2nd Z.

    I only have 1 in each of my 3 PC`s so I just use X

    Lastly, no you can`t hide the System Reserved partition from your XP shot of disk management, forget about it, do not touch it. Don`t worry about it. You said you hardly use XP anyway.

    Is that shot of disk management from Windows 7 ? It looks like you put 7 on the left which is good. As suggested I would slide the XP partition all the way to the right since you will rarely use it, then add mega space to 7.

    You had excellent help by ds and you did a great job
    Last edited by AddRAM; 12 Jan 2015 at 03:25.
      My Computer


  4. Posts : 5
    Windows XP SP3 x86
    Thread Starter
       #14

    Last q-can i move xp bootloader to system reserved or hide nst folder in c;?
    Attached Thumbnails Attached Thumbnails Transfering Windows XP and 7 to one hdd-qwdq.jpg  
      My Computer


  5. Posts : 2,752
    Windows 7 Pro x64 (1), Win7 Pro X64 (2)
       #15

    ziro1337 said:
    Last q-can i move xp bootloader to system reserved or hide nst folder in c;?
    WinXP installed Boot Manager in its own system partition (i.e. in C), so there was no second small "system reserved" partition as there is with Win7. The C-partition for XP was itself marked "active" (so that the BIOS would go there looking for Boot Manager). If you had additional bootable Windows partitions (e.g. for the even older Win98), they were added to the WinXP Boot Manager boot menu when you installed WinXP and the installer discovered you already had a previous Windows installed.

    Now if you then installed Win7, in an environment where you already had WinXP installed (and thus had its WinXP C-partition marked as "active" and containing WinXP Boot Manager and boot menu), the Win7 installer would now replace the WinXP Boot Manager on the WinXP C-partition with its own new Win7 Boot Manager and boot menu. The existing boot menu (with its one or more Windows systems on it, e.t. Win98 and WinXP) would be updated to add Win7 (installed into a separate partition) as yet another bootable OS , and this Win7 system (on what will be C when you boot to Win7) was set to be the new default OS to boot.

    On the other hand, if you installed Win7 on a clean brand new empty drive, and the installer couldn't find any other bootable OS's on this or any other hard drive, then the Win7 installer would create the small 100MB "system reserved" partition and place the Win7 Boot Manager there, along with its boot menu. The true Win7 system is placed into a second partition on the drive, normally occupying the entire drive unless you do pre-partitioning to keep it smaller. Of course the boot menu only had one bootable OS on it so it doesn't stop at boot time but simply defaults to that one-and-only bootable Win7 system (which again, will be C when you boot to Win7). But in fact, there is truly a boot menu with just one bootable OS in it.

    When we consolidated your two old drives onto your one new 500GB drive, and used EasyBCD to get the boot menu to reflect what you wanted, you were really updating the Win7 boot menu that lives in the 100MB "system reserved" partition along with Win7 Boot Manager. So it now shows the two bootable Windows partitions per your screenshot.


    I have just re-booted to my own WinXP system (where I haven't been for almost a year), and investigated whether or not there is a REMOVE button from the WinXP version of DISKMGMT.MSC, when getting into the "change drive letter" dialog.

    And the answer is YES... there IS a REMOVE button, same as there is in Win7.

    So when you're booted to WinXP, you should be able to eliminate the drive letter you say you're seeing for that small 100MB "system reserved" partition (which really is only used for Boot Manager and the boot menu), using the REMOVE button. That is what I would recommend.


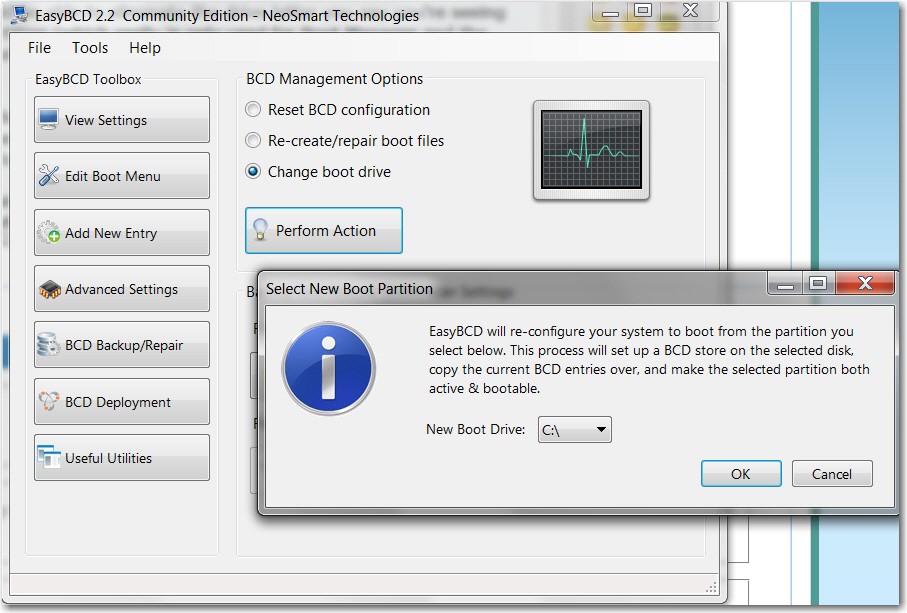
    NOTE: EasyBCD has the ability to relocate Boot Manager into another partition, if you should want to do that (although I strongly feel it is unnecessary for you to do that, if you can simply remove the drive letter you currently see for it when booted to WinXP through the REMOVE button in DISKMGMT.MSC).

    That function is in EasyBCD's "Backup/Repair" button. While you are booted to Win7, when you push that button you get a dialog that shows three "BCD Management Options", with the third one shown as "change boot drive". When you then push the "perform action" button you'll get another dialog window that allows you to pick your new boot partition... for example, C (i.e. the Win7 system partition itself):


    Then push the OK button and EasyBCD will write a new copy of Boot Manager into C, and will copy the boot menu (from your "system reserved" partition) into C. It will also mark C as "active" (and will remove the "active" flag for "system reserved") so that the BIOS will now go to C the next time you re-boot.

    You can read EasyBCD's HELP contents about the "change boot partition" subject, to get complete details about this.

    EasyBCD does NOT delete your existing "active" partition (i.e. your 100MB "system reserved" partition on the 500GB drive), so that just in case something goes wrong during this process you can revert back to your original "active" partition location. But if everything now goes right, and you truly can boot with Boot Manager in the Win7 C-partition which is now marked "active", then you can delete the original and now unneeded "system reserved" partition (using Partition Wizard or DISKMGMT.MSC while running under Win7).

    You don't actually need that "system reserved" to boot Win7, same as you didn't need a "system reserved" to boot WinXP. You only need Win7's Boot Manager and its boot menu living in the "active" partition, whatever that partition is.


    But honestly, why do this? Just remove the drive letter for "system reserved" when you are next in WinXP and it will never bother you again, but will still be there quietly for booting. And it's only 100MB.
      My Computer

  6.    #16

    It seems correct in your Disk Management screenshot, but can we see the view from XP Disk Mgmt to know for sure? To do this use Prnt Scrn button, paste into Paint, save and attach file using paper clip in Reply box. Screenshot with Paint

    If you added XP from Win7 then it is almost certainly correct and needs no adjusting.

    I'm assuming your screenshot is from Win7 although you have that hideous Win2000 government-file-cabinet graphics instead of Win7's elegant Aero themes. Why? This is like taking all the paintings off the wall in a museum to avoid clutter. Right click on the desktop to Personalize, choose a Theme with a slideshow to enjoy Win7 beauty.
      My Computer


  7. Posts : 13,576
    Windows 10 Pro x64
       #17

    He probly didn`t even do his updates yet or graphics driver when he posted that shot Greg.

    Post the shot of disk management from XP as requested please.


    hideous Win2000 government-file-cabinet graphics
      My Computer


Page 2 of 2 FirstFirst 12

  Related Discussions
Our Sites
Site Links
About Us
Windows 7 Forums is an independent web site and has not been authorized, sponsored, or otherwise approved by Microsoft Corporation. "Windows 7" and related materials are trademarks of Microsoft Corp.

© Designer Media Ltd
All times are GMT -5. The time now is 13:56.
Find Us