


How to Change a User Account Type in Windows 7
InformationThis will show you how to change a already created user account to be either a guest, standard user, or administrator type in Windows 7.Note
Guests - A guest account allows people to have temporary access to your computer. People using the guest account can't install software, hardware, or change settings. While the default "Guest" account cannot be password protected, an existing user account made into only a guest account using an option below can have a password.
Standard user (Users) - A limited unelevated standard "users" account that can use most software and change system settings that do not affect other users. If a standard user wants to do an action that requires elevated rights or affects other users, then they will be prompted by UAC (if set to notify) to provide an administrator's password before being allowed to do so. If UAC is not set to notify, then the standard user will just be denied and not allowed to do the action.
Administrator - An unelevated administrator account that has complete access to the computer and can make any desired changes. Based on your UAC notification settings, administrators may be prompted to provide their password or confirmation before being allowed to open or run anything that requires elevated rights to do so, and make changes that affect the system or other users.
OPTION ONEUse "User Accounts" in Control Panel to Change "Your" User Account Type
1. Open the Control Panel (Large icons view), and click on User Accounts.
2. Click on the Change your account type link. (see screenshot below)3. If prompted by UAC, then click on Yes (administrator) or enter the administrator's password (standard user).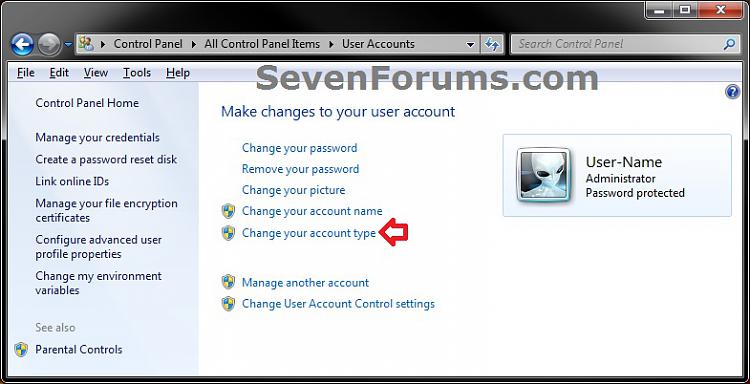
4. Select (dot) what type of user account (Standard user or Administrator) you want this user account to be now, and click on the Change Account Type button. (see screenshot below)
NOTE: If the user account is originally an administrator account, then Windows 7 will not let you change it to a standard user account unless you already have another administrator account on the computer.5. Close the User Accounts window when finished. (see screenshot below step 2)
OPTION TWOChange "Another" User Account's Type in "User Accounts" in Control Panel
1. Open the Control Panel (Large icons view), and click on User Accounts.
2. Click on the Manage another account link. (see screenshot below)3. If prompted by UAC, then click on Yes (administrator) or enter the administrator's password (standard user).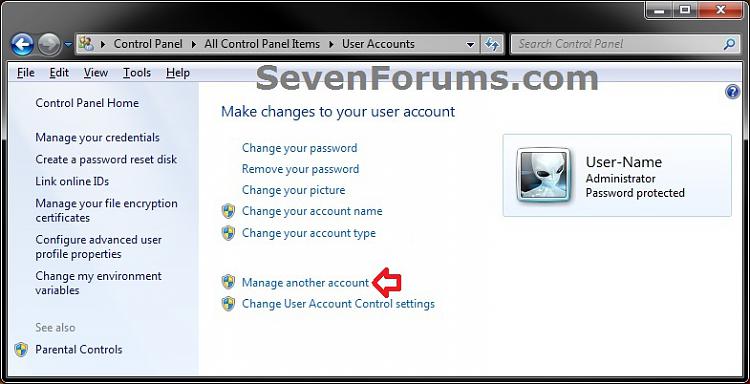
4. Click on the Administrator or Standard user account that you want to change the type of. (see screenshot below)
NOTE: If this is a guest account type, and not the actual default "Guest" account, then the only way to change it's type would be to change it to an Administrator account type first. Afterwards, you will be able to leave it as Administrator, or be able to change it to a Standard User account type.5. Click on the Change your account type link. (see screenshot below)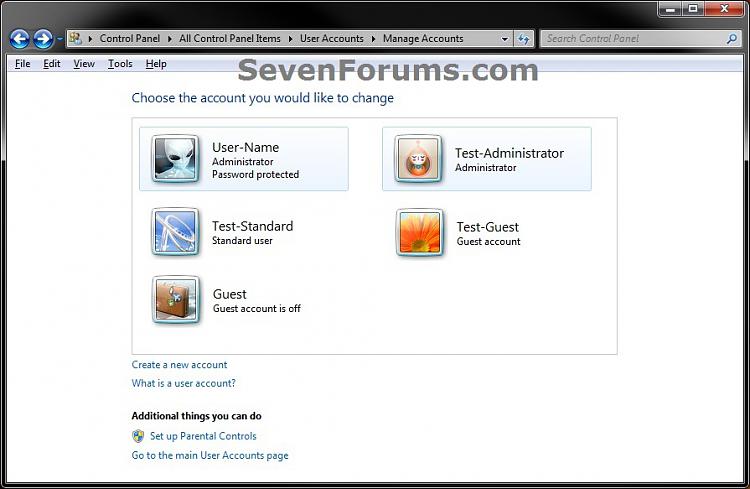 6. Select (dot) what type of user account (Standard user or Administrator) you want this user account to be now, and click on the Change Account Type button. (see screenshot below)
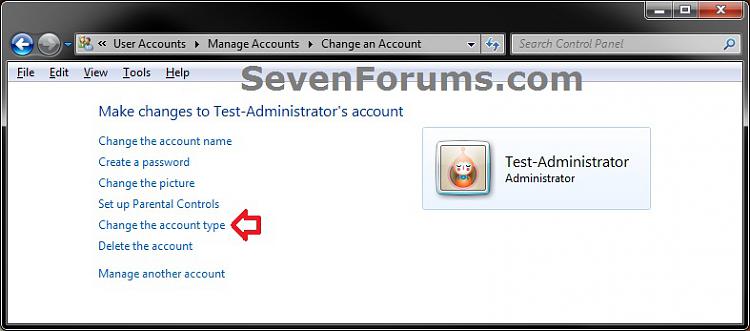
NOTE: If the user account is originally an administrator account, then Windows 7 will not let you change it to a standard user account unless you already have another administrator account on the computer.7. Close the Change an Account window when finished. (see screenshot below step 5)
OPTION THREEChange "Any" User Account's Type in Advanced User Accounts
1. Open the Start Menu, then type netplwiz in the search box and press enter.
2. If prompted by UAC, then click on Yes (administrator) or enter the administrator's password (standard user).
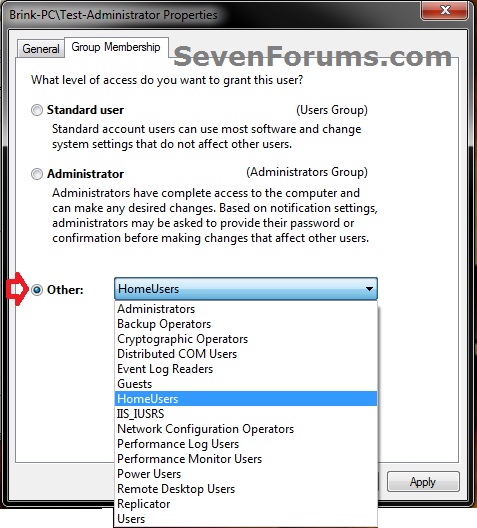
3. Check the Users must enter a user name and password to use this computer box, select (highlight) the Administrators or Users (Standard user) account under Group that you want to change the type of, then click on the Properties button. (see screenshot below)4. Click on the Group Membership tab, select (dot) what type of user account (Standard user or Administrator) you want this user account to be now, and click on OK. (see screenshot below)
WARNING: If the user account is originally an administrator account, then do not change it to a standard user account unless you already have another administrator account on the computer. You will lose access to everything that a standard user cannot open if you do.
5. If you had a user account set to be logged on to at startup automatically, then you will need to set this back for that user account.
6. Close the advanced User Accounts window when finished. (see screenshot below step 3)
OPTION FOURChange User Account Type in Elevated Command Prompt
NOTE: This option will use the net localgroup command to basically add an "existing user account" to the group that you want the account type to be, then remove the user account from any other group (account type) that it belongs to, leaving the user account as only a member of the group that you want the account type to be.1. Open an elevated command prompt.
2. To See What Groups the Existing User Account Currently Belongs To
NOTE: This will give you a list of user account names that are a member of each user account type. For example, to see what account types my Example-Standard (name) user account is a member of.3. Do either step 4, 5, or 6 below for what account type you want the user account (ex: Example-Standard) to be.
A) In the elevated command prompt, copy and paste the commands below one at a time for each account type, and press Enter after each one. (see screenshots below)
- net localgroup guests
- net localgroup users
- net localgroup administrators
4. To Add User Account to Administrators Group
NOTE: This is to make the user account (ex: Example-Standard) a administrator account type by adding it to the administrators group, and removing the user account from the users and guests groups if the user account is a part of them.A) In the elevated command prompt, type the command below and press Enter. (see screenshot below)5. To Add User Account to Users Group
NOTE: Substitute UserName in the command below with the actual user name of the user account (ex: Example-Standard) within quotes that you want to add to the administrators group.net localgroup administrators "UserName" /addB) Go to step 7, and remove the user account from the users and guests groups if listed as being a member of them from step 2.
NOTE: This is to make the user account (ex: Example-Standard) a standard user account type by adding it to the users group, and removing the user account from the administrators and guests groups if the user account is a part of them.A) In the elevated command prompt, type the command below and press Enter. (see screenshot below)6. To Add User Account to Guests Group
NOTE: Substitute UserName in the command below with the actual user name of the user account (ex: Example-Standard) within quotes that you want to add to the users group.net localgroup users "UserName" /addB) Go to step 7, and remove the user account from the administrators and guests groups if listed as being a member of them from step 2.
NOTE: This is to make the user account (ex: Example-Standard) a guest account type by adding it to the guests group, and removing the user account from the users and administrators groups if the user account is a part of them.A) In the elevated command prompt, type the command below and press Enter. (see screenshot below)7. To Remove User Account from Groups
NOTE: Substitute UserName in the command below with the actual user name of the user account (ex: Example-Standard) within quotes that you want to add to the guests group.net localgroup guests "UserName" /addB) Go to step 7, and remove the user account from the users and administrators groups if listed as being a member of them from step 2.
NOTE: This is to remove the user account (ex: Example-Standard) from all of the groups that is was listed as being a member of from step 2 except for the group (account type) that you want the user account to be.A) In the elevated command prompt, type the commands below one at a time for only each group (account type) that you want to remove the user account from being a member of, and press Enter after each one. (see screenshots below)8. When finished, close the elevated command prompt.
NOTE: Substitute UserName in the command below with the actual user name of the user account (ex: Example-Standard) within quotes that you want to remove from being a member of the group.
- net localgroup administrators "UserName" /delete
- net localgroup users "UserName" /delete
- net localgroup guests "UserName" /delete
OPTION FIVEChange User Account Type in Local Users and Groups
1. Open Local Users and Groups, and click on the Users folder in the left pane. (see screenshot below)That's it2. In the middle pane, double click on the user account (ex: Example-Standard) under the Name column that you want to change the account type of. (see screenshot below)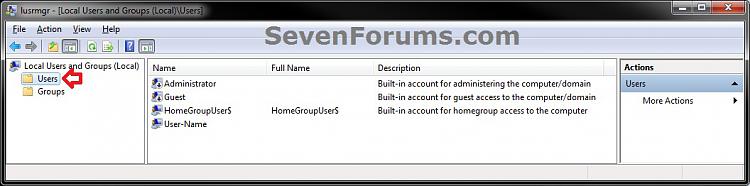 3. Click on the Member of tab, and do either step 4, 5, or 6 below for what account type you want the user account (ex: Example-Standard) to be. (see screenshot below)4. To Add User Account to Administrators Group
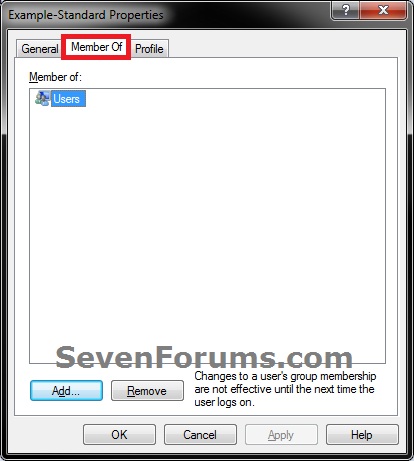
NOTE: This is to make the user account (ex: Example-Standard) a administrator account type by adding it to the administrators group, and removing the user account from the users and guests groups if the user account is a part of them.A) Click on the Add button, and add "Administrators". (see Option One at link for how)5. To Add User Account to Users Group
B) If listed, select Users and Guests, and click on the Remove button. (see Option One at link for how)
NOTE: You can press and hold the CTRL key to select more than one listed group.
C) Go to step 7.
NOTE: This is to make the user account (ex: Example-Standard) a standard user account type by adding it to the users group, and removing the user account from the administrators and guests groups if the user account is a part of them.A) Click on the Add button, and add "Users". (see Option One at link for how)6. To Add User Account to Guests Group
B) If listed, select Administrators and Guests, and click on the Remove button. (see Option One at link for how)
NOTE: You can press and hold the CTRL key to select more than one listed group.
C) Go to step 7.
NOTE: This is to make the user account (ex: Example-Standard) a guest account type by adding it to the guests group, and removing the user account from the users and administrators groups if the user account is a part of them.A) Click on the Add button, and add "Guests". (see Option One at link for how)7. When finished, click on OK. (see screenshot below step 3)
B) If listed, select Users and Administrators, and click on the Remove button. (see Option One at link for how)
NOTE: You can press and hold the CTRL key to select more than one listed group.
C) Go to step 7.
8. Close Local Users and Groups.
Shawn
Related Tutorials
- How to Create a Password for a Windows 7 User Account
- How to Create a User Accounts Shortcut in Windows 7
- How to Change Your User Account Picture in Windows 7
- How to Change the Password for Your or Another User Account in Windows 7
- How to Enable or Disable the Windows 7 Built-in Administrator Account
- How to Add or Remove User Accounts from Groups in Windows 7 and Vista
- How to Create and Delete a User Group in Windows 7 and Vista
- How to Hide or Unhide a User Account in Vista and Windows 7
- How to Change the User Folder Name of a User Profile in Windows 7
User Account Type - Change
-
-
-
New #3
Brink,
This may not be the right place, but I had a friend who had an uninvited guest take over an account on his computer - Alexah was the name. Does that ring any bells? It doesn't come up on the forum's search.
Thanks, Noel
-
New #4
Hello Noel,
I guess about all he can do is to either change the password on the user account, or create a new one with a better password to use and delete the old one afterwards.
-
New #5
Thanks Brink,
I found the way to delete the account and everything in it - turns out he may have inadvertently created it using a grandchild's name as a password. But it's gone now and he's as happy as a clam.
Noel
-
-
New #7
Tutorial updated to add OPTION FOUR and OPTION FIVE. Plus, to be able to change existing user accounts to a Guest account. :)Last edited by Brink; 14 Aug 2011 at 16:48. Reason: updated
-
New #8
Hi Brink..
I am new to this forum and also new to Windows 7
Actually i have an user account and now i am confused whether it is Administrative or Standard User
In Control Pannel User Acounts it is showing as Administrator with Password Protected
But i dont have the complete rights as Original Administrator Account (which is hidden)
Can you please clarify me..
-
New #9
Hello Ramesh, and welcome to Seven Forums.
This is normal. You have an administrator account as shown in Control Panel "User Accounts".
In Vista and Windows 7, the administrator user account acts like a standard user account until you do something that either requires elevation or changes the system. By default, you would then get prompted to allow it or not by UAC. An administrator account will just approve to allow it, while a standard user must enter the administrator's password to approve.
The built-in Administrator account is like the one that was in XP and had full control as below.
Built-in Administrator Account - Enable or Disable
Hope this helps,The default administrator account that is created during the installation of Windows 7, or setup already for you on a OEM (ex: Dell) computer, will have complete access to the computer and can make any desired changes. To help make the computer more secure, this administrator account may be asked with a UAC prompt to provide their password or confirmation before allowed to make changes that affect the system, other users, or when running anything elevated (Run as Administrator) since running elevated will allow it to have access to the entire computer.
The built-in Administrator account is an account that has full access and permission on the computer, and will not be prompted by UAC. It is not recommended to leave the built-in Administrator account always enabled, or use it all the time for just everyday purposes.
Shawn


 Quote
Quote
Related Discussions