

How to Set or Change the Screen Saver Timeout Period in Windows 7
InformationThis will show you how to set or change the screen saver timeout period to specify how much user idle time must elapse before the screen saver is launched for you or all users in Windows 7.NoteIf you checked the on resume, display logon screen box, it will still resume to the logon screen even if you have selected (None) for your screen saver.
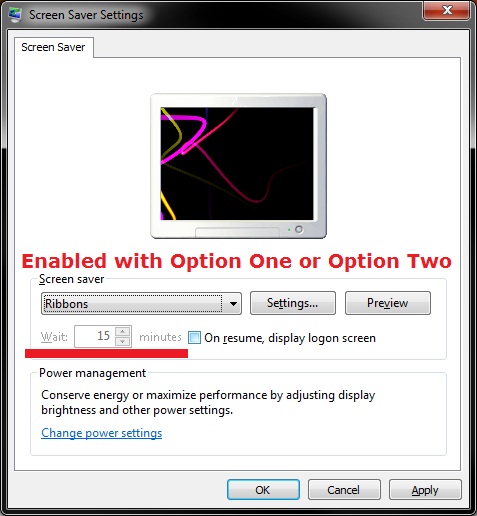
EXAMPLE: Screen Saver Timeout Settings
NOTE: Wait X minutes is grayed out if you used OPTION TWO or OPTION THREE below to enable a screen saver timeout period for all users.
OPTION ONEChange or Set Screen Saver Timout for "Current User" Only
NOTE: This option will only affect the user that you are currently logged in as.
1. Right click on a empty space on the desktop and click on Personalize.
2. Click on the Screen Saver link at the bottom of the Personalization window. (see screenshot below)
3. If You Selected a Screen Saver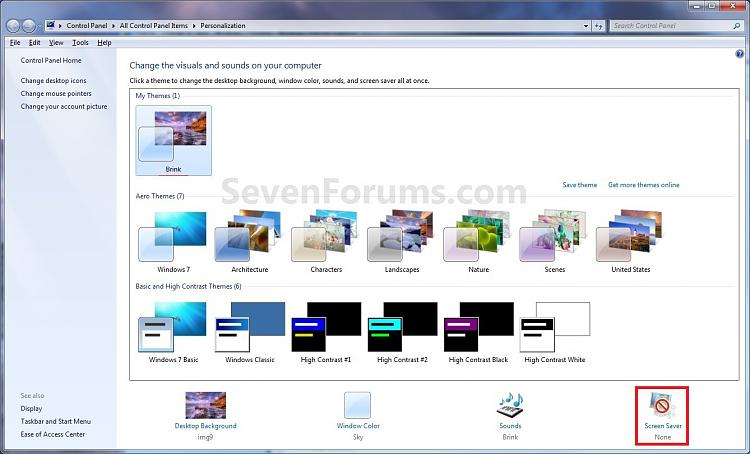
A) Select how many idle minutes to Wait before the selected screen saver displays.4. If You Selected (None) for No Screen Saver
B) Decide if you wanted to turn the screen saver password protection on or off (option one at link).
C) Go to step 5.
A) Check the On resume, display logon screen box.5. Click on OK. (see screenshot below)
B) Select how many idle minutes to Wait before going straight to the log on screen without a screen saver displaying first.
OPTION TWOThrough Local Group Policy Editor for "All Users"
NOTE: This option will override OPTION ONE. You will need to be logged in as an administrator to be able to do this option
1. Open the all users, specific users or groups, or all users except administrators Local Group Policy Editor for how you want this policy applied.2. In the left pane, click on to expand User Configuration, Administrative Templates, Control Panel, and Personalization. (see screenshot below)
3. In the right pane, right click on Screen saver timeout and click on Edit. (see screenshot above)
4. To Not Set a Screen Saver Timout for "All Users"
NOTE: This is the default setting, and will allow users to set their own screen saver timeout using OPTION ONE instead.
A) Select (dot) either Not Configured or Disabled. (see screenshot below step 6)B) Go to step 6.5. To Change or Set Screen Saver Timout for "All Users"
NOTE: This option prevents users from being able to change the screen saver timeout "wait" setting in the Screen Saver Settings window.
A) Select (dot) Enabled. (see screenshot below step 6)6. Click on OK. (see screenshot below)
B) Under Options, select or type in how many seconds (60 seconds = 1 minute) you want for how much user idle time must elapse before the screen saver is launched. (see screenshot below step 6)
7. Close the Local Group Policy Editor window.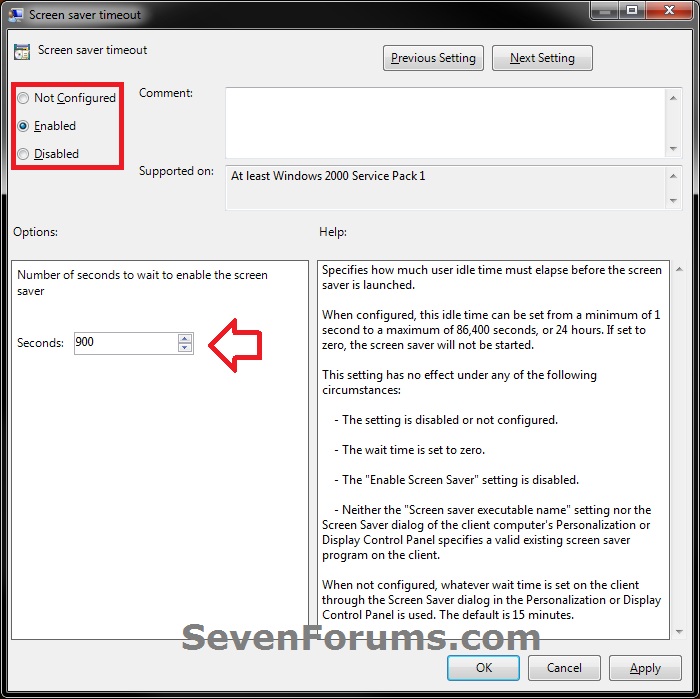
OPTION THREEThrough Registry Editor for "All Users"
NOTE: This option will override OPTION ONE. You will need to be logged in as an administrator to be able to do this option.
1. Open the Start Menu, and type regedit in the search box and press enter.That's it,
2. If prompted by UAC, then click on Yes.
3. To Change or Set Screen Saver Timout for "All Users"
NOTE: This option prevents users from being able to change the screen saver timeout "wait" setting in the Screen Saver Settings window.
A) In regedit, navigate to the location below. (see screenshot below)4. To Not Set a Screen Saver Timout for "All Users"
HKEY_CURRENT_USER\Software\Policies\Microsoft\WindowsB) In the left pane right click on Windows, and click on New and Key. (see screenshot above)
NOTE: If you already have the Control Panel key (step 3C), then skip this step and go to step 3D.
C) Type in Control Panel and press Enter. (see screenshot below)
D) Right click on Control Panel, and click on New and Key. (see screenshot above)
NOTE: If you already have the Desktop key (step 3E), then skip this step and go to step 3F.
E) Type in Desktop and press Enter. (see screenshot below)
F) In the right pane of Desktop, right click on a empty space and click on New and String Value. (see screenshot above)
NOTE: If you already have the ScreenSaveTimeOut string value (step 3G), then skip this step and go to step 3H.
G) Type in ScreenSaveTimeOut and press Enter. (see screenshot below)
H) In the right pane of Desktop, right click on ScreenSaveTimeOut and click on Modify. (see screenshot above)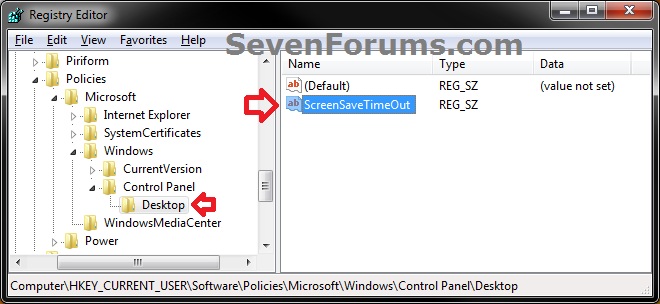
I) Type in how many seconds (60 seconds = 1 minute) you want for how much user idle time must elapse before the screen saver is launched, then click on OK. (see screenshot below)
J) Go to step 5.
NOTE: This is the default setting, and will allow users to set their own screen saver timeout using OPTION ONE instead.
A) In regedit, navigate to the location below. (see screenshot below)Code:HKEY_CURRENT_USER\Software\Policies\Microsoft\Windows\Control Panel\DesktopB) In the right pane of Desktop, right click on ScreenSaveTimeOut and click on Delete. (see screenshot above)5. Close regedit.
C) Click on Yes to approve deletion. (see screenshot below)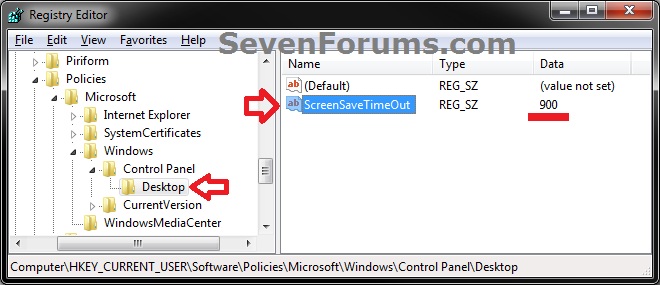
Shawn
Related Tutorials
- How to Turn Screen Saver On or Off in Windows 7
- How to Change the Screen Saver in Windows 7
- How to Add and Restore the Windows Energy Screen Saver Back in Windows 7
- How to Add and Restore the Aurora Screen Saver Back in Windows 7
- How to Enable or Disable the Windows 7 Log On Screen Saver
- How to Create a Screen Saver Settings Shortcut in Windows
- How to Enable or Disable Windows 7 Screen Saver Password Protection
- How to Allow or Prevent Changing Screen Saver in Windows 7
- How to Specify a Default Screen Saver for All Users in Windows 7
- How to Enable or Disable Screen Savers in Windows 7 and Vista
Screen Saver Timeout Period - Set or Change
-
New #1
Just a note about the "NOTE" at the start:
This information is true. If you have "On resume, display logon screen" checked, it will always invoke a screensaver at the set timeout, even if you have selected "(none)".
My reason for posting: this is exactly backwards from XP. I had the screen saver kicking in for quite a while before I figured out that Win 7 is being too smart with this.
To get actually no screensaver, one must select "(none)" and uncheck the "On resume" box.
...Stu
-
New #2
Hi,
I followed Option 2 and 3 instructions above. But my "Wait" option is still greyed out. Are there any other things that might cause this?
-
New #3
Hello Wuming,
Unless you used step 4 in OPTION TWO or OPTION THREE, those options will gray "Wait". In addition, do you have a screen saver selected? Could you also please post a screenshot of your Screen Saver Settings window to see if it may help ID what the issue may be? :)
-
New #4
Hi, I tried all above methods skipping option step 4 in option 2 and 3.
Below is my print screen for all three options.Last edited by Brink; 15 Apr 2016 at 07:38. Reason: removed broken images
-
New #5
Wuming,
You would need to do step 4 in OPTION TWO and/or OPTION THREE to not have it set for all users, and to ungray the "Wait" option. You'll need to close and reopen "Screen Saver Settings" afterwards to see the change though.
To ungray the On resume, display logon screen option, you might see if using either step 1 (Option Two) or step 3 (Option Three) in the tutorial below may.
Screen Saver Password Protection -Enable or Disable
-
New #6
Hi, I tried ungraying the "Wait" option with your method and only step 4 of option 3 works. But when I try to ungray the On resume, display logon screen option either step 1 (Option Two) or step 3 (Option Three) from Screen Saver Password Protection -Enable or Disable, after restarting the system, everything goes back to square 1 again. Both got grayed out again.
-
New #7
If you do not have any group policy settings that you would like to keep, or mind resetting again afterwards, then you might see if using the tutorial below to reset all group policies back to the default of "Not Configured" may help if it's some stray set policy causing this.
Local Group Policy - Reset to Default
-
New #8
Hi All, the issue is solved. It's my wireless keyboard and mouse. I just had to update my drivers from Microsoft (mine is a Wireless Multimedia Keyboard 1.1). After update, the screen saver is working now. Thanks for all the advises here.
-
New #9
That's great news Wuming. I'm happy to hear that you got it sorted. Thank you for posting back with your results. :)

Screen Saver Timeout Period - Set or Change
How to Set or Change the Screen Saver Timeout Period in Windows 7Published by Brink


 Quote
Quote
Related Discussions