How to Automatically Switch Default Printers with Location Aware Printing in Windows 7 and Windows 8
InformationLocation Aware Printing allows you to set up default printers for each network you use with your laptop or notebook. As you move from one network to another, Windows will automatically switch to using the default printer that you selected to be used in that network for as long as you are connected to that network.
For example, when you print at work, Windows will automatically print to your work printer. When you print at home, Windows will automatically select and use your home printer.
This tutorial will show you how to add and remove a printer to be used as the default printer for a selected network when you connect to that network.Warning
- "Location Aware Printing" is only available in the Windows 7 Professional, Windows 7 Ultimate, and Windows 7 Enterprise, Windows 8 Pro, and Windows 8 Enterprise editions.
- "Location Aware Printing" is not available on a desktop computer. It is only available on mobile devices such as a laptop or notebook.
OPTION ONETo Setup and Use Location Aware Printing in Windows
1. Open Devices and Printers.
2. Select a printer, and click on Manage default printers on the toolbar. (see screenshot below)
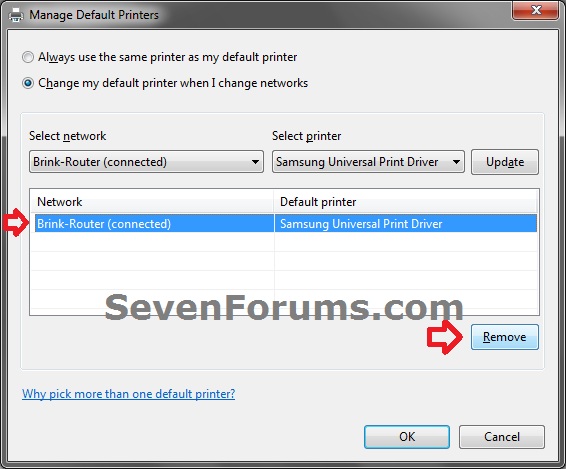
3. Select (dot) Change my default printer when I change networks. (see screenshot below)
4. To Add or Update a Default Printer for a Selected Network
A) In the Select network drop down menu, select a network that has a printer you want to add. (see screenshot below)5. To Remove a Default Printer and Selected Network
NOTE: If you want a wireless network to appear in this list, you need to have successfully connected to that wireless network at least once.
B) In the Select printer drop down menu, select a default printer to be used for the selected network. (see screenshot above)
C) If the Selected Network has Not already been Added
- Click on the Add button to have the selected network and it's default printer added to the list. (see screenshot below)
D) If the Selected Network has already been Added
- Click on the Update button to update the default printer for the already listed network. (see screenshot below)
E) Repeat steps for any additional networks and default printers you wish to add or update.
6. When finished, click on OK. (see screenshot below step 3)
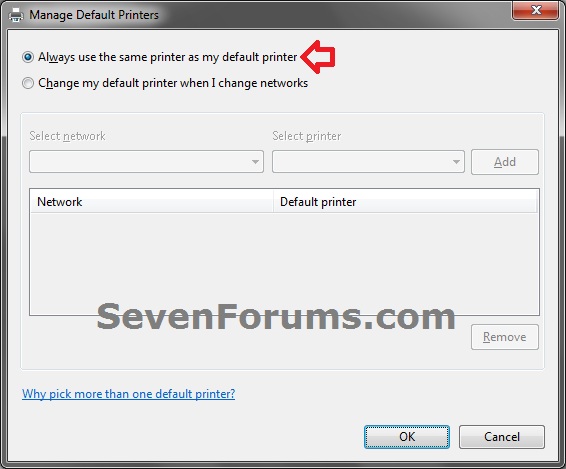
OPTION TWOTo Turn Off Location Aware Printing in Windows
NOTE: This is if you do not want Windows 7 to change your default printer settings when you moved from network to network.
1. Open Devices and Printers.That's it,
2. Select a printer, and click on Manage default printers on the toolbar. (see screenshot below)
3. Select (dot) Always use the same printer as my default printer, and click on OK. (see screenshot below)
Shawn
Location Aware Printing - Automatically Switch Default Printers

Location Aware Printing - Automatically Switch Default Printers
How to Automatically Switch Default Printers with Location Aware Printing in Windows 7 and Windows 8Published by Brink
Related Discussions


