

How to Allow or Prevent Users and Groups to be able to Take Ownership
InformationThis will show you how to allow or prevent specific users and groups from being able to Take Ownership of items such as a file, folder, registry key, drive, or other objects in Vista, Windows 7, and Windows 8.
You will need to be logged in as administrator to be able to do this tutorial.
NoteDefault Users and Groups Allowed to Take Ownership
NOTE: This security setting determines which users can take ownership of any securable object in the system, including Active Directory objects, files and folders, printers, registry keys, processes, and threads.
On All Computers: Administrators
OPTION ONEThrough Local Security Policy
1. Open the Local Security Policy window, expand Local Policies in the left pane, and select User Rights Assignment. (see screenshot below)
2. In the right pane of User Rights Assignment, double click on Take ownership of files or other objects. (see screenshot above)
3. Prevent Listed Users or Groups to be able to Take Ownership
A) Select (highlight) listed user(s) and/or group(s) that you do not want to be allowed to shut down the computer anymore, then click on the Remove button. (see screenshot below)
NOTE: You can press and hold the CTRL key to select more than one listed user and group.4. Allow Users or Groups to be able to Take OwnershipB) Click on Apply. (see screenshot below)
TipTo Only Prevent Specific Administrators
- You will also need to remove the Administrators group in addition to step 3A first, then only add each administrator user account name in step 4A that you want to be able to take ownership.
A) Click on the Add User or Group button. (see screenshot above)
B) To Change the Location to Search for "Object Types"
NOTE: This is only if you wanted to search for object types to allow from a location other than your local computer. If you only want to search from your computer, then skip this step and go to step 4C.
- Click on the Locations button. (see screenshot below step 4C)
- Select a location, and click on OK. (see screenshot below)
C) Click on the Advanced button. (see screenshot below)5. When finished, click on OK. (see screenshots below steps 3B and 4I)
D) Click on the Object Types button. (see screenshot below)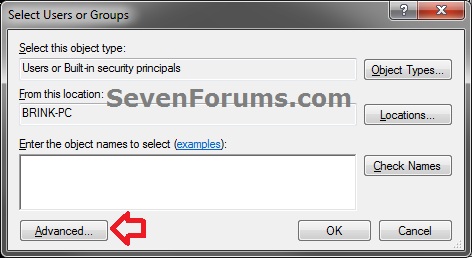
E) Check all boxes or the "object types" (ex: Users or Groups) that you want to find and select from in step 4G, and click on OK. (see screenshot below)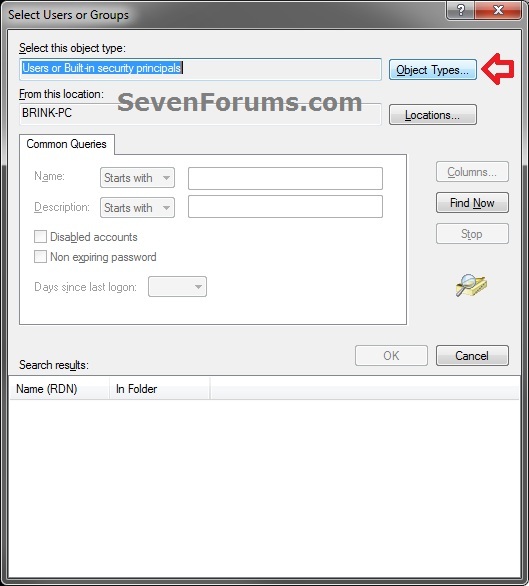
F) Click on the Find Now button. (see screenshot below)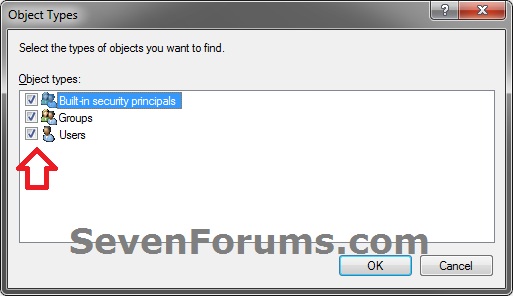
G) In the bottom pane under Search results, select the user account name(s) and/or groups that you want to be allowed to shut down the computer, then click on OK. (see screenshot below)
NOTE: You can press and hold the CTRL key to select more than one listed users (user account names) or group.
H) Click on OK. (see screenshot below)
TipTo Only Allow Specific Administrators
- You will need to remove the Administrators group in step 3A first, then add each administrator user account name that you want to be able to take ownership.
I) Click on Apply. (see screenshot below)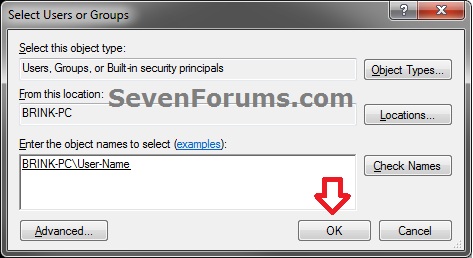
6. Close the Local Security Policy window. (see screenshot below step 1)
OPTION TWOUsing an Elevated Command Prompt
NOTE: Be sure to write down changes you make to the user rights assignment so that you will know what you changed later. Please see the NOTE box at the top of the tutorial for the default user rights assignments.
1. If you have not already, click on the Download button below to download the ntrights.bat file originally from within the Windows Server 2003 Resource Kit Tools.That's it,
2. Open an elevated command prompt (Run as administrator).
Download
A) Save the ntrights.zip file to your desktop.
B) Unblock the ntrights.zip file.
C) Open the .zip file, and extract (drag and drop) the ntrights.exe fileto your desktop.
D) Right click on the ntrights.exe file and click on Move.
E) Open Windows Explorer and navigate to and open the C:\Windows\System32 folder, then Paste the ntrights.exe file to move it here.
F) If prompted, click on Continue and Yes to approve moving the ntrights.exe file into the System32 folder, then close the Windows Explorer window.
3. Prevent Users or Groups to be able to Take Ownership
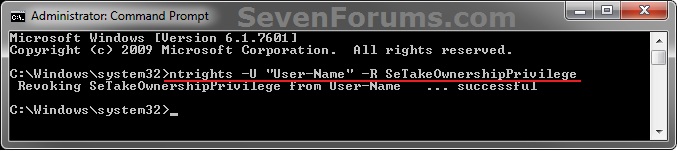
A) In the elevated command prompt type in the command below and press enter. (see screenshot below)
NOTE: Substitute User or Group in the command below with the actual user account name (ex: Users) or group name within quotes that you want to prevent.4. Allow Users or Groups to be able to Take Ownershipntrights -U "User or Group" -R SeTakeOwnershipPrivilege
TipTo Only Prevent Specific Administrators
- You will also need to remove the Administrators group in addition to step 3A first, then only add each administrator user account name in step 4A that you want to be able to take ownership.
A) In the elevated command prompt type in the command below and press enter. (see screenshot below)
NOTE: Substitute User or Group in the command below with the actual user account name (ex: Users) or group name within quotes that you want to allow.5. When finished, close the elevated command prompt.ntrights -U "User or Group" +R SeTakeOwnershipPrivilege

TipTo Only Allow Specific Administrators
- You will need to remove the Administrators group in step 3A first, then add each administrator user account name that you want to be able to take ownership.
Shawn
Related Tutorials
- How to Add or Remove User Accounts from Groups in Windows 7 and Vista
- How to Allow or Deny Permissions to Users and Groups
- How to Create a Take Ownership Shortcut in Windows 7
- How to Take Ownership of a Item in Vista and Windows 7
- How to "Take Ownership" of a File, Folder, Drive, or Registry Key in Windows 8
- How to Add "Take Ownership" to the Context Menu in Windows 8
Take Ownership - Allow or Prevent Users and Groups To
-
New #1
But if the admin affected by this action go through the Local Security Policy and allow himself to Take Ownership of files or other objects????
-
New #2
Hello Agustín,
Yes, an admin could do so, but only trusted people should be made admins.
This is mostly to be able to allow other groups or users other than admins to be able to Take Ownership though.
-
New #3
And there is a way to prevent other admins to take ownership? I mean the posibility of having a folder totally private that the permissions could not be modified after the taken ownership of that folder by another admin. Is that possible? I don't think so... by maybe there's a way, that is what I were looking into this tutorial.
By the way, the tutorial is really good.
-
New #4
You might try this below to keep the folder private.
Folder - Lock with a Password without Any Software
-
New #5
I had read this post before. Is good, but here the trick is basic. It just allow a folder to be "seen" by the system as a protected operating system file, so if we uncheck the option refered to this in Folder Options and also the option that allow us to see the hidden files, the folder will appear on the screen.
-
New #6
Thanks, again! I always have to come back to get this when installing a new hard drive!
-
-
New #8
I keep getting this error:
Code:C:\WINDOWS\system32>ntrights -U "User or Group" +R SeTakeOwnershipPrivilege Granting SeTakeOwnershipPrivilege to User or Group ... failed (GetAccountSid(User or Group)=1332
-

Take Ownership - Allow or Prevent Users and Groups To
How to Allow or Prevent Users and Groups to be able to Take OwnershipPublished by Brink


 Quote
Quote
Related Discussions