

How to Use vLite to Trim Down Windows 7 for a Custom Installation
InformationFor anyone who has ever used Windows, there is one fact that can never be denied...it is bloated. Even with Windows 7 having a lower footprint and more customization than Windows Vista, it is still bloated. This tutorial aims to help the user with using vLite: a program designed by a developer named nuhi. To summarize the program's ability, it takes in the source files of a Windows Vista/7 installation, you choose an edition to modify, and then components can be added, modified, or deleted.
WarningAttempting to make a custom installation of Windows is not a daunting task but many things can go wrong...as always follow my optional testing environment below to make sure that any issues won't be encountered when a clean install is performed on your native hardware. Please note that it is highly inadvisable to do an upgrade with a lite build...always do a clean install
PREREQUISITES
Windows Vista/7 (RC or above recommended)
A CPU that supports Virtualization (optional)
2GB or more of RAM (optional, for Virtual PC/VMWare/etc.)
6GB or more of free Hard Disk Space
TipInstall either Virtual PC 2007, VMware Workstation or another virtualization solution to test your builds in a virtual environment before testing on native hardware.
Heres How:
1. To start off download vLite and the Windows Vista SP1 WAIK.Hope it helps
WarningTo guarantee no compatibility issues between vLite and Windows 7, set the vLite installer for Windows Vista compatibility and run as a administrator. Do the same for the WAIK setup.exe on the ISO. When running vLite always run as an administrator.
TipDownload MagicDisc or another ISO mount program and just mount the WAIK instead of burning it to a DVD
2. Browse to the location of the installation files.
TipIf you choose a DVD or a mounted ISO than you will be required to copy all files off the media to a location on the computer.
3. Choose your edition of Windows to modify.
NOTE: I will be using Ultimate edition in this tutorial and in all my INIs.
4. Choose your options.
- Integration
- Components
- Tweaks
- Unattended setup (Do not select this one if modifying Windows 7)
- Bootable ISO
- Enable before apply.(Click this to make an ISO at any time during this process)
5. Integration Tab: Hotfixes, Drivers, and Language Packs.
·For Hotfixes you will need either the .cab or .msu of the update (these can normally be found on Microsoft's website...Windows Vista only right now)
·For Drivers you will need the *.ini(s) of the driver...these can be found in the folders of driver installers (use Google)
·For Language Packs you will need to find the .cab of the language you want to install (use Google)
TipCan't select anything in these windows? Don't forget to hit the enable button in the top left hand corner.
6. Components Tab: Select from the categories listed. Their explanations will be available when you highlight an entry including any possible warnings.
TipWhen you click on the tab you will notice that a windows comes up with presets (ex. Aero Glass). Check beside one of these to hide the services/files needed for that feature so you don't accidentally delete/corrupt it.
7. Tweak Tab: Choose various tweaks to enable by default.
8.Hit apply and watch vLite strip 7 down to your specifications. You can choose to either rebuild one edition (your chosen one), all of them, or just save changes.
TipIt is generally not recommended to rebuild all editions when you hit apply this just wastes space considering you are going for the edition you chose
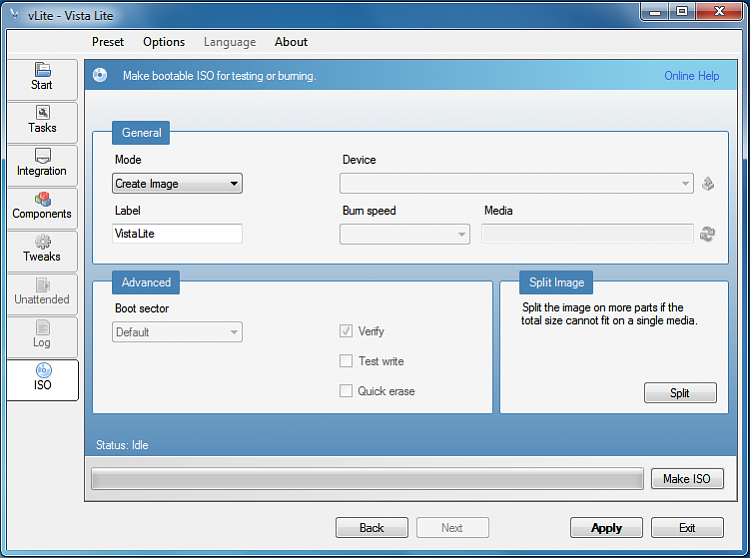
9. Deployment: Choose a method below
·The USB Key Method Follow the link above to use your modified source files on a USB Key for installation
·The Burn Disc Method Proceed to the ISO tab and choose Direct Burn. Give it a label and if necessary you can split the image up on multiple media. Hit Make ISO and your done
Chris
Related Tutorials
- vLite Homepage
- Compare Windows 7 Editions
- Windows Vista SP1/Windows Server 2008 WAIK
- Run a Program as an Administrator
- Run a Program in Compatibility Mode
- MagicDisc - ISO Mounter (If your Installation is still an ISO)
- Microsoft Virtual PC 2007 (For testing)
- VMware Workstation (For testing)
- Create a USB Installation Key Drive
Custom Windows Installations - Windows 7
-
New #1
Great tutorial,
Will test it soon, when I find the time.
Greetz
-
New #2
Nice work!
Can i add wallpapers and some programs to it? I mean portable programs that is enough to copy to the right place.
How can I save all my currently used driver to use it in the installer? (sorry it is OFF)
Is it legal to modify the original installer?
-
New #3
Im checking on the wallpaper/programs thing right now. When you run the installer of the driver...most of the time it dumps a folder pertaining to the driver and any apps that come with it in the program files folder. If you check its folder in there more than likely you will find the ini of the driver. You can also user DriverMax...it scans your current computer and outputs all the iNis...just as easy as that
-
New #4
Amazing.
Congrats Zid!
-
-
New #6
-
-
New #8
Wow great tutorial!! Ill be tryng this one for sure its tempting to build own custom W7 installer lol! Is it possible to also put some apps/software that will be install together with W7
-
New #9
Nice tutorial

Custom Windows Installations - Windows 7
How to Use vLite to Trim Down Windows 7 for a Custom InstallationPublished by Zidane24


 Quote
Quote
Related Discussions