How to Stop and Prevent Windows from Deleting the Thumbnail Cache
InformationThis tutorial will show you how to stop and prevent Vista and Windows 7 from deleting and clearing the thumbnail cache and causing you to not have thumbnail previews until reloaded again.
This is a good workaround if Windows is randomly deleting and clearing your thumbnail cache.
You must be logged in as an administrator to be able to do this tutorial.
OPTION ONETo Prevent Windows from Deleting the Thumbnail Cache
NOTE: This option will only stop and prevent Windows from being able to delete the thumbnail cache. This will not prevent users from being able to manually delete or from using Disk Cleanup to delete their thumbnail cache.
1. In Windows Explorer, navigate to the hidden system folder below, right click on the Explorer folder, and click on Properties. (see screenshot below)
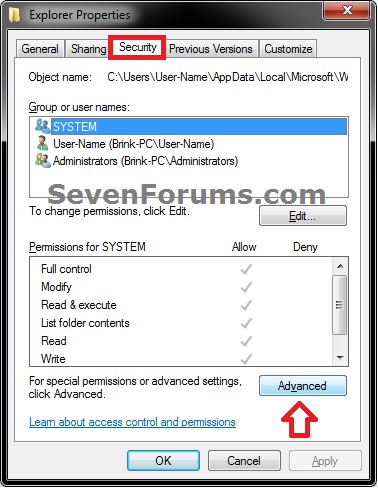
2. Click on the Security tab, then click on the Advanced button. (see screenshot below)
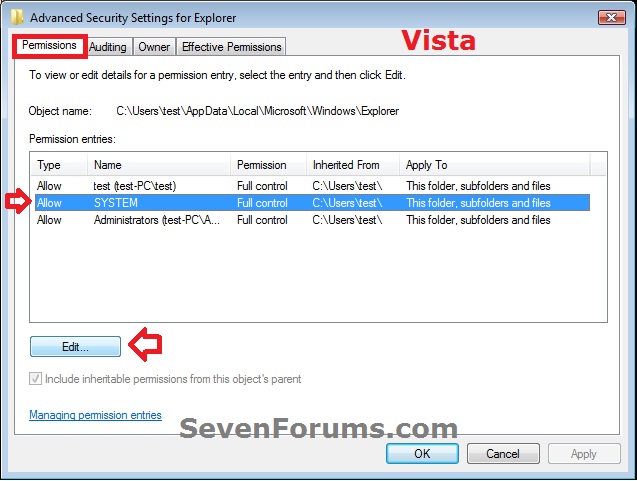
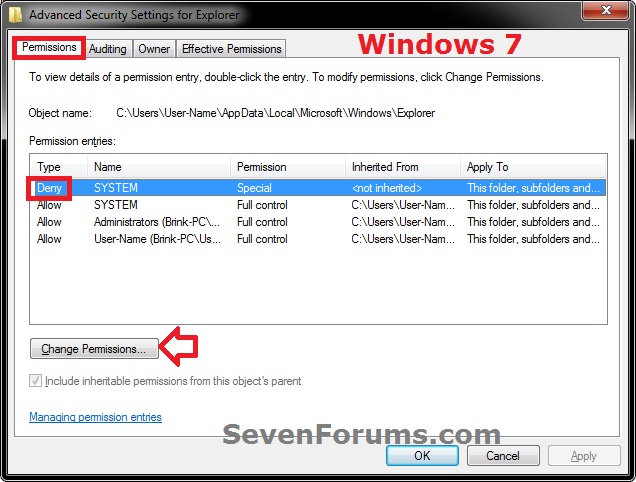
3. In the Permissons tab, select (highlight) the SYSTEM entry, and click on the Change Permissions (Windows 7) or Edit (Vista) button. (see screenshots below)
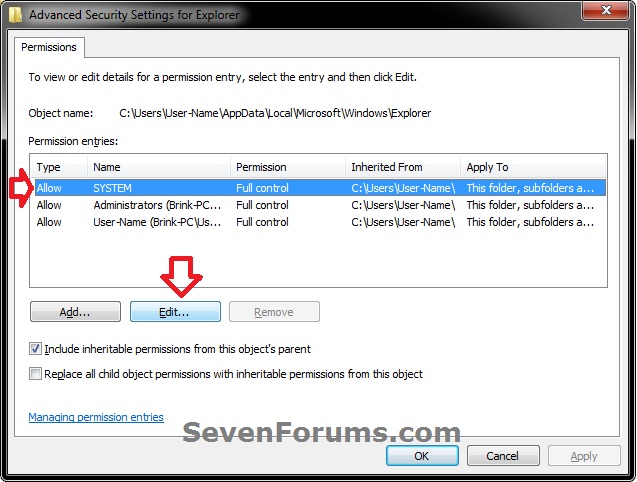
4. Select (highlight) the SYSTEM entry, and click on the Edit button. (see screenshot below)
5. Scroll down a bit, check the Deny box for both the Delete subfolders and files and Delete permissions items, then click on OK. (see screenshot below)
6. Click on OK. (see screenshot below step 4)
7. Click on Yes. (see screenshot below)
8. Click on OK. (see screenshots below step 3)
9. Click on OK. (see screenshot below step 2)
NoteIf this still doesn't help afterwards, then repeat the steps above for each user and group listed under the Name column (step 3) to prevent everything from being able to delete the thumbnail cache.
OPTION TWOTo Allow Windows to Delete and Clear the Thumbnail Cache
NOTE: This is the default setting. This option is to undo OPTION ONE above.
1. In Windows Explorer, navigate to the hidden system folder below, right click on the Explorer folder, and click on Properties. (see screenshot below)That's it,
2. Click on the Security tab, then click on the Advanced button. (see screenshot below)
3. In the Permissons tab, select (highlight) the SYSTEM entry with Deny as the type, and click on the Change Permissions (Windows 7) or Edit (Vista) button. (see screenshots below)
4. Select (highlight) the SYSTEM entry with Deny as the type, and click on the Remove button. (see screenshot below)
5. Click on OK. (see screenshot)
6. Click on OK. (see screenshots below step 3)
7. Click on OK. (see screenshot below step 2)
Shawn
Thumbnail Cache - Prevent Windows from Deleting

Thumbnail Cache - Prevent Windows from Deleting
How to Stop and Prevent Windows from Deleting the Thumbnail CachePublished by Brink
Related Discussions


