

How to Set and Unset Read-only Attribute of a File or Folder in Windows
InformationThis tutorial will show you how to set or unset files or all files in folders to be read-only or not in Vista, Windows 7 and Windows 8.
In Windows, folders cannot be set as read-only. Only the files in the folders can be.
If You cannot view or change the Read-only or the System attributes of folders in Windows Server 2003, in Windows XP, in Windows Vista or in Windows 7
Note
Read-only box = (Windows 8) Default neutral setting for a folder that is always displayed.
Read-only box = (Vista and Windows 7) Default neutral setting that is always displayed. File is not read-only. For a folder, it means all files in the folder not to be set as read-only.
Read-only box = File is read-only. For a folder, it means all files in the folder are set to be read-only when applied. Only displays temporarily while setting it.
Read-only box = File is not read-only, or to set file as not read-only when applied. For a folder, it means all files in the folder are set to be not read-only when applied. Only displays temporarily while setting it.
METHOD ONEThrough the File or Folder Properties Page
OPTION ONEFor a File
NOTE: This option is if you want to select one file to set or unset as read-only.
1. Select one or more files, right click on the file(s), and click/tap on Properties.
2. To Set the File as Read-only
A) In the General tab, click on the Read-only box until checked, and click/tap on OK. (see screenshot below)3. To Set the File as Not Read-only
A) In the General tab, click on the Read-only box until unchecked, and click/tap on OK. (see screenshot below)
OPTION TWOFor a Folder
NOTE: This option is if you want to have all files in a folder set or unset as read-only.
1. Select one or more folders, then right click on the folder(s), and click/tap on Properties.
2. Click/tap on the General tab. (see screenshot below)
NOTE: When the Read-only box is blue, this is the default undetermined state. It does not mean read-only or not read-only.
3. To Set All Files in a Folder as Read-only
A) Click on the Read-only box until checked, and click on OK. (see screenshot below)4. To Set All Files in a Folder as Not Read-only
B) Select the option you want, and click/tap on OK. (see screenshot below)
NOTE: You will only be able to select the top option if you selected more than one folder.
A) Click on the Read-only box until it's empty, and click/tap on OK. (see screenshot below)
B) Select the option you want, and click/tap on OK. (see screenshot below)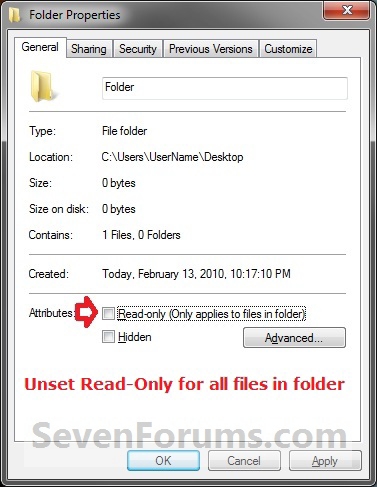
NOTE: You will only be able to select the top option if you selected more than one folder.
OPTION THREEFor Multiple Files and Folders
NOTE: This option is if you want to select multiple files and folders at once to have the files and all files in the folders set or unset as read-only.
1. Select one or more files and/or folders, right click on the file(s), and click/tap on Properties.
2. To Set as Read-only
A) In the General tab, click on the Read-only box until checked, and click/tap on OK. (see screenshot below)3. To Set as Not Read-only
B) Select the option you want, and click/tap on OK. (see screenshot below)
A) In the General tab, click on the Read-only box until unchecked, and click/tap on OK. (see screenshot below)
B) Select the option you want, and click/tap on OK. (see screenshot below)
METHOD TWOThrough a Command Prompt with the ATTRIB Command
NOTE: While you can do this with a non-elevated command prompt or a elevated command prompt, you may get better results using a elevated command prompt if you are logged in as an administrator.
That's it,
OPTION ONEFor a File
NOTE: This options is if you want to set or unset a file as read-only.
1. Open a non-elevated command prompt or a elevated command prompt.
2. To Set a File as Read-only
A) In the command prompt, type the command below, and press Enter. (see screenshot below)
NOTE: Substitute "Full path of file with file extension" for the actual full path of the file.
FOR EXAMPLE: I would type this command exactly as below for a file named file.txt in a folder on my desktop.Code:attrib +r "Full path of file with file extension"
Code:attrib +r "C:\Users\UserName\Desktop\Folder\File.txt" 3. To Set a File as Not Read-only
A) In the command prompt, type the command below, and press Enter. (see screenshot below)
NOTE: Substitute "Full path of file with file extension" for the actual full path of the file.
FOR EXAMPLE: I would type this command exactly as below for a file named file.txt in a folder on my desktop.Code:attrib -r "Full path of file with file extension"
Code:attrib -r "C:\Users\UserName\Desktop\Folder\File.txt"
OPTION TWOFor a Folder
NOTE: This option is if you want to set or unset all files in a folder and it's subfolders as read-only.
1. Open a non-elevated command prompt or an elevated command prompt.
2. To Set All Files in a Folder and subfolders as Read-only
A) In the command prompt, type the command below, and press Enter. (see screenshot below)
NOTE: Substitute Full path of folder for the actual full path of the folder.
FOR EXAMPLE: I would type this command exactly as below for a folder on my desktop.Code:attrib +r "Full path of folder\*.*" /S /D
Code:attrib +r "C:\Users\UserName\Desktop\Folder\*.*" /S /D3. To Set All Files in Folder and subfolders as Not Read-only
A) In the command prompt, type the command below, and press Enter. (see screenshot below)
NOTE: Substitute Full path of folder for the actual full path of the folder.
FOR EXAMPLE: I would type this command exactly as below for a folder on my desktop.Code:attrib -r "Full path of folder\*.*" /S /D
Code:attrib -r "C:\Users\UserName\Desktop\Folder\*.*" /S /D
Shawn
Related Tutorials
- How to Hide or Unhide a File or Folder in Windows 7
- Sharing and Permissions
- How to Allow or Deny Permissions to Users and Groups
- How to Lock a Folder with a Password without Any Software in Windows 7
- How to Add "Set and Unset as Read-only" to File and Folder Context Menu in Windows 7 and Windows 8
- How to Add "List Read-only Files" to Context Menu in Vista, Windows 7, and Windows 8
Read-only File and Folder Attribute
-
New #1
None of this works it always come back with Read-only folder. Can you make your "Take ownership" solution in french please?
-
New #2
Hello Zorro, and welcome to Seven Forums. :)
Technically, you can't set a folder as read-only as it gets applied to the files in the folder instead.
If the files in this folder do not have a check mark in the read-only box, then they are not read-only.
Taking ownership of a file or folder will not change its attribute (ex: read-only). It will only change its permissions instead. Here'a French version below that you requested though.
French-Add_Take_Ownership_with_Pause_to_context_menu.reg

Read-only File and Folder Attribute
How to Set and Unset Read-only Attribute of a File or Folder in WindowsPublished by Brink


 Quote
Quote
Related Discussions