

How to Do an Inplace Upgrade Installation from Vista to Windows 7
InformationA upgrade installation allows you to keep intact the files, settings, and programs from your current version of Vista SP1 or SP2. This will show you how to do a upgrade installation with a Upgrade version of Windows 7 from Vista. XP users will now be able to upgrade to Windows 7, but will have to do a clean install or custom install of Windows 7 instead.
Yes, you can do a clean install from a upgrade Windows 7 version. :)
NOTE: See this tutorial for how: Clean Install with a Upgrade Windows 7 Version
NoteDo a Upgrade installation if:
- Your computer is running Windows Vista with Service Pack 1.
NOTE: To see if you are: Open the Start Menu, right click on Computer, and then click on Properties. Under Windows edition, look for Service Pack 1 next to your Windows Vista edition name. If you dont have Vista Service Pack 1 installed, or your computer is running an earlier version of Windows, then you cant perform an upgrade installation to Windows 7.- You DO want to preserve your user accounts, data, programs, and system drivers.
- You want to do a in place upgrade from either a 32-bit version of Windows Vista to a 32-bit version of Windows 7, or a 64-bit version of Windows Vista to a 64-bit version of Windows 7. You cannot upgrade from 32-bit to 64-bit. You can only do a clean install from 32-bit to 64-bit, or from 64-bit to 32-bit.
- Youre upgrading to the same Windows language. For example, from English to English.
TipBefore doing this upgrade install, you should run the Windows 7 Upgrade Advisor to see if you might have any issues before upgrading.
If everything checks out, then be sure to download and save all of your device drivers to DVD, or some other media, to have them handy to make setting up Windows 7 easier after the installation. Sometimes using the Vista drivers in Windows 7, you will need to use Compatibility Mode on the driver for it to install.
I would also recommend that you backup anything that you do not want to lose to be extra safe.
After you do a upgrade install, you will also see the option Files discarded by Windows upgrade option in Disk Cleanup. This would be for the C:\Windows.old , C:\$INPLACE.~TR , and C:\$WINDOWS.~Q files left over from the previous operating system.
You can also get more great information about upgrading Windows 7 at this link below:
Windows: Windows 7 Upgrade Option
WarningWindows 7 Minimum Hardware Requirements:
NOTE: See also: Windows 7 system requirements
Supported Upgrade Paths to Window 7 without doing a Clean Install:
- 1 GHz 32-bit or 64-bit processor
- 1 GB RAM for 32-bit Windows 7 OR 2 GB RAM for 64-bit Windows 7
- 16 GB available disk space 32-bit Windows 7 OR 20 GB for 64-bit Windows 7
- Support for DirectX 9 graphics with 128 MB memory (in order to enable Aero theme)
- DVD-R/W Drive
- Internet access (to download the Beta and get updates)
NOTE: You can only upgrade from a 32-bit (x86) Vista to 32-bit (x86) Windows 7 or 64-bit (x64) Vista to 64-bit (x64) Windows 7. Going from a 32-bit to 64-bit, or 64-bit to 32-bit, will require a clean install instead.
No code has to be inserted here.
No code has to be inserted here.
EXAMPLE: Windows 7 Upgrade Chart by Microsoft
NOTE: In-Place Upgrade is upgrading your currently installed OS to Windows 7 without losing anything. A Custom Install is doing a clean install without formatting the hard drive and selecting the current os to install Windows 7 on top of it to place the current OS in a C:\Windows.old folder as a backup.
Here's How:
1. Start Vista, and log on to an administrator account.That's it,
NOTE: If you wanted to do a clean install with an upgrade Windows 7, then you would be doing this tutorial to do a upgrade install of Windows 7 from within a clean install of Windows 7 instead of from within Vista.
2. Disable any 3rd party firewall, antivirus, or other security program to avoid it from possibly preventing the upgrade installation to Windows 7.
3. You should run the Windows 7 Upgrade Advisor to see if you may have any issues before upgrading. Correct any issues found before continuing.
NOTE: Skip this step if you are doing a clean install with a upgrade Windows 7, then you would be doing this tutorial to do a upgrade install of Windows 7 inside a clean install of Windows 7 instead.
4. Place your Windows 7 installation DVD into the DVD drive and click on the Run setup.exe option in the AutoPlay window from within Vista. (See screenshot below)
NOTE: If the AutoPlay window does not open, then open the drive folder in Computer and run the setup.exe file.
5. Click on the Install Now button to start the installation. (See screenshot below)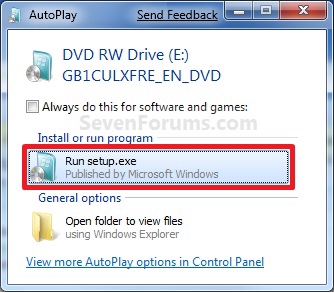
6. Uncheck the I want to help make Windows installation better box (unless you want to), and click on the Go online to get the latest updates for installation option. (See screenshot below)
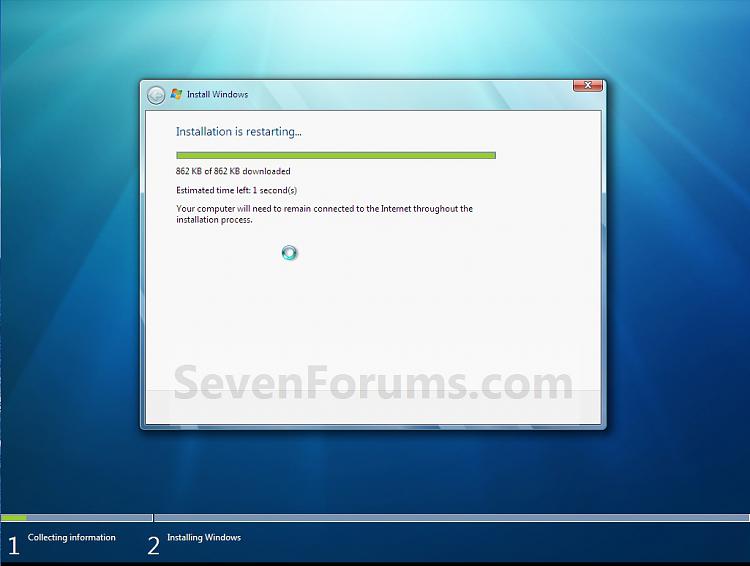
7. Windows 7 will now check online for and install any available installation updates. (See screenshots below)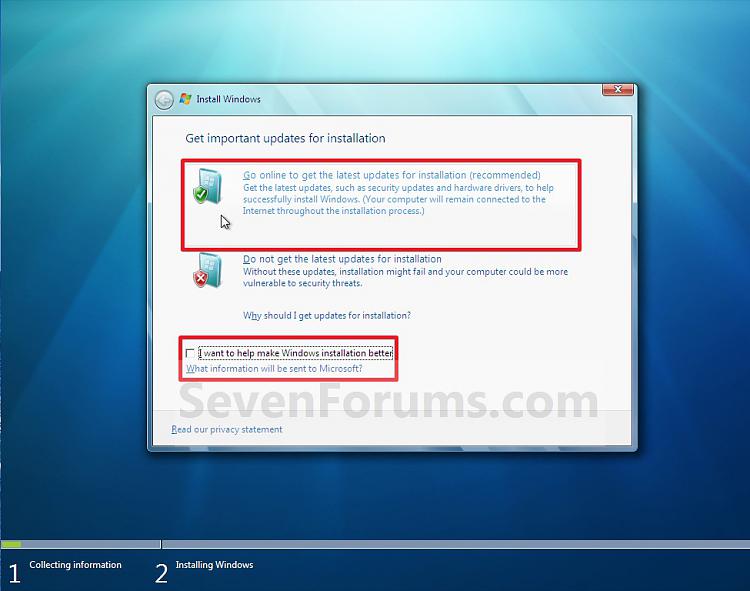
8. Check the I accept the license terms box and click on Next. (See screenshot below)
9. For a In-place Upgrade Install
NOTE: Do this option if you are currently running Vista and want to keep your files, programs, and settings and install (upgrade to) Windows 7. See the warning box at the top of the tutorial for upgrade options. Do this step if you are doing a clean install with a upgrade Windows 7, then you would be doing this tutorial to do a upgrade install of Windows 7 inside a clean install of Windows 7 instead.
A) Click on the Upgrade option. (See screenshot below)10. For a Custom Install
B) Go to step 11.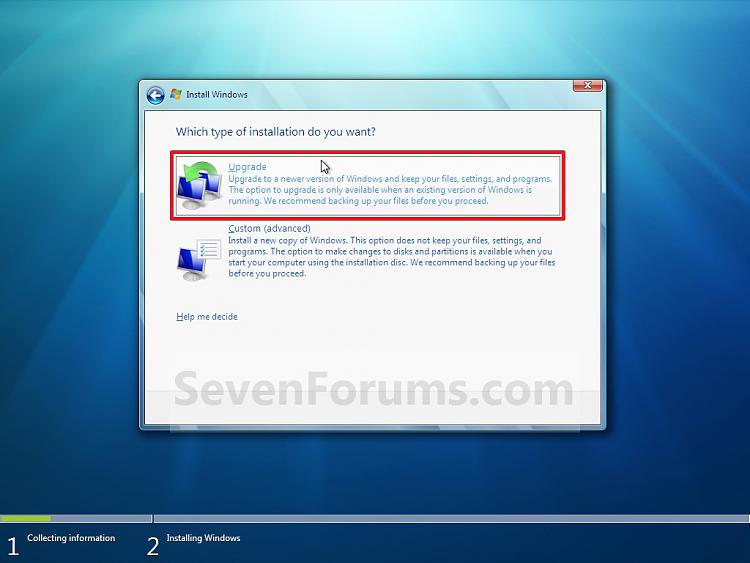
NOTE: Do this option if you are running XP or want to completely replace your current version of Windows with Windows 7. You will need to reinstall your programs after installation. This will be like doing a clean install without formating. Your previous installation will be placed in the C:\Windows.old folder (step 19) so you can copy any files back.
11. The installation of Windows 7 will now begin. (See screenshot below)
NOTE: During the installation process, your screen may flash and computer will restart a few times.
12. After the final restart, you will see this screen for a moment. (See screenshot below)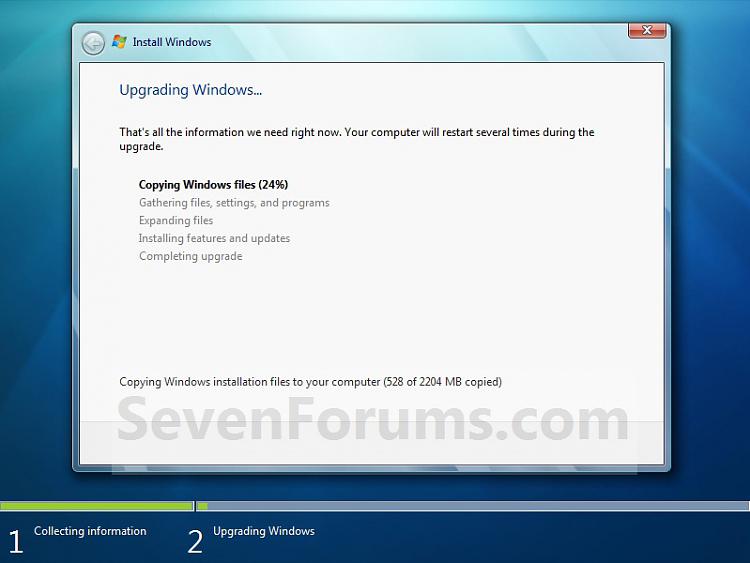
13. Type in your Windows 7 product key number. (See screenshot below step 14)
14. Uncheck the Automatically activate Windows when I'm online box unchecked, then click on the Next button. (See screenshot below)
NOTE: You can activate Windows 7 later after you make sure it is running properly. (See step 21 below)
If you chose to automatically activate Windows online when you set up your computer, automatic activation begins trying to activate your copy of Windows three days after you log on for the first time.
15. Click on Use recommended settings to allow automatic Windows Updates and proper security settings. (See screenshot below)
NOTE: For more information about these recommended settings, click on the Learn more about each option link in this window.
16. Select your time zone and set your time and date settings, then click on the Next button. (See screenshot below)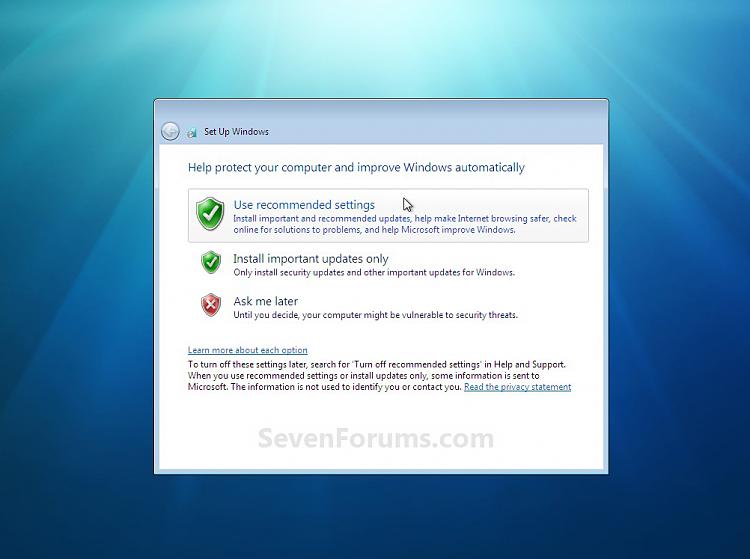
17. Click on your computer's correct network location type location to select it and have the settings for that location automatically applied. (See screenshot below)
18. Windows 7 will now prepare your desktop to startup. (See screenshots below)
19. Check to see if you are missing any user files. If you are, then you can copy them from the C:\Windows.old or the hidden protected operating system C:\$INPLACE.~TR and C:\WINDOWS.~Q backup folders.
20. If everything checks out in step 19, then you can run Disk Cleanup (step 6 at this link). You will need to click on the Clean up system files button first, and then check the Files discarded by Windows upgrade box. (See screenshot below)
NOTE: This will delete the C:\Windows.old, C:\$INPLACE.~TR and C:\WINDOWS.~Q folders from step 17 above.
21. Install all of your device drivers if needed, then all Windows Updates.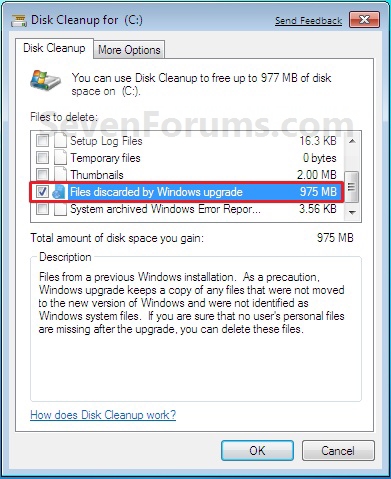
22. Refresh your Windows Experience Index (WEI) score.
23. When done, all you will need to do is to activate Windows 7. (See screenshot below)
Shawn
Related Tutorials
- How to Do a Clean Install with a Upgrade Windows 7 Version
- How to Use Windows 7 Upgrade Advisor
- How to Do a Clean Installation with Windows 7
- How to Do a Repair Install to Fix Windows 7
- How to Activate Windows 7 Online
- How to Extend the Windows 7 Activation Trial Period Up to 120 Days
- How to Change the Default Operating System to Start in Windows 7
- How to Change Time to Display Operating Systems at Boot in Windows 7
- How to Delete an Operating System Listed in Windows Boot Manager
- How to Create a Windows 7 Installation USB Key
- How to Install Windows 7 from USB Pen Drive Using Grub4Dos
- How to Install Windows 7 FAST without a DVD or USB Device
- How to Setup Windows 7 to Boot from a VHD (Virtual Hard Disk)
- How to Create a Windows 7 VHD at Boot to Start with from Boot
- How to Do a Custom Installation of Windows 7
- How to Enable or Disable Windows Anytime Upgrade in Windows 7
- How to Slipstream Windows 7 SP1 and Updates to Create a Bootable USB, Installation DVD, or ISO File
Upgrade Install with Windows 7
-
New #1
Due to having to spread reputation around, I'll post here that your tutorial was yet another well written "how things work".
Keep up the great work
-
-
New #3
Upgrading!
Wow that was great, I even think I can upgrade without screwing it up!
Thanks Brink!
-
-
New #5
I don't even think I need to post here that it is a good tutorial. It is just implied if it is written by Brink.
Nice job!
-
-
New #7
Brink you are master great man (il maestro).
ahmed tabit
-
-
Upgrade Install with Windows 7
How to Do an Inplace Upgrade Installation from Vista to Windows 7Published by Brink


 Quote
Quote
Related Discussions