How to Create a "Searches" Library with Correct Icon in Windows 7 and Windows 8
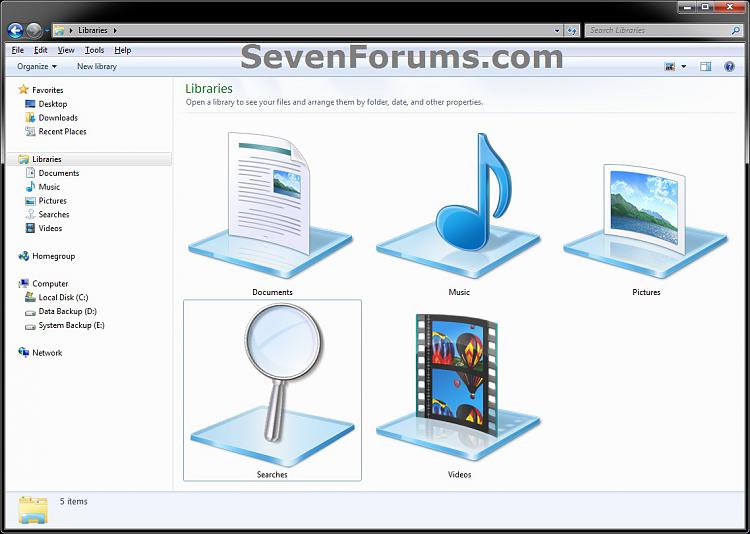
InformationThis will show you how to create a Searches library in Windows 7 and Windows 8 that has the correct Searches folder icon on a glass plate for it's library icon.
EXAMPLE: Searches Library with Correct Icon
Here's How:
1. To Download the Searches Library IconThat's it,
A) Click/tap on the Download button below to download the Searches_Library.zip file that contains the correct Searches library icon.2. To Create the Searches Library
B) Save the ZIP file to your desktop.
C) Double click/tap on the ZIP file to open it, then extract (drag and frop) the Searches_Library.ico file to the location that you want to keep it at.
WARNING: The icon file will need to remain at this location while it is being used (step 3) for the library. If you move it, then the icon will no longer be displayed for the library.
D) Right click or press and hold on the Searches_Library.ico file, and click/tap on Properties, General tab, on the Unblock button, and on OK. (see screenshot below)
NOTE: If you do not have a Unblock button under the General tab, then the shortcut is already unblocked and you can continue on to step 2.
A) In Windows Explorer, navigate to your C:\Users\(user-name) folder, then create a new library with the Searches folder. (see screenshot below)3. Do step 4 or 5 below depending on if you are in Windows 7 or Windows 8.
NOTE: If you like, you could include any other folder location(s) that you would like to also be included inside the Searches library as well.
4. To Change the Searches Library Icon in Windows 7
A) Change the Searches library icon to use the Searches_Library.ico icon file at the location you have saved it to in step 1. (see screenshots below)NoteFor example, I saved my icon from step 1 to C:\Users\Brink\My Documents, so I would add the line below (right screenshot below) while changing the icon if using step 5 OPTION TWO at that link.
<iconReference>"C:\Users\Brink\Documents\Searches_Library.ico"</iconReference>
You would substitute the path in red to the full path of where you saved the Searches_Library.ico file instead in step 1.
5. To Change the Downloads Library Icon in Windows 8
A) Using OPTION ONE in the tutorial below, change the new library's icon using the Searches_Library.ico icon file at the location you have saved it to in step 1. (see screenshot below)6. You will now notice that the Searches library icon has changed.
NOTE: See example screenshot at the top of the tutorial.
Shawn
Related Tutorials
- How to Create a "Downloads" Library with Correct Icon in Windows 7 and Windows 8
- How to Create a "Games" Library with Correct Icon in Windows 7 and Windows 8
- How to Create a "Favorites" Library with Correct Icon in Windows 7 and Windows 8
- How to Create a "Links" Library with Correct Icon in Windows 7 and Windows 8
- How to Change a Library Icon in Windows 7
- How to Create a New Library in Windows 8
- How to Hide or Show a Library in the Windows 7 Navigation Pane
- How to Restore the Default Libraries in Windows 7
- How to Fix Libraries when Hidden and Empty in Windows 7
- How to Create a New Library in Windows 7
- How to Include a Folder in a Library in Windows 7
- How to Remove a Included Folder from a Library in Windows 7
- How to Set the Default Save Folder for a Library in Windows 7
- How to Add or Remove the Libraries Desktop Icon in Windows 7
- User Folders in Windows 7 Libraries
- How to Turn the Library Pane On or Off in Windows 7
- How to Add "Search" to Context Menu in Windows 7 and Windows 8
- How to Save a Search in Windows 7 and Windows 8
Searches Library - Create

Searches Library - Create
How to Create a "Searches" Library with Correct Icon in Windows 7 and Windows 8Published by Brink
Related Discussions


 Quote
Quote