

How to Add "Devices and Printers" to "Computer" or "This PC" in Windows 7 and Windows 8
InformationThis will show you how to add or remove Devices and Printers to My "Computer" or "This PC" window for all users in Windows 7 and Windows 8.
You must be logged in as an administrator to be able to do the steps in this tutorial.
EXAMPLE: "Devices and Printers" added to My Computer
Here's How: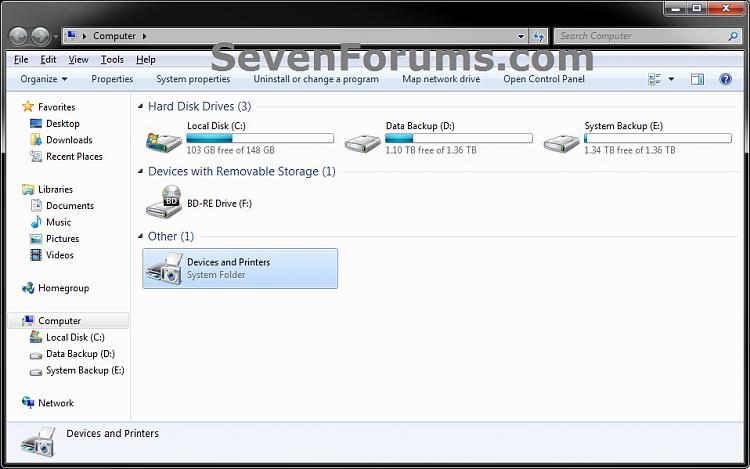
1. To Add "Devices and Printers" to My Computer or This PCThat's it
A) Click/tap on the download button below to download the file below, and go to step 3 below.2. To Remove "Devices and Printers" from My Computer or This PC
Add_Devices-and-Printers_to_My-Computer.reg
NOTE: This is the default setting.
A) Click/tap on the download button below to download the file below, and go to step 3 below.3. Save the .reg file to your desktop.
Remove_Devices-and-Printers_from_My-Computer.reg
4. Double click/tap on the downloaded .reg file to merge it.
5. When prompted, click/tap on Run, Yes (UAC), Yes, and OK to approve the merge.
6. You can now delete the downloaded .reg file if you like.
Shawn
Related Tutorials
- How to Add or Remove Libraries in This PC in Windows 8 and 8.1
- How to Add or Remove Control Panel in This PC in Windows 8 and 8.1
- How to Add or Remove OneDrive in This PC in Windows 8.1
- How to Create a "Devices and Printers" Shortcut in Windows 7 and Windows 8
- How to Open Devices and Printers in Windows 7 and Windows 8
- How to Change the Device Driver and Information Installation Settings in Windows 7
- How to Create a Devices and Printers Troubleshoot Shortcut in Windows 7
- How to Add "Search" to "My Computer" Context Menu in Vista and Windows 7
- How to Add or Remove DLNA Media Servers from This PC in Windows 8 and 8.1
Devices and Printers - Add to My Computer
-
New #1
Nice tutorial with a convenient .reg file!
Are there any corners of the registry you haven't deciphered yet Shawn?
-
-
-
New #4
Is there any other way to add "Devices and Printers" in My Computer ?
-
Devices and Printers - Add to My Computer
How to Add "Devices and Printers" to "Computer" or "This PC" in Windows 7 and Windows 8Published by Brink


 Quote
Quote
Related Discussions