Dual Boot - Delete a OS

Page 8 of 14 FirstFirst ... 678910 ... LastLast
  1.    #70

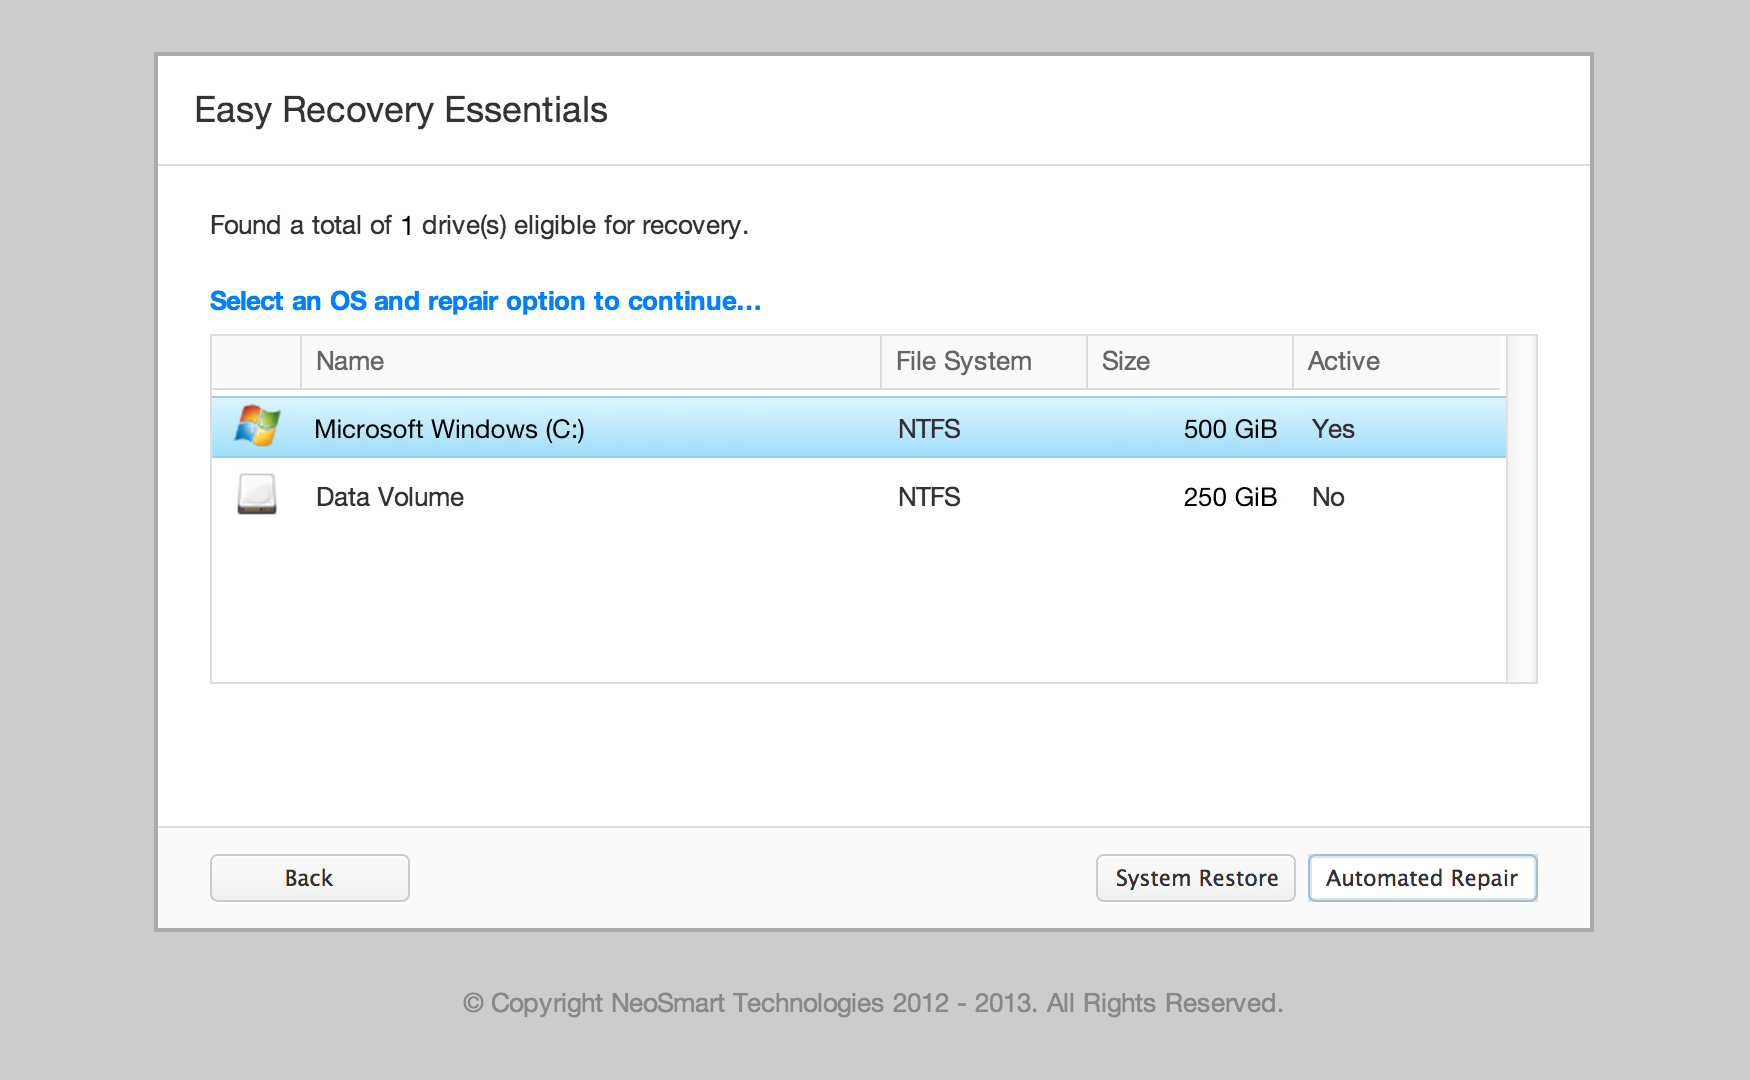
    Sorry, yes, you'd be using the Partition Wizard boot disk. Download the ISO and burn to CD with Windows Image Burner.

    The boot the disk, rightclick first Vista partition to Delete, click OK, then Apply.

    then rightclick C Win7 partition to Resize, drag left border all the way to left, click OK, Apply. Partition Wizard to Resize Partition - Video Help.

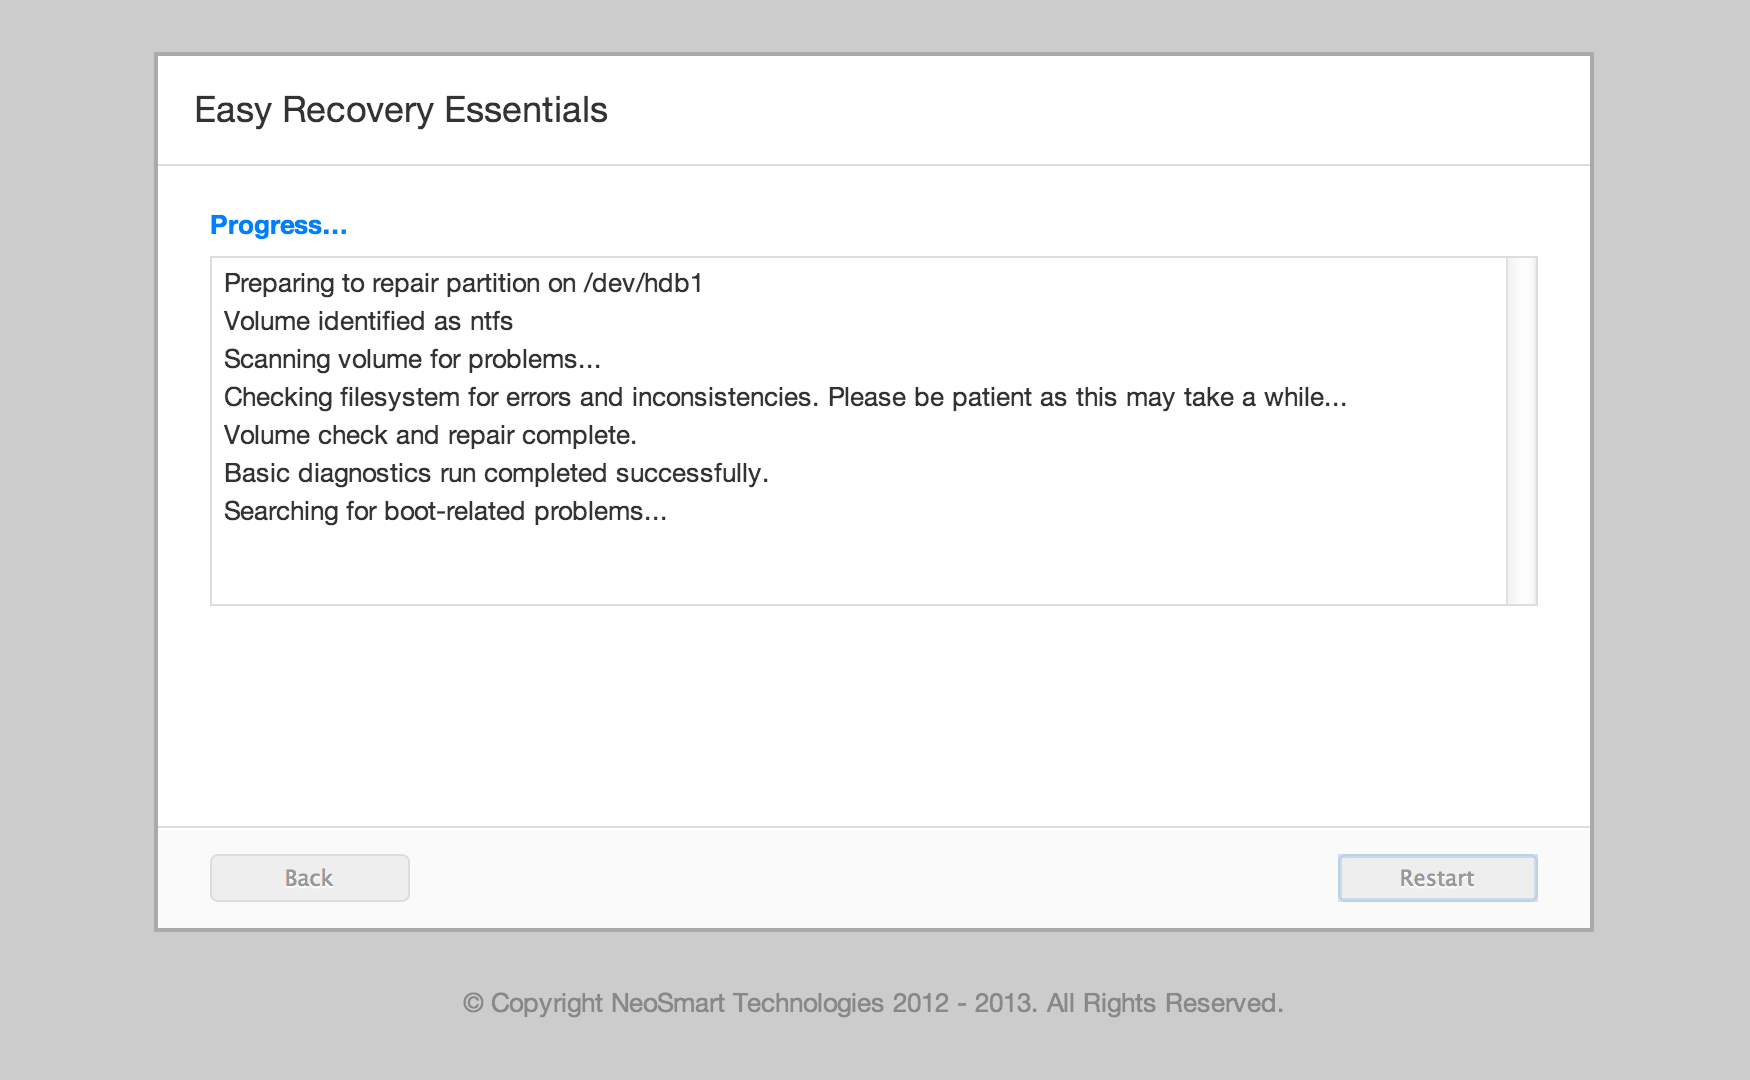
    You can also burn a System Repair Disk CD in case Startup Repair is needed.
      My Computer


  2. Posts : 2,470
    Windows 7 Home Premium
       #71

    Greg,

    Followed the PW instructions to delete Compaq D:, resized what was supposed to be C: (left and right to occupy unallocated space), and last, selected Rebuild MBR. All actions completed successfully.

    Did notice that the partition where Windows 7 is supposed to be did not show up as C:, and its status was: None
    The Recovery E: partition showed its name and letter, but its status was also: None

    When done, booted, and got the following:
    "Reboot and select a proper boot device or insert Boot Media in selected boot device and press a key..."

    What course of action do you suggest at this point?

    BTW, did find the Windows 7 Ultimate CD.

    Once again, thanks for your help on all this.
      My Computer

  3.    #72

    Confirm that C is Partition Marked Active and then run Startup Repair - Run 3 Separate Times to write the boot files to C.

    If there is any problem then please post back a camera snap of the PW drive map, or let us know the labels on each partition.

    IF Startup Repair x3 cannot get it started then:

    1. Download Easy Recovery Essentials.
    2. Burn the image. Follow these instructions on how to burn the bootable ISO image very carefully, as making a bootable CD can be tricky! Alternatively, these instructions explain how to create a bootable EasyRE recovery USB stick/drive.
    3. Boot up your PC from the Easy Recovery Essentials CD or USB you created.
    4. Once EasyRE is running, choose the “Automated Repair” option and click Continue. Choose “Automated Repair” in Easy Recovery Essentials
    5. After EasyRE scans your computer’s drives, identify and select the drive letter for your Windows installation from the list, and then click on the Automated Repair button to begin. Choose the drive associated with the Windows installation you’re trying to repair.
    6. Easy Recovery Essentials will start analyzing the selected drive for problems. EasyRE will test for and attempt to automatically correct errors with the disk, partition, bootsector, filesystem, bootloader, and registry. No intervention is required, as EasyRE’s repair is fully automated: Easy Recovery Essentials searches for errors and makes corrections to the selected Windows installation.
    7. Once the process is complete, EasyRE will report its findings. Click on the Restart button to reboot your PC and test the changes.
    Last edited by gregrocker; 13 Nov 2014 at 03:21.
      My Computer


  4. Posts : 2,470
    Windows 7 Home Premium
       #73

    Thanks for the info, Greg!

    Since the Windows 7 CD is available, decided to use it, and that way the computer recipient will start clean, and I will not have to engage into doing a deep clean.

    Everything went well. Still in the process of downloading an AV, Windows Updates, etc., but, do not expect any problems.

    Your help is really appreciated, and I cannot thank you enough.

    My attempt to give you a rep did not work...have to spread more of them around.
    However, in my book, you are a top gun!!


    .
    Last edited by cottonball; 13 Nov 2014 at 17:59.
      My Computer

  5.    #74

    Really glad to hear it Marie.

    Take good care and come back to visit when you can :)
      My Computer


  6. Posts : 2,470
    Windows 7 Home Premium
       #75

    Well, all was going smooth installing an AV, MBAM, Windows Updates, but something happened that the Desktop will not connect to the Internet.

    Keep getting:
    "The remote device or resource won't accept the connection."
    "Connection with server cannot be established."

    In Device Manager there was a Teredo Tunneling Pseudo-Interface with a yellow flag. I removed it and restarted, but, it was not there after the reboot, so, it did not re-install.

    Guess I am headed to the Networking forum and hope to get some help there.

    I have helped others bring back an Internet connection using an elevated command prompt, but my brain has been replaced with marbles...know that I've done it, but, blank as to how.
      My Computer

  7.   My Computer


  8. Posts : 1
    Microsoft Windows 8.1 Professional 32-bit and Microsoft Windows 7 Professional 32-bit
       #77

    Thanks a lot


    Dear Thanks a lot for sharing such useful tutorial. I am really glad... Allah bless you...
    Thanks a lot again Dear...
      My Computer


  9. Posts : 12
    windows 7 ultimate x64
       #78

    Kimwu said:
    Hi!

    Thanks for the great tut !! However, after a long research (and about 4/5 boot files repair with WinRE), I believe it misses a very important part, which will cause the system NOT to boot : it cant find any boot file.


    You miss a final step 6 !
    Under "BCD BACKUP", you have to launch "Re-create boot files" !

    I have tested this many times to make sure. Without doing it, the bios wont find the "boot files"
    But when doing Step 4 - Reset the BCD / Step 5 - Adding a new entry / Step 6 - Reset the Mbr it works


    To my "understanding", there are two parts : the boot files // the boot data config
    - When hitting Reset BCD, I guess it will erase everything, files included.
    - When adding new entry, you setup the boot data again, but not the files
    - When hitting Recreate boot file, you copy the file again.

    Files + data = Boot
    Followed exactly and without any errors. the excellent TUT from WHS Steps 1,3,4,5 plus your suggested Step 6. After successfully changing in Step 1 the boot record in XP (D) to Windows 7 (C), I changed the first boot HDD in the BIOS to the HDD with Windows 7 (C)

    Result: eliminated XP from the dual boot and now I have duplicate entries for Windows 7 in the dual boot startup window. Windows 7 boots correctly but the dual boot screen with the duplicate entries still appears. I no longer have a need for a dual boot and wish to eliminate the screen options at start up. I assume the solution is simply going to EasyBCD> Edit Menu> select an entry > Delete > Yes> Save Settings. If there is only one entry, the boot menu itself will be hidden and the computer will automatically be booted into the remaining OS. If there is no need for any boot options I suppose selecting "Skip the Boot Menu" in Timeout Options should do the trick.

    Before trying that I wanted to get some feedback.

    ¿? TIA
    Last edited by MCabZ; 19 Dec 2014 at 11:44.
      My Computer

  10.    #79

    It would be best for us to first see a screenshot of Disk Management - Post a Screen Capture Image . We need to confirm that Win7 or it's 100mb System Reserved partition is marked "System Active" confirming it is indeed booting itself.

    If so then first check in msconfig>Boot to see if the duplicate listing exists to delete it there.

    If not install EasyBCD (click Download - no Name or Email required) to delete the extra listing there.
      My Computer


Page 8 of 14 FirstFirst ... 678910 ... LastLast

  Related Discussions
Our Sites
Site Links
About Us
Windows 7 Forums is an independent web site and has not been authorized, sponsored, or otherwise approved by Microsoft Corporation. "Windows 7" and related materials are trademarks of Microsoft Corp.

© Designer Media Ltd
All times are GMT -5. The time now is 18:23.
Find Us