

How to Create a "Pen and Touch" Settings Shortcut in Windows 7 and Windows 8
InformationThis will show you how to create or download shortcuts that will open directly to the Pen and Touch separate Pen Options, Flicks, and Handwriting tabs.
NoteIf you only have a touch screen and do not have a pen, then you will only have the Pen Options tab available in Pen and Touch settings.
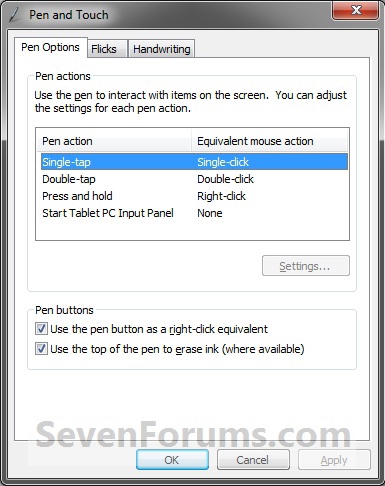
EXAMPLE: Pen and Touch - Pen Options, Flicks, and Handwriting tabs

OPTION ONETo Download a "Pen and Touch" Settings Shortcuts
1. Do step 2, 3, or 4 below for what shortcut you would like to download.
2. Shortcut to Pen and Touch Pen Options Tab
A) Click/tap on the download button below to download the file below, and go to step 5 below.3. Shortcut to Pen and Touch Flicks Tab
Pen_and_Touch_Options.zip
A) Click/tap on the download button below to download the file below, and go to step 5 below.4. Shortcut to Pen and Touch Handwriting or Touch Tab
Pen_and_Touch_Flicks.zip
A) Click/tap on the download button below to download the file below, and go to step 5 below.5. Save the .zip file to your desktop.
Pen_and_Touch_Handwriting.zip
6. Open the .zip file ,and extract (drag and drop) the Pen and Touch shortcut to your desktop.
7. Unblock the Pen and Touch shortcut.
8. In Windows 7, you can now Pin to Taskbar or Pin to Start Menu, add to Quick Launch, assign a keyboard shortcut to it, or move this shortcut to where you like for easy use.
9. In Windows 8 and 8.1, you can Pin to Taskbar on desktop, Pin to Start screen, add to Quick Launch, assign a keyboard shortcut to it, or move this shortcut to where you like for easy use.
10. When done, you can delete the downloaded .zip file if you like.
OPTION TWOTo Manually Create a "Pen and Touch" Settings Shortcuts
1. Right click or press and hold on an empty area on your desktop, and click/tap on New and Shortcut.That's it,
2. Type in the command in bold below for the Pen and Touch settings tab you want the shortcut to open to, and click on the Next button. (See screenshot below)
- Pen and Touch Pen Options Tab
rundll32.exe shell32.dll,Control_RunDLL tabletpc.cpl
- Pen and Touch Flicks Tab
rundll32.exe shell32.dll,Control_RunDLL tabletpc.cpl,,1
- Pen and Touch Handwriting or Touch Tab
rundll32.exe shell32.dll,Control_RunDLL tabletpc.cpl,,2
3. Type Pen and Touch tab name (ex: Pen and Touch Flicks), and click on the Finish button. (See screenshot below)
NOTE: You can name this shortcut anything you would like though.
4. Right click on the new Pen and Touch shortcut on the Desktop and click on Properties.
5. Click on the Shortcut tab, and click on the Change Icon button. (See screenshot below)
6. In the line under "Look for icons in this file", type the location in bold below for the Pen and Touch tab you selected in step 2, then press Enter. (See screenshots below)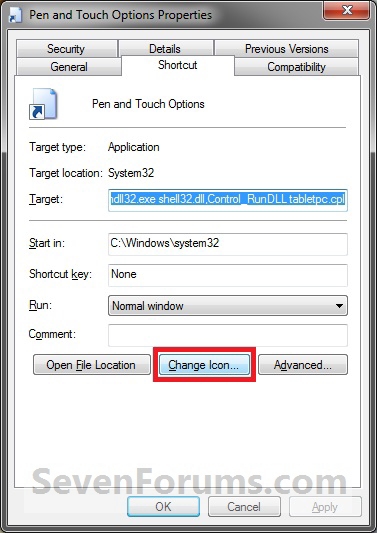
- Pen and Touch Pen Options Tab
%SystemRoot%\System32\TabletPC.cpl
- Pen and Touch Flicks Tab
Code:%SystemRoot%\winsxs\amd64_microsoft-windows-t..flicklearningwizard_31bf3856ad364e35_6.1.7600.16385_none_69769fd78b751ad3\FlickLearningWizard.exe
- Pen and Touch Handwriting Tab
%SystemRoot%\System32\TabletPC.cpl
7. Select the Pen and Touch icon highlighted in blue above for the tab you selected in step 2, and click on OK. (See screenshots above)
8. Click on OK. (See screenshot below)
9. In Windows 7, you can now Pin to Taskbar or Pin to Start Menu, add to Quick Launch, assign a keyboard shortcut to it, or move this shortcut to where you like for easy use.
10. In Windows 8 and 8.1, you can Pin to Taskbar on desktop, Pin to Start screen, add to Quick Launch, assign a keyboard shortcut to it, or move this shortcut to where you like for easy use.
Shawn
Related Tutorials
- How to Enable or Disable Touch by Finger on Touch Screen in Windows 7 and Windows 8
- How to Configure Pen and Touch Displays in Windows 7 and Windows 8
- How to Create a "Tablet PC Settings" Shortcut in Windows 7 and Windows 8
- How to Calibrate or Reset Screen for Pen or Touch in Windows 7 and Windows 8
- How to Change Touch Scrolling Friction in Windows 8 and 8.1
Pen and Touch Settings - Create Shortcut
-
New #1
Hi Shawn,
I know this will sound very idiotic, but what is this for exactly? Could you explain in a basic language but detailed for me? I'm no good with computers.
Thanks,
Paul
-
New #2
Hello Paul, and welcome to Seven Forums.
This is for when you have a touch pen device installed. Usually with a tablet.
-
New #3
Okay, can this touch pen be installed onto any laptop running Windows 7?
-
New #4
You'll have to check the requirements of the laptop and specific pen to see if you may be able to.Last edited by Brink; 10 Mar 2014 at 17:26.
Pen and Touch Settings - Create Shortcut
How to Create a "Pen and Touch" Settings Shortcut in Windows 7 and Windows 8Published by Brink


 Quote
Quote
Related Discussions