

How to Disable ULPS (Ultra Low Power State) for Graphics Cards in AMD CrossfireX
InformationULPS stands for Ultra Low Power State for GPU's or graphic card adapters.
You may want to disable ULPS if you have an AMD CrossfireX configuration because the 2nd GPU installed will load 99% and causes overheating, crash, and possible GPU damage.
The point of this is to disable power draw from the 2nd card when not in gaming mode.
It has become a major issue when gaming or just plain web browsing. You'll notice an increase in GPU fan noise, and start to see artifacts because the 2nd GPU is at 100% load and will not stop unless you disable CrossFire or SLI.
These steps are here to help you at least keep the problem off until a proper driver or fix has been establish by AMD.
You must be logged in as an administrator to be able to do the steps in this tutorial.
WarningThis is only a temporary fix. Each time that you update your AMD Catalyst drivers, you will need to do this tutorial again if you need to have ULPS disabled again.
OPTION ONEDisable ULPS using ULPS Configuration Utility
NoteThe ULPS Configuration Utility is used to enable or disable ULPS, or ultra-low power state, for AMD/ATI graphics cards in CrossfireX. The program will go to a specific string in the registry and change the hexadecimal value of the EnableULPS key to either 0 or 1, depending on whether it is being enabled or disabled.
#1 Go to the site below to download and run the latest version of the ULPS Configuration Utility v#.#.#.exe file.
#2 Enter the number of the option you want to do, and press Enter. (see screenshot below)
OPTION TWODisable ULPS Manually in Registry Editor
#1 Press the Windows + R keys to open the Run dialog, type regedit, and click/tap on OK.
#2 If prompted by UAC, then click/tap on Yes.
#3 In Registry Editor, navigate to the key location below. (see screenshot below)
Code:HKEY_LOCAL_MACHINE\SYSTEM\CurrentControlSet\Control\Video\{331C6CE7-51C4-49B1-978F-E524E6682663}\0000#4 In the right pane of 0000, double click/tap on the EnableUlps DWORD to modify it. (see screenshot below)
#5 Type 0 (zero), and click/tap on OK. (see screenshot below)
NOTE: 1 is the default setting to enable ULPS.
#6 Repeat steps 4 and 5 above for each next 0001, 0002, 0003, 0004, and 0005 keys one at a time.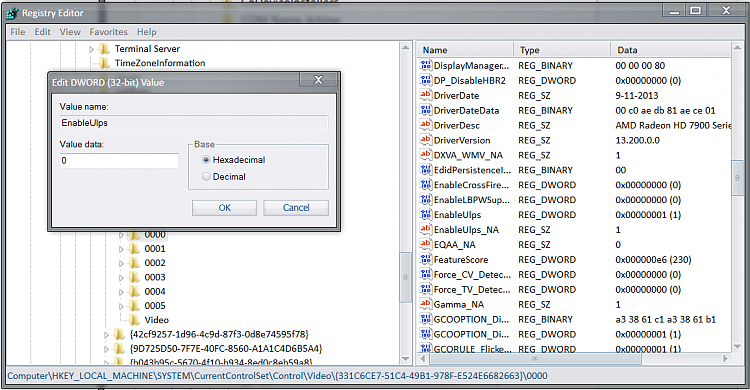
NoteThe keys 0000-0001-0002-0003-0004-0005 represent the Graphic Cards you have installed you will need to edit all keys in that area as in the screen shot in order for this fix to work.
#7 When finished, close Registry Editor, and restart the PC to apply.
ULPS (Ultra Low Power State) - Disable for AMD CrossfireX
-
-
-
New #3
Just an addition to OP.
{331C6CE7-51C4-49B1-978F-E524E6682663} may not exist in your video directory. In fact all entries under "Video" folder are completely different than those shown here on my PC.
However, the rest of the address "HKEY_LOCAL_MACHINE\SYSTEM\CurrentControlSet\Control\Video\" is correct. There will be two folders with 0000-0005 folders in them under "video" if you have two GPUs. Those are the ones you are looking for regardless of what numbers are present on the folders title under the video directory in the path shown in the OP.
All the other above steps apply.
On that note, I've only ever had to change the 0000 folder's ULPS setting in each of my two directories under video when I've updated CCC. The others remain set at "0".
It's a good idea to check anyway, I always do, but the other folder's settings [0001-0005] will probably remain set at 0 if you've done this before after updating CCC again. Just an interesting note there.
At any rate, don't think you've done something wrong just because the numbers of the folders in your video directory don't match the example above. You're still in the right place and just need to look for the two directories with six entries rather than two or three.
-

ULPS (Ultra Low Power State) - Disable for AMD CrossfireX
How to Disable ULPS (Ultra Low Power State) for Graphics Cards in AMD CrossfireXPublished by Solarstarshines


 Quote
Quote
Related Discussions