How to Remove an Included Folder from a Library in Windows 7
InformationThis will show you how to remove an included folder so that it's contents will no longer be included in a library in Windows 7.
NoteLibraries let you access and arrange items from one or more folders quickly without moving them from their original location. Libraries themselves don't store your files or folders. Instead, they point to different locations on a hard disk or external drive attached to your computer. This gives you easy access to a category of files no matter where they are stored. For instance, if you have music files on your hard disk and on an external drive, you can access all of your music files from within the "Music" library.
For more information about Windows 7 Libraries see:
TipThe full path to the hidden Libraries folder is below.
C:\Users\(User-Name)\AppData\Roaming\Microsoft\Windows\Libraries
OR
%AppData%\Microsoft\Windows\Libraries
Here's How:
1. Open the Start Menu.That's it,
2. Right click on the User Name button and click on Open. (See screenshot below)
3. From the Library Properties Page
A) Right click on the library (ex: Music) that you want to remove the included folder from, and click on Properties. (See screenshot below)
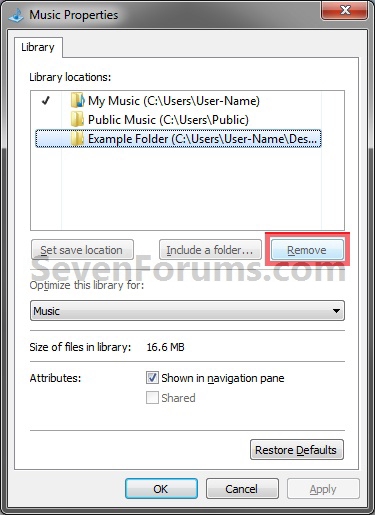
B) Select (highlight) the included folder you want to remove from the library, and click on the Remove button. (See screenshot below)
D) Click on OK. (See screenshot above)4. From Inside the Library
E) Go to step 6.
A) Open the library (ex: Music) that you want to remove the included folder from. (See screenshot below step 3A)
B) Click on the # locations toolbar button. (See screenshot below)C) Select (highlight) the included folder you want to remove from the library, and click on the Remove button. (See screenshot below)D) Click on OK. (See screenshot above)5. From the Navigation Pane
E) Close the library window when done. (See screenshot below step 4B)
F) Go to step 6.
A) Click on the drop down triangle to the left of the Library, that you want remove a included folder from, to expand it. (See screenshot below step 5B)6. Close the Libraries window when done. (See screenshot below step 3A)
B) Right click on the included folder (subfolder) under the library, and click on Remove Location from library. (See screenshot below)
Shawn
Related Tutorials
- User Folders in Windows 7 Libraries
- How to Restore the Default Libraries in Windows 7
- How to Fix Libraries when Hidden and Empty in Windows 7
- How to Hide or Show a Library in the Windows 7 Navigation Pane
- How to Create a New Library in Windows 7
- How to Include a Folder in a Library in Windows 7
- How to Include a Network Drive or Folder in a Library in Windows 7 and Windows 8
- How to Set the Default Save Folder for a Library in Windows 7
- How to Create a "Games" Library with Correct Icon in Windows 7 and Windows 8
- How to Create a "Downloads" Library with Correct Icon in Windows 7 and Windows 8
- How to Create a "Favorites" Library with Correct Icon in Windows 7 and Windows 8
- How to Create a "Searches" Library with Correct Icon in Windows 7 and Windows 8
- How to Create a "Links" Library with Correct Icon in Windows 7 and Windows 8
- How to Turn the Library Pane On or Off in Windows 7
- How to Add or Remove "Include in library" in Windows 7 Context Menu
- How to Arrange Folders Included in a Library in Any Order in Windows 7 and Windows 8
- How to Clear Changes made to Library View in Windows 7 and Windows 8
Library - Remove a Included Folder
-
New #1
THANK YOU! I could not figure out how to do it, was starting to pull my hair out! Thanks again,
By the way there's a misspelling on the "Note" part of the page. "from their original locatation"
Just want to keep your kick ass site in good shape
-
-
New #3
Anyway to remove the Public Folders in the Libraries via GPO?
-
New #4
Hello Scott,
Not that I'm aware of. You can remove them using the method in this tutorial to each of the 4 default Libraries. :)
-
New #5
I agree and it does work but when you are building hundreds of Windows 7 computers the more you can do via GPO the better.
-
-
New #7
I guess this is just the way things are but here's what I noticed.
Example:
Even though there's a pictures library and the properties says optimize for pictures, it still displays every file from folders that you include in that library.
I was hoping I could add folders to a library like the pictures library and only have pictures appear, but no.
If anyone knows a way to set this up let me know, but I'm thinking there isn't.
-
New #8
Hello BFG,
About the only way that I know of is to only have images in the folders that you include in the library instead.
-
New #9
Hello I figured out a way for changing configuration in several PC like remove the Public Folders in the Libraries if you make the change just like explained in this post you can copy the files *.library-ms at %AppData%\Microsoft\Windows\Libraries but if you edit any of this files you will notice that it is a xml and have a field <ownerSID> so I think it will only work in cloned PCs but I had no tested yet cuz I will need a way to do this with different PCs if someone know another way via command line, registry, GPO, please post
regards

Library - Remove a Included Folder
How to Remove an Included Folder from a Library in Windows 7Published by Brink
Related Discussions


 Quote
Quote
