How to Create an Offline Files "Sync Center" Shortcut in Windows 7 and Windows 8
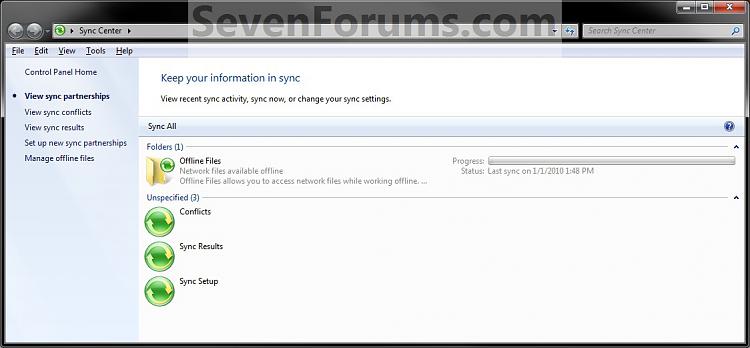
InformationSync Center allows you to check the results of your recent sync activity if you've set up your computer to sync files with a network server (often called offline files). When you sync with a network server, you can access files by keeping synced copies of those files on your computer, even when the network server is unavailable. Sync Center can tell you if the files synced successfully or if there are any sync errors or warnings.
This will show you how to create or download a Sync Center shortcut in Windows 7 and Windows 8.
NoteIn Windows 7, offline files is only available in the Windows 7 Professional, Ultimate, and Enterprise editions.
In Windows 8, offline files is only available in the Windows 8 Pro and Windows 8 Enterprise editions.
EXAMPLE: Sync Center
OPTION ONETo Download the "Sync Center" Shortcut
1. Click on the download button below to download the file below.
2. Save the .zip file to your desktop.
3. Open the .zip file and extract the Sync Center shortcut to the desktop.
4. Right click on the Sync Center shortcut, and click/tap on Properties, General tab, and on the Unblock button. (see screenshot below)
NOTE: If you do not have a Unblock button under the General tab, then the shortcut is already unblocked and you can continue on to step 5.
5. In Windows 7, you can now Pin to Taskbar or Pin to Start Menu, add to Quick Launch, assign a keyboard shortcut to it, or move this shortcut to where you like for easy use.
6. In Windows 8, you can Pin to Taskbar on desktop, Pin to Start screen, add to Quick Launch, assign a keyboard shortcut to it, or move this shortcut to where you like for easy use.
7. When done, you can delete the downloaded .zip file if you like.
OPTION TWOTo Manually Create the "Sync Center" Shortcut
1. Right click or press and hold on an empty area on the desktop, and click/tap on New and Shortcut.
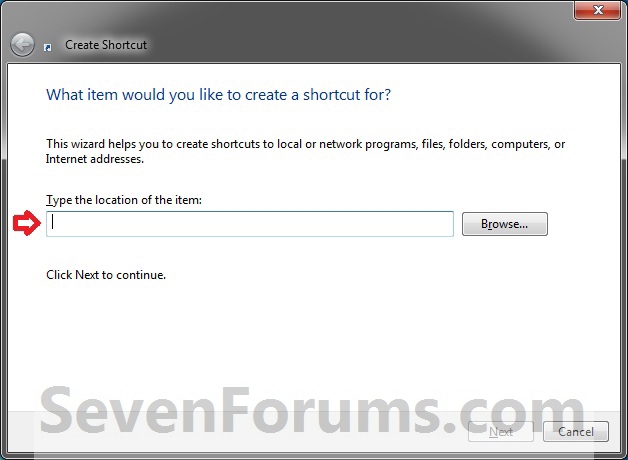
2. Copy and paste the location below into the location area, and click/tap on the Next button. (see screenshot below)%windir%\explorer.exe shell:::{9C73F5E5-7AE7-4E32-A8E8-8D23B85255BF}3. Type Sync Center for the name, and click/tap on the Finish button. (see screenshot below)That's it,
NOTE: You can name this anything you would like though.
4. Right click on the new Sync Center shortcut on the Desktop, and click/tap on Properties.
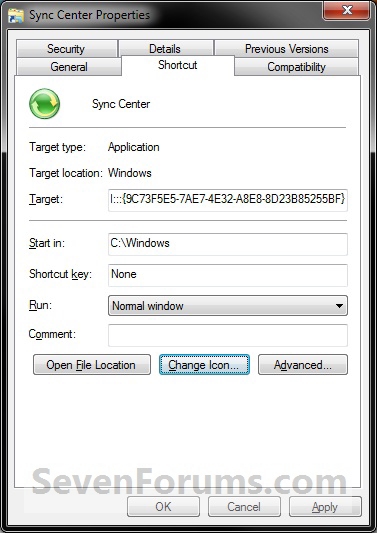
5. Click/tap on the Shortcut tab, then click/tap on the Change Icon button. (see screenshot below)
6. In the line under "Look for icons in this file", copy and paste the location below, and press Enter. (see screenshot below)
%SystemRoot%\System32\SyncCenter.dll7. Select the icon highlighted in blue above, and click/tap on OK. (see screenshot above)
NOTE: You can use any icon that you would like instead though.
8. Click/tap on OK. (see screenshot below)
9. In Windows 7, you can now Pin to Taskbar or Pin to Start Menu, add to Quick Launch, assign a keyboard shortcut to it, or move this shortcut to where you like for easy use.
10. In Windows 8, you can Pin to Taskbar on desktop, Pin to Start screen, add to Quick Launch, assign a keyboard shortcut to it, or move this shortcut to where you like for easy use.
Shawn
Related Tutorials
- Enable or Disable the Use Of Offline Files in Windows 7 and Windows 8
- How to View All Your Offline Files in Windows 7 and Windows 8
- How to Make Network Files or Folders Available Offline in Windows 7 and Windows 8
- How to View and Change Your Offline Files Status in Windows 7
- How to Encrypt or Unencrypt Offline Files in Windows 7 and Windows 8
- How to Manually Sync Your Offline Files in Windows 7 and Windows 8
- How to Create an "Offline Files Folder" Shortcut in Windows 7 and Windows 8
- How to Create an Offline Files "Sync Conflicts" Shortcut in Windows 7 and Windows 8
- How to Create an Offline Files "Sync Results" Shortcut in Windows 7 and Windows 8
- How to Create an Offline Files "Sync Setup" Shortcut in Windows 7 and Windows 8
Sync Center Shortcut - Create

Sync Center Shortcut - Create
How to Create an Offline Files "Sync Center" Shortcut in Windows 7 and Windows 8Published by Brink
Related Discussions


