How to Do a Clean Installation of Windows 7 from the Windows Desktop
This shows how to do a clean installation of Windows 7 from the Windows 7 desktop, using only an ISO - Disk Image File; though you will have to supply a valid, purchased Windows 7 activation key for the Windows 7 version you install.
This method is very helpful if you don't have a way to boot the Windows 7 installation media, whether the CD/DVD drive is not functioning or not present, as in a Netbook; or the PC is not capable of booting independently from a USB stick.Warning
Be advised: You must make back-ups of any personal data you need to save to external media before you start this process as it will over-write all data on the Windows 7 partition and it will not be recoverable at all after this installation is finished, this is not an upgrade.
You will have to reinstall all the programs/apps that you use as they integrate themselves into the Windows registry and are not moveable from one Windows installation to another so be sure to save the program installers and the product activation keys where applicable.
As there is no upgrade path to go from 32-bit to 64-bit, or vise-versa, this method will not work for that, that has to be a true, complete clean installation from scratch.
This works exactly the same to clean install Windows 7 from the Vista desktop.If you need information on how best to extract the Windows 7 installation files from an ISO to the Windows 7 desktop, have a look at the tutorial at this link.
If you want to copy the Windows 7 installation files to the Windows 7 desktop from a Windows 7 installation DVD, have a look at the Copy To method of this tutorial.
Let's get started!
1) Right click Setup and select Run as Administrator and enter your user credentials for the UAC prompt, then click OK to start the process.
2) In the window that opens click Install Now.
3) You'll get Setup is Starting; then this Get Updates dialog box, just select to not get updates during the installation process, it just seems to go smoother this way, Windows will auto-update later, after the installation has completed.
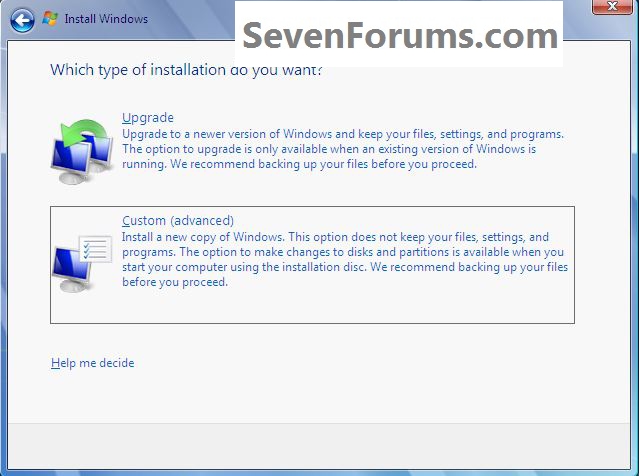
4) Accept the License Terms, then choose Custom (advanced) at this "What Type Install ... " dialog box.
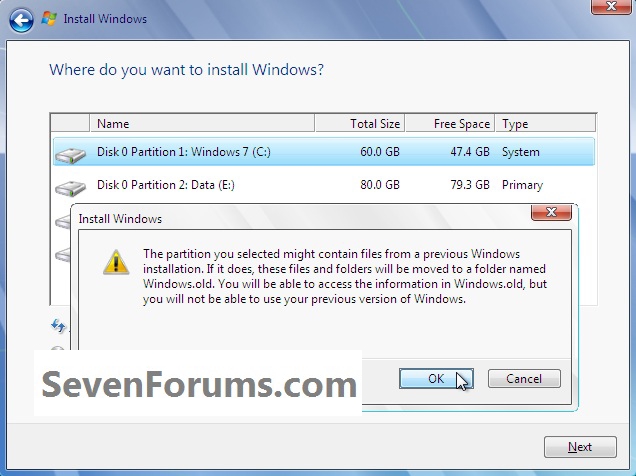
5) Be sure to click to highlight/select the Windows 7 C: partition to do the installation to, you don't want to select the wrong partition if there is more than one partition; then OK for the Windows.old dialog box.
6) The Copying Windows files goes fairly fast.
7) Then it'll start Expanding Windows files to about 27% and restart and you'll see this boot screen in the second snip down, it's not a dual boot so don't be concerned, that's normal.
8) Then it'll finish Expanding Windows files and then a second restart, as in this second snip, same thing, don't be concerned that's normal and it will correct it's self by the time the installation completes and it'll boot straight to Windows 7.
9) Then you'll see Updating Registry Settings, than Starting Services, then Completing Installation and a normal restart.
10) To view the rest of the steps, have a look at this tutorial starting at Step #10 to complete the installation process.
Enjoy! :)
Related Tutorials
- Clean Install Windows 7 from the Windows XP Desktop
- Slipstream Windows 7 SP1 into a Installation DVD or ISO File
- Clean Install with a Upgrade Windows 7 Version
- Clean Install Windows 7
- USB Windows 7 Installation Key Drive - Create
- Clean Install Windows 7 : Ahead of XP
- Clean Install Windows 7 : Ahead of Vista
Clean Install Windows 7 from the Windows 7 Desktop
-
New #1
Here's the other version of this at this link below.
..Last edited by Bare Foot Kid; 05 Aug 2011 at 14:35. Reason: Added Link!
-
-
-
-
-
-
-
New #8
Hey Guys can i get more information from the 7 and 8th step?
i dont know what to choose from them.. thanks for the reply
-
New #9
Hello RJ,
No worries. The items highlighted in the screenshot is what is supposed to be selected.
However, you could also just let it sit and automatically choose for you when the timer runs out at step 7 and 8 to continue with the installation. :)

Clean Install Windows 7 from the Windows 7 Desktop
How to Do a Clean Install of Windows 7 from the Windows 7 DesktopPublished by Bare Foot Kid
Related Discussions


 Quote
Quote