

How to Add or Remove the "Hardware" Tab from Properties in Vista, Windows 7, and Windows 8
InformationThis will show you how to add or remove the Hardware tab from Mouse, Keyboard, and Sounds and Audio Devices in the Control Panel for specific or all users. It also removes the Hardware tab from the Properties dialog box for all local drives, including hard drives, floppy disk drives, and CD-ROM drives.
If removed, users cannot use the Hardware tab from these locations to view or change the device list or device properties, or use the Troubleshoot button (if available) to resolve problems with the device.
EXAMPLE: Hardware Tab Added (default) and Removed
OPTION ONEAdd or Remove Hardware Tab using a REG File
1. To Add or Restore the Hardware Tab for Only Current User
NOTE: This is the default setting.
A) Click on the Download button below to download the file below.
Add-Restore_Hardware_Tab.regB) Go to step 3.2. To Remove the Hardware Tab for Only Current User
A) Click on the Download button below to download the file below.3. Save the .reg file to your desktop.
Remove_Hardware_Tab.reg
4. Right click on the downloaded .reg file, and click on Merge.
5. Click on Run, Yes, Yes, and OK if prompted.
6. When done, you can delete the downloaded .reg file if you like.
OPTION TWOAdd or Remove Hardware Tab in Group Policy
1. Open the all users, specific users or groups, or all users except administrators Local Group Policy Editor for how you want this policy applied.2. In the left pane, click on to expand User Configuration, Administrative Templates, Windows Components, and Windows Explorer. (see screenshot below)That's it,
3. In the right pane, right click on Remove Harware tab and click on Edit. (see screenshot above)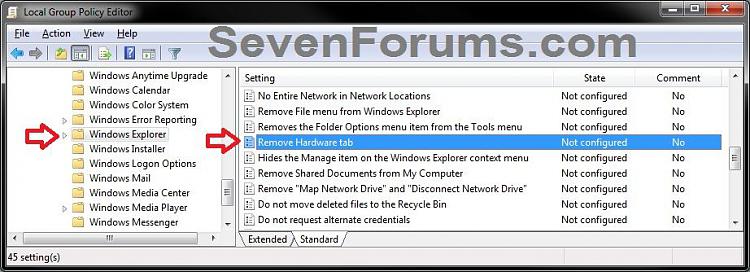
4. To Add or Restore the Hardware Tab
A) Select (dot) either Not Configured or Disabled. (see screenshot below step 6)
NOTE: Not Configured is the default setting.B) Go to step 6.5. To Remove the Hardware Tab
A) Select (dot) Enabled. (see screenshot below step 6)6. Click on OK. (see screenshot below)
7. Close the Local Group Policy Editor window.
Shawn
Related Tutorials
- How to Add or Remove the "Security" Tab from Properties in Vista, Windows 7, and Windows 8
- How to Add or Remove the "Customize" Tab from Properties in Vista, Windows 7, and Windows 8
- How to Add or Remove "Previous Versions" Tab from Properties in Vista and Windows 7
- How to Add or Remove "Details" Tab in File Properties in Vista, Windows 7, and Windows 8
- How to Add or Remove "Compatibility" Tab in Properties Page in Vista, Windows 7, and Windows 8
Hardware Tab - Add or Remove from Properties
Hardware Tab - Add or Remove from Properties
How to Add or Remove the "Hardware" Tab from Properties in Vista, Windows 7, and Windows 8Published by Brink


Related Discussions