Win 7 Virtual XP


  1. Posts : 4
    Win 7 32 Bit
       #1

    Win 7 Virtual XP


    Hello.
    Firstly, I am sorry if this is in the wrong place.
    I am a 63year old computer user, not a compter fixer.

    I have just got a new Dell E 5510 Laptop with Win 7 Pro 32bit.

    I want to use some programs that only run on XP Pro.

    I has downloaded and installed Virtual XP, loaded my program, and all is well.

    Now the bad news. The program needs to be activated by getting a file from drive A

    If I plug my USB disk drive in and connect it, it comes up as drive B

    How can I make the virtual drive A active.

    Help urgently needed in simple plain English.

    I await your wise words.

    BC
      My Computer


  2. Posts : 4
    Win 7 32 Bit
    Thread Starter
       #2

    Help still needed.


    Come on people I still need help..

    :) :) :) :)

    BC
      My Computer


  3. Posts : 17,545
    Windows 10 Pro x64 EN-GB
       #3

    Hello Barry, welcome to the Seven Forums.

    Virtual PC adds an emulated pseudo floppy drive to XP Mode. This drive uses the drive letter A: as the screenshot shows:

    Win 7 Virtual XP-xpm_floppy_1.png

    In order to be able to give your USB floppy the letter A:, you have to remove this VPC native emulated drive, to get drive letter A: available. This might work:
    1. Disconnect the USB floppy drive
    2. Open the Device Manager. If you don't know how, you can open it like this:
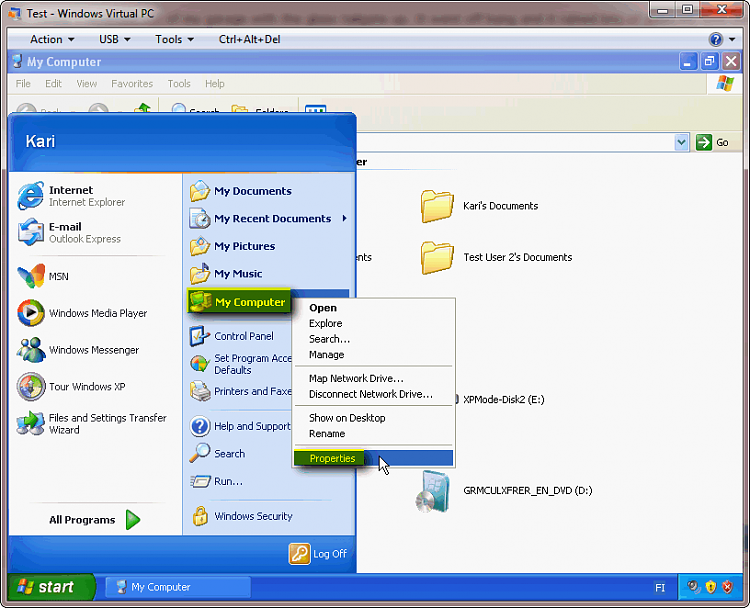
      • Click Start, right click My Computer, select Properties:
        Win 7 Virtual XP-xpm_floppy_2.png
        .
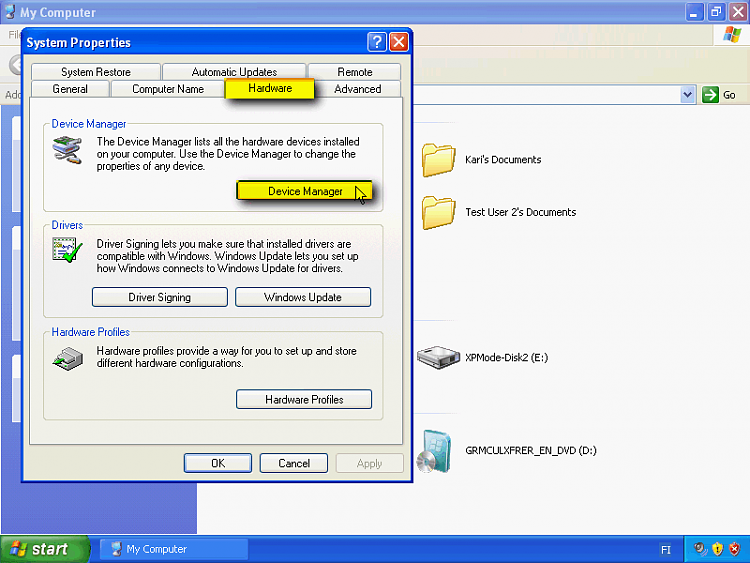
      • Select Hardware tab, click Device Manager:
        Win 7 Virtual XP-xpm_floppy_3.png
        .
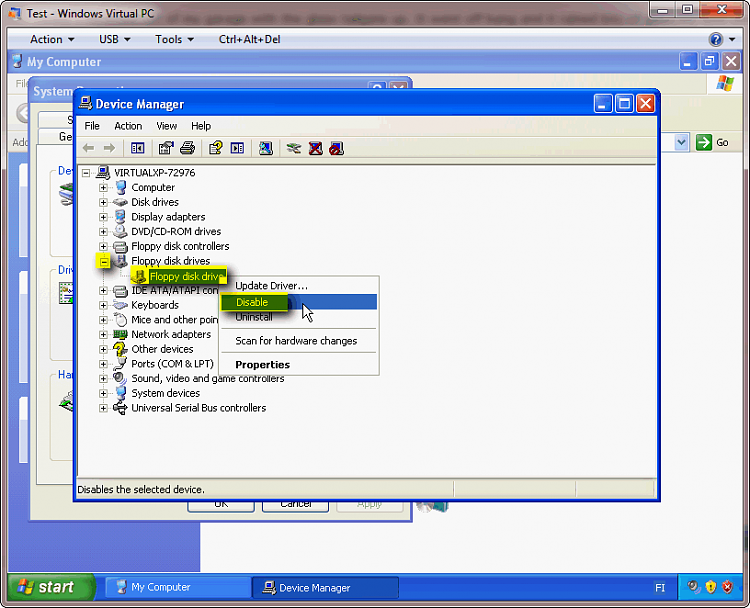
    3. When Device Manager opens, click the + sign in front of Floppy disk drives, right click Floppy disk drive, select Disable:
      Win 7 Virtual XP-xpm_floppy_4.png
      .
    4. You get a warning dialog. Just click Yes:
      Win 7 Virtual XP-xpm_floppy_5.png
      .
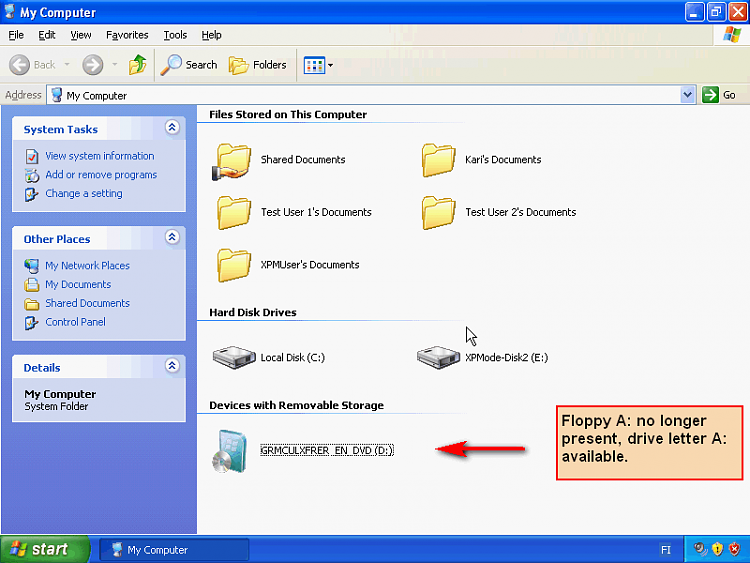
    5. Close the Device Manager, close System Properties. You should now see the emulated floppy drive has disappeared:
      .
      Win 7 Virtual XP-xpm_floppy_6.png
    6. Reboot XP Mode
    7. Connect your USB floppy drive, it should now get the drive letter A:


    Kari
    Last edited by Kari; 19 Mar 2011 at 10:40.
      My Computer


  4. Posts : 4
    Win 7 32 Bit
    Thread Starter
       #4

    Win 7 Virtual XP. Help still needed.


    Kari,
    That worked OK, up until I plugged the floppy drive into the USB port. Then nothing happened.

    Any more ideas anyone.

    Is there any way of asking Microsoft about this?

    BC
      My Computer


  5. Posts : 4
    Win 7 32 Bit
    Thread Starter
       #5

    Kari,
    With a bit more prodding, the floppy has connected. But still as Drive B. I need it to come up as drive A

    In your original info, you said the "Disable" the virtual drive A. How about deleating it??

    BC
      My Computer


  6. Posts : 17,545
    Windows 10 Pro x64 EN-GB
       #6

    I have no USB floppy drive to test if this works, but it looks like as if you have to completely disable the internal VPC native floppy A: from XP Mode BIOS.

    To enter BIOS in any Virtual PC virtual machine, you have to first shut down virtual machine completely and then disable automatic integration. If you have not changed default settings, XP Mode is always only hibernated, not shut down when you close it. To be able to shut down XP Mode, change the setting told in step 6 in this post. Step 7 in that same post shows you then how to close XP Mode so it really shuts down.

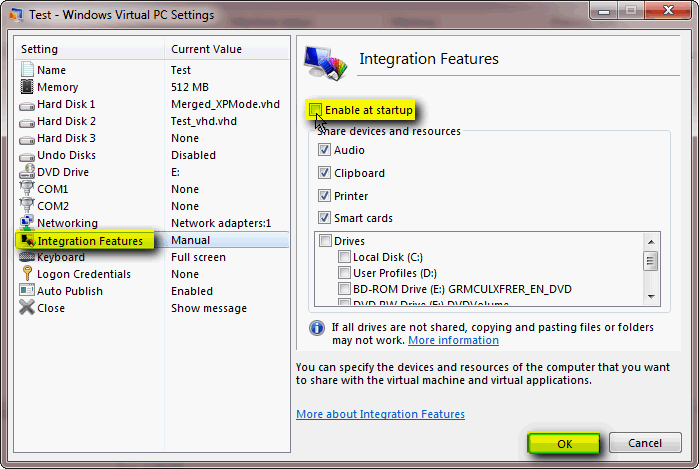
    When XP Mode is shut down, open its settings and disable integration features. Open XP Mode settings, select Integration Features on left pane, uncheck the option Enable at startup and click OK to save settings and exit :

    Win 7 Virtual XP-xpm_disable_integration.png

    Now launch XP Mode and start hitting the DEL key on your keyboard until BIOS screen appears. When in BIOS, move to Advanced menu > Floppy configuration using arrow keys. Open this menu item with Enter:

    Win 7 Virtual XP-xpm_bios_floppy_1.png

    Again using arrow keys, select Floppy A and hit Enter to open a submenu. Select Disable, confirm with Enter:

    Win 7 Virtual XP-xpm_bios_floppy_2.png

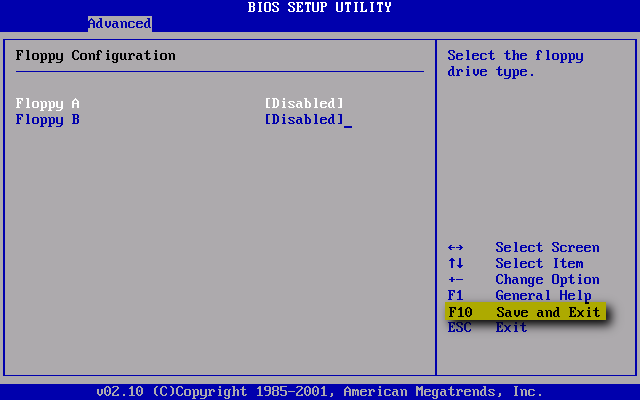
    Now both internal VPC floppy drives should be disabled. Press F10 to save settings and exit BIOS:

    Win 7 Virtual XP-xpm_bios_floppy_3.png

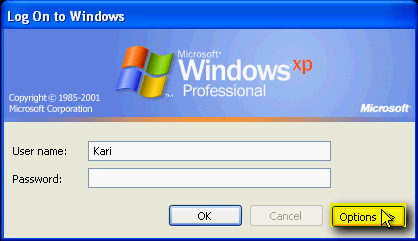
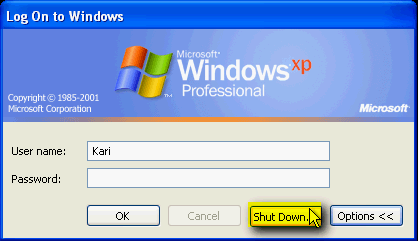
    XP Mode reboots now. When it has booted to login screen, click Options button to reveal Shut Down button, then click Shut Down:

    Win 7 Virtual XP-xpm_login_options.png
    Win 7 Virtual XP-xpm_shutdown_from_login.png

    When XP Mode is again shut down, re-enable integration features in settings, reboot XP Mode, connect your USB floppy and come back here to tell which letter it now got.

    Kari
      My Computer


  7. Posts : 222
    Win 7 Ult + Starter, XP Pro +Home, 2kAS, Linux Mint 8, SuperOS
       #7

    Unless the Application's floppy has some hidden filesystem (some do):

    Here's another way.

    There is an old DOS command SUBST, still in XP and Windows 7 which allows a folder to be treated as if it were a floppy drive. Thus from a command prompt subst f: c:\docs, would create a drive F:\ containing the contents of C:\docs.

    There is already an a:\drive in the XP Mode VM. It can be disabled from the device manager. Right-click My Computer, select Manage and then device manager from the Management Console. Double-Click on the Floppy Disk Drives to expand the branch, right click on the Floppy Disk Drive at the end of the branch and select disable. It should get a red cross against it.

    From My Computer you should not see an A:\ drive any longer (press F5 to refresh, no restart required). If you copy the contents of your application's floppy drive to a folder accessible from your XP Mode (if possible on a short path without long filenames or spaces in the folders), eg c:\floppy - then use the subst command from a command prompt window:

    Subst a: c:\floppy

    My Computer will now show an a:\ drive (a hard drive icon, but that should not matter), containing the files from the floppy. Does your application now work?
      My Computer


  8. Posts : 9
    windows 7 ultimate x64
       #8

    changing floppy letter to A: xp mode


    Kari's method if followed exactly worked for me . I disabled native floppy. Then rebooted (closed down and reopened) xp mode, plugged in usb floppy, and then "attached" usb floppy and voila letter A . If you remove the native floppy it will simply reinstall itself when you reopen xp mode Hence the drive letter will remain B. Thankyou and Good Day!!!
      My Computer


  9. Posts : 17,545
    Windows 10 Pro x64 EN-GB
       #9

    Hi Vaporize, welcome to the Seven Forums.

    I want to thank you for joining the forums and posting this, it is always good to know something you have told as a possible solution but not been able to test by yourself works.

    Kari
      My Computer


  Related Discussions
Our Sites
Site Links
About Us
Windows 7 Forums is an independent web site and has not been authorized, sponsored, or otherwise approved by Microsoft Corporation. "Windows 7" and related materials are trademarks of Microsoft Corp.

© Designer Media Ltd
All times are GMT -5. The time now is 12:03.
Find Us