BSOD shortly after joining a League Of Legends game, BCCode: 117


  1. Posts : 5
    Windows 7 Home Premium & 64 bit
       #1

    BSOD shortly after joining a League Of Legends game, BCCode: 117


    So far it has only happened right after getting into a League of Legends game. Usually at about 2-4 minutes in it happens but several times it has happened after 20-30 minutes of game play. It has only happened once when I wasn't in the middle of a game and I'm still not sure if it was actually the same problem.

    After restarting the computer and going to the errors section is shows 5-6 errors similiar to the ones bellow all titled as "VIDEO HARDWARE ERROR" in a 1-2 minute period of time follow by the final error "SHUT DOWN UNEXPECTEDLY" which is where I'm presuming I hit the power button until the computer turned off. They all have slightly different codes as can be seen below.

    I have yet to complete a game all the way through because of this problem.
    ****ALSO SYSTEM SPECS ARE LISTED IN MY PROFILE****

    UPDATE: Also recently roamed into the "performance information area" and noticed it says "new hardware detected your windows experience index needs to be refreshed" and shortly after hitting the REFRESH button I believe it got to around the testing windows aero effects stage and I got the BSOD again. I guess now I know it's not specifically from League of Legends although that is only the second time it's happened outside of LoL.

    Files that help describe the problem
    WD-20130925-1739.dmp
    sysdata.xml
    WERInternalMetadata.xml


    BCCode: 117
    BCP1: FFFFFA800D6954E0
    BCP2: FFFFF880049CC6B4
    BCP3: 0000000000000000
    BCP4: 0000000000000000
    OS Version: 6_1_7601
    Service Pack: 1_0
    Product: 768_1

    BCCode: 117
    BCP1: FFFFFA800DA711A0
    BCP2: FFFFF88004A1A378
    BCP3: 0000000000000000
    BCP4: 0000000000000000
    OS Version: 6_1_7601
    Service Pack: 1_0
    Product: 768_1

    BCCode: 117
    BCP1: FFFFFA80061A2010
    BCP2: FFFFF8800F2720C0
    BCP3: 0000000000000000
    BCP4: 0000000000000000
    OS Version: 6_1_7601
    Service Pack: 1_0
    Product: 768_1
    Last edited by travincal; 28 Sep 2013 at 03:50.
      My Computer


  2. Posts : 3,056
    Windows 10
       #2

    Hello and welcome to SF :) .
    Please follow Blue Screen of Death (BSOD) Posting Instructions
      My Computer


  3. Posts : 5
    Windows 7 Home Premium & 64 bit
    Thread Starter
       #3

    YoYo155 said:
    Hello and welcome to SF :) .
    Please follow Blue Screen of Death (BSOD) Posting Instructions

    OOPS I apologize. I attached the required zip folder so it should be taken care of now according to the directions. Thank you :)
      My Computer


  4. Posts : 5
    Windows 7 Home Premium & 64 bit
    Thread Starter
       #4

    bump
      My Computer


  5. Posts : 3,056
    Windows 10
       #5

    Hi, please don't bump the thread as we are only human.

    The files uploaded are not relevant (dating from 2011).
    I can see your dumps are being saved in a different location from the default.

    Search your PC for a folder named Live Kernel Reports or for some reason it can also be name
    Live Kernal Reports, the recent dumps should be located there.

    Also search you PC for WD-20130925-1739.dmp this will direct you to the folder as well.

    Now the only recent dump doesn't show much, but it suggests storage.
    Code:
    PROCESS1_INITIALIZATION_FAILED (6b)
    Arguments:
    Arg1: 0000000000000000, Indicates the NT status code that caused the failure.
    Arg2: 0000000000000000, (reserved)
    Arg3: 0000000000000000
    Arg4: 0000000000000000
    Code:
    Usual causes:  Hard drive, Cables, Missing boot files, Disabled driver
    What you posted earlier is a GPU fault and not a real bugcheck in it's true sense.
    Code:
    lmvm nvlddmkm
    Browse full module list
    start             end                 module name
    fffff880`0481f000 fffff880`052c6000   nvlddmkm   (deferred)             
        Image path: \SystemRoot\system32\DRIVERS\nvlddmkm.sys
        Image name: nvlddmkm.sys
        Browse all global symbols  functions  data
        Timestamp:        Fri Jan 18 15:22:15 2013
    Are you using an SLI configuration, are we dealing with two cards?

    How old is your PSU?
    What is the make and model of your PSU?
    Please fill out this form and post back the results.


    Update your graphics driver:

    Arc said:
    Install the 314.22 WHQL only.


    • Uninstall All nvidia items in Control Panel > Programs and features
      • 3D Vision Control Driver
      • 3D Vision Driver
      • Graphics Driver
      • HD Audio Driver
      • PhysX
      • nvidia Update

      (Are you using nvidia chipset drivers? If so, dont uninstall anything other than those are listed).
    • Now follow Drivers - Clean Left over Files after Uninstalling
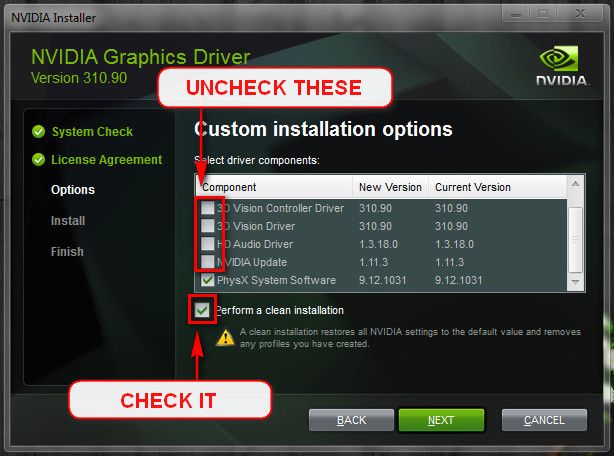
    • Boot normally now. Go to Drivers - Download NVIDIA Drivers, Download 314.22 WHQL. While installing, Select Custom (Advanced) install. In the next page, follow this settings:


    Let us know the results.

    Are you still overclocked?

    Code:
    2: kd> !sysinfo cpuinfo
    [CPU Information]
    ~MHz = REG_DWORD 3611
    Component Information = REG_BINARY 0,0,0,0,0,0,0,0,0,0,0,0,0,0,0,0
    Configuration Data = REG_FULL_RESOURCE_DESCRIPTOR ff,ff,ff,ff,ff,ff,ff,ff,0,0,0,0,0,0,0,0
    Identifier = REG_SZ Intel64 Family 6 Model 26 Stepping 5
    ProcessorNameString = REG_SZ Intel(R) Core(TM) i7 CPU         920  @ 2.67GHz
    Update Signature = REG_BINARY 0,0,0,0,11,0,0,0
    Update Status = REG_DWORD 0
    VendorIdentifier = REG_SZ GenuineIntel
    MSR8B = REG_QWORD 1100000000
    
      Processor may be overclocked!
      Expected Frequency: 2670
      Actual Frequency:     3611
      Overclock Ratio:      1.35
    !If you're revert all overclocked components back to stock!


    Good practice, open up the case and re-seat all types of connection.

    • SATA Cables (HDD/SSD/ODD).
    • SATA-Power.
    • Motherboard 24-pin.
    • Motherboard 4/8-pin (CPU).
    • Re-seat the RAM.
    • Re-seat the GPU.

    Make sure that every slot / cable head is free of dust or other obstruction.
    Make sure that every connection is seating properly and firmly in-place.

    Testing the HDD:

    1. Perform a Disk Check | Disk Check
    2. Then Post the results following | THIS METHOD
    3. Download SeaTools for Windows if you don't want to use a CD to test the HDD you can use YUMI – Multiboot USB Creator to create a bootable USB (instructions are found at the bottom of both pages).
    4. If SeaTools for Windows is unable to recognize your HDD visit HDDdiag and follow the instructions.


    Test for thermals and stability:


    • Download Speccy and post a Screenshot of the summary window, one at idle and another while putting load on the PC using Prime95 for the CPU side and Furmark for the GPU.


    Post back with the results!
      My Computer


  6. Posts : 5
    Windows 7 Home Premium & 64 bit
    Thread Starter
       #6

    I'm not very good with computers so I'm not sure what you are talking about the dump files. I downloaded the Windows 7 diagnostic tool and used the grab all the uploaded the file but I don't understand how to update the dump files. I found the section explaining how to set it up because after searching the computer for "live kernel reports" I found nothing.

    So do I need to set it up for to "create a dump file", "create small memory dump, "create kernel memory dump" or "create complete memory dump"?

    It is a SLI motherboard but I only have 1 video card installed right now. I'm working on the things you asked but you're saying that I should make it so that it's not overclocked anymore and get everything stock? I don't really know how to do that even if I wanted to and frankly would be worried about doing it on my own especially if it's a trial and error and not a full proof 100% fix. I had the computer ordered by Digital Storm computers and paid extra for the overclocking which was guaranteed stable with a 3 year warranty. I ran League of Legends all the time for the first year I owned the computer and then for reasons I stopped playing for 2 years and just recently installed it again. Now since I have tried to start playing it again it has not worked once. Why would the overclocking be a part of the problem?

    Also sorry about the bumping I read on another post by someone that if no one has answered and the problem continues to bump the topic. I won't do it again.
      My Computer


  7. Posts : 3,056
    Windows 10
       #7

    Honestly I don't see how anyone can guaranty the stability of an overclock over an amount of time
    seeing that they can't guaranty that the user will maintain proper cleaning intervals of the PC, plus the integrity
    of the transistors and the VRM on the motherboard / around the GPU.

    I usually insist on dropping back to stock speeds as it has unexpected consequences, but I'll let it be for now
    and wait to see how things develop.

    If you're are experiencing bugchecks only when playing LoL, please check the author's website for patches
    and updates.
      My Computer


  8. Posts : 5
    Windows 7 Home Premium & 64 bit
    Thread Starter
       #8

    As far as the website goes for the game developers I have patched, uninstalled, re-installed, deleted certain files and then patched again and gone through every step by step for the different BSODs that are usually associated with the game but mine is not one that is common apparently. Usually the BSOD in LoL happens before the game starts, upon loading the game, during the character selection and other times and not actually a few minutes after the game has started. That fact and the fact that the BSOD has happened 3 times now while the game wasn't even on leads me to believe that it is an issues with something else. When it happens the error is listed as a video hardware problem.

    If every other solution fails and all that is left is to reset the overclocked then I suppose I'm willing to try that but I imagine it's not a very easy thing to do and therefore does instinctively frighten me bc most of the time I have tried to do my own complicated computer repairs it has ended up creating more problems.

    As far as the dump files I am really interested to see what they have to say so I just need to know which type of dump files do I need to set up for. The small memory dump, kernel memory dump or complete memory dump?
      My Computer


  9. Posts : 3,056
    Windows 10
       #9

    Oops sorry I missed your question the first time around, please set it to create a minidump :) .
      My Computer


  Related Discussions
Our Sites
Site Links
About Us
Windows 7 Forums is an independent web site and has not been authorized, sponsored, or otherwise approved by Microsoft Corporation. "Windows 7" and related materials are trademarks of Microsoft Corp.

© Designer Media Ltd
All times are GMT -5. The time now is 21:01.
Find Us