How To Fix Blurry Text Caused By Using An HDMI Connection Between A PC And HDTV
(NVIDIA Geforce GT 430, Game Ready Driver Version 381.65)
A revision of the method posted by ejk on rhymswithtoaster.com
How to fix NVIDIA blurry or fuzzy screen or text caused by driver installation | Rhymes with Toaster who in turn got his/her info from a post which link now sends you to a bogus microsoft virus alert page so I will not be including the link for that post.
I decided to write this article because it is hard to find anything about actually fixing the verticle ghosting/blurry text when connecting a PC via HDMI to an HDTV. It turns out that there is a workaround for NVIDIA based cards. Keep in mind that after applying the fix you will most likely have to go into your tv's settings and make adjustments there to further sharpen your picture; for example I had to turn off Dynamic Contrast, turn up Noise Reduction, and turn off signal Balancer on my Sanyo to get it all perfectly in focus.
I have only tried this with the Gforce GT 430 running Window 7 64 bit so be advised that if you are wanting to use this method for another NVIDIA card and or OS there will most likely be small differences such as file names and locations of files but the process is most likely the same. Also I lost audio connectivity via HDMI due to this fix so I have to use my audio output from the sound card on my pc to the input on my tv for the DVI/VGA connection. I am currently looking for a fix to this and if I find one I will update this article. I don't know about you but I would rather have a clear screen and worry about an extra cable then have audio and video all in one cable and blurry words on my screen.
Download latest NVIDIA driver then run the installer. After the files extract to your hard drive a nicer looking window will open that says checking system compatibility, wait till it is done then click cancel. You can click cancel at any time but to avoid your computer locking up or bogging down (assuming most people are using older hardware) but be patient.
Download Phoenix EDID Designer 1.3 (201.53KB)
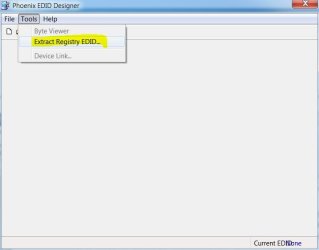
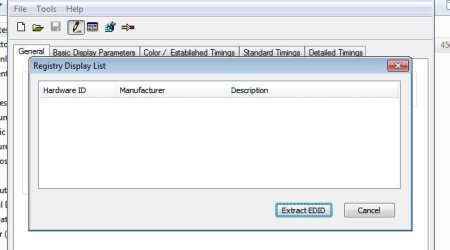
Phoenix EDID Designer - Free Download - Tucows Downloads then run. Click on Tools in the menu bar. Click Extract Registry EDID. If after clicking on the link I provided does not send you to the download page for this program manually type it into your address bar and it should take you right to it.
https://www.sevenforums.com/attachment.php?attachmentid=398073&stc=1&d=1492389095
A window will pop up and in that window first click on your device then click the Extract EDID button.
https://www.sevenforums.com/attachment.php?attachmentid=398074&stc=1&d=1492389095
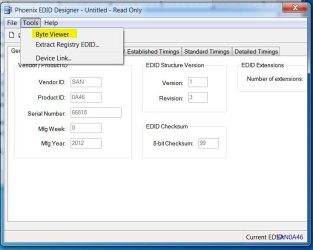
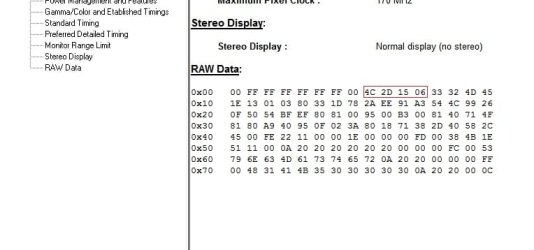
Click on Tools again and this time click Byte Viewer.
https://www.sevenforums.com/attachment.php?attachmentid=398075&stc=1&d=1492389095
A box will pop up that is full of letters and numbers. You want the info from row 00, columns 08 through 0B. As you can see at the time I did this the header did not line up with the columns, remember to double check the header so you do not accidentally grab the wrong info.
https://www.sevenforums.com/attachment.php?attachmentid=398076&stc=1&d=1492389095
Where the X's are below is where the info goes.
HKR,,OverrideEdidFlags0,%REG_BINARY%,XX,XX,XX,XX,00,00,FF,FF,04,00,00,00,7E,01,00
Mine looks like the one below for example.
HKR,,OverrideEdidFlags0,%REG_BINARY%,4C,2E,46,0A,00,00,FF,FF,04,00,00,00,7E,01,00
You will need this to alter a file in the driver install folder that was extracted when the installation tool was run at the beginning of this tutorial.
Now the "fun part", you will need to open Notepad first and you have to do it in a special way elsewise the file you modify will not save or it will save but the installer will throw errors.
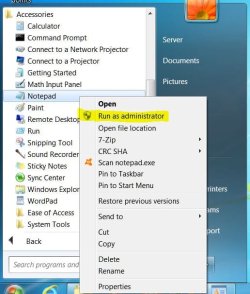
From the Start Menu go to All Programs, Accessories and then right click on Notepad then left click Run As Administrator.
https://www.sevenforums.com/attachment.php?attachmentid=398077&stc=1&d=1492389095
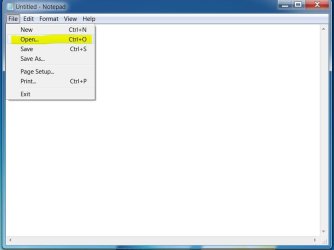
When Notepad opens you will need to click File then Open.
https://www.sevenforums.com/attachment.php?attachmentid=398078&stc=1&d=1492389095
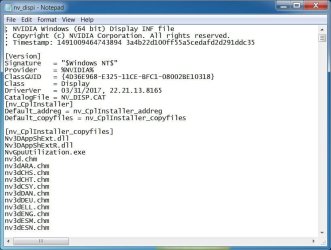
A window will open and now you need to find file. If you allowed the installer to extract the files to the default location this is where you need to find the inf you need to modify. Mine was at C:\NVIDIA\DisplayDriver\381.65\Win8_Win7_64\International\Display.Driver and the inf I needed to modify was nv_dispi.inf. Other names it could be are nv_disp.inf, nv4_disp.inf or nv_disp_win7.inf. There may be other names (mine was not on the list where I got the info to build this article on) but I am not sure. Once you find it open it.
https://www.sevenforums.com/attachment.php?attachmentid=398079&stc=1&d=1492389095
It should look something like this.
https://www.sevenforums.com/attachment.php?attachmentid=398080&stc=1&d=1492389095
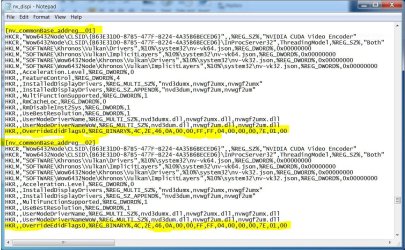
Once it is open you will have to find out where to put the line you created earlier using the EDID info you extracted earlier. This is the fun I was talking about. It might take you a while to look through the file to find the appropriate places. You could try pressing ctrl+f and then typing [nv_commonBase_addreg__01] or one of the variations below (depending on your system) to take you to the area you need to be but you need to have the brackets on the outside of them in the search bar or it may skip over where you need to be.
This is where I put my info,
[nv_commonBase_addreg__01] and [nv_commonBase_addreg__02].
These two areas could be called something different depending on your card, os, driver etc. Other examples are [nv_commonBase_addreg], [nv_SoftwareDeviceSettings] and [nv_SoftwareDeviceSettings_GT2x] There are probably more variations of these titles but they are unknown to me. Once you put the info in its proper places just click File then Save from the drop down menu to save the file in its original location.
https://www.sevenforums.com/attachment.php?attachmentid=398081&stc=1&d=1492389095
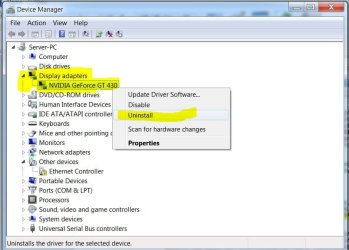
Next you need to uninstall your videocard drivers. Go to the Start Menu and in the search box type in device manager and click on it when it comes up in the search results. Then under Display adapters right click on your graphics card then left click Uninstall and follow the instructions. After it is done installing windows will install a basic driver so the screen will still work, just wait till this is complete then restart if necessary and install the new driver.
https://www.sevenforums.com/attachment.php?attachmentid=398083&stc=1&d=1492389095
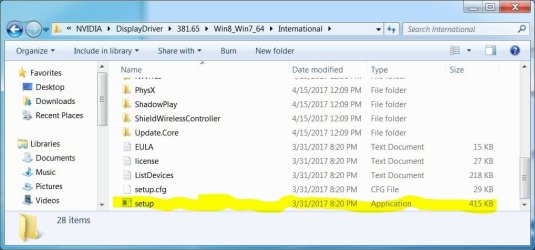
Go to folder where all the files were extracted at the beginning of this tutorial and click on setup and install your newly modified drivers. This is where mine was located.
https://www.sevenforums.com/attachment.php?attachmentid=398082&stc=1&d=1492389095
An error box will pop up eventually saying that the driver signature is bogus or something to that effect but that is due to the inf file you modified so the checksum does not add up. Just ignore this and install anyway. After doing this I have been playing my games, streaming video, reading blogs and doing every thing else I use my computers for and the only issue I have had is the necessity of using an audio cable in conjunction with my HDMI cable. I hope this helps.
A shout out to ejk and their post at
Rhymes with Toaster | Hail to the Concrete Stereos your article got me on the right track. Thanks