Advice on cleaning a Gateway cooler fan.

Page 1 of 3 123 LastLast

  1. Posts : 5,605
    Originally Win 7 Hm Prem x64 Ver 6.1.7600 Build 7601-SP1 | Upgraded to Windows 10 December 14, 2019
       #1

    Advice on cleaning a Gateway cooler fan.


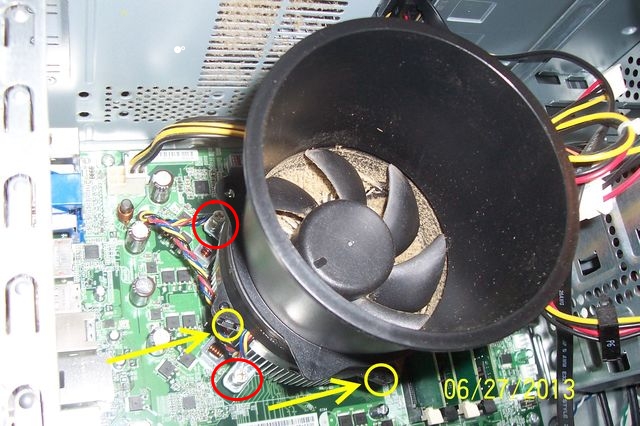
    I was cleaning our machine the other day and I wanted to make sure how the, I'm not sure what to call it, a horn? is removed from the cooler fan inside the case before I go and break it.

    I can see what looks like plastic clips on the fan body that snap into holes on the horn.
    I'm thinking those clips have to be pushed back with a plastic? screwdriver as the horn is maneuvered around the clip(s). There are two more opposite the ones I show in the pix, highlighted by yellow circles and arrows.

    Maybe it would be easier to remove the whole cooling unit and put in some bench time? Highlighted in red are metal spring loaded screws, there are 4 total around the base of the fan that look to be the mounting screws.

    I really don't want to use compressed air, bottled or machine.

    Anyone have suggestions? Know of a link to a "good" service manual?


    See Pix:
    Advice on cleaning a Gateway cooler fan.-100_2769.jpg


    EDIT:
    To see solution: Go to post #27
    Last edited by Anak; 06 Jul 2014 at 06:15. Reason: Added link.
      My Computer


  2. Posts : 1,711
    Win 7 Pro 64-bit 7601
       #2

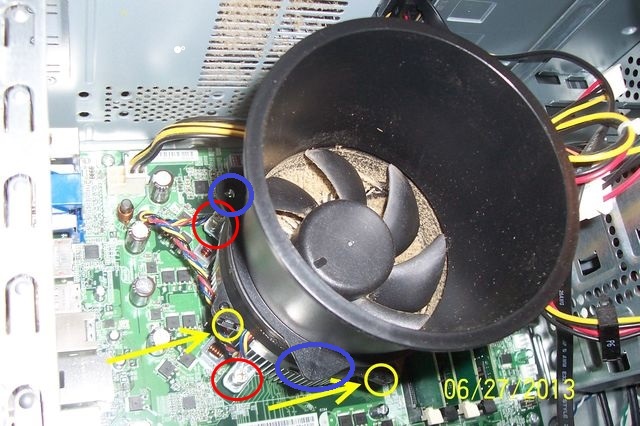
    the ones in red seem to be the ones holding the dissipator bolted to the mobo. If you loose them you will have to reapply thermal paste (not a bad thing to do per-se). But then you will be able to move it ouside the house and then give it a good, through clean with whatever.

    The ones in yellow seem to be the screws that keep the fan bolted to the dissipator.

    The horn seems to be held in place by the stuff I highlighted in blue in the attached image.
    Advice on cleaning a Gateway cooler fan.-100_2769.jpg
    There seems to be a screw in the corner, but the one in the clear does not have any.
    Might just need some pulling like a tupperware's cover to come off. Be careful though and pull from the blue-highlighted parts (and the ones on the other side).
      My Computer


  3. Posts : 11,424
    Windows 7 Ultimate 64
       #3

    Anak,
    Actually you can leave the horn in place while you use compressed air to clean the entire computer. Please hold all fans with a pencil with an eraser tip and if possible please clean all fans in the computer including the PSU fan. I like to take my rig outdoors to perform deep cleaning as the amount of dust trapped can be alarming. I also will use a clean dry paint brush to loosen the dirt and dust to ease the process. I like to start from the intake fans and work my way to the exhaust then after cleaning all the CPU, GPU NB & SB cooling fins, hard drives, fans then I blast the inside of the case for a final clean then I take a very damp clean micro fiber towel and wipe down the outside of the rig and allow the rig to rest and dry for 5-10 minutes then install back into the system. To use only a physical cleaner like a brush with out air would be impossible to remove the dust from the case, use a mask if you are sensitive to dust and blast with air, you can also enlist the vacuum into service as well but if you're outdoors then just blast away.
      My Computer


  4. Posts : 231
    Windows 7 Home Premium x64
       #4

    I agree with Linnemeyerhere, you can use a can of compressed air, and a q-tip for the hard to reach places under the fan.
    Here's a video on how to do it.
    http://www.youtube.com/watch?v=5K02P5I8BsE
      My Computer


  5. Posts : 5,605
    Originally Win 7 Hm Prem x64 Ver 6.1.7600 Build 7601-SP1 | Upgraded to Windows 10 December 14, 2019
    Thread Starter
       #5

    All good suggestion guys, but I have to lean towards linnemeyerhere and Razor505 until I can be absolutely sure if that horn is removable. Looks like I have to get a couple of cans of air.

    I've worked on too many appliances that were engineered to only be assembled, if you tried to take them apart you broke them.
    Try changing a circuit board in a canister vacuum, I didn't break it but that top cover is a bugger to reach the inside clips even with a 22" long screwdriver.

    I'll let you know how I make out, right now I have some chores then its off to our niece's sixth birthday party.
      My Computer


  6. Posts : 11,424
    Windows 7 Ultimate 64
       #6

    Here's and idea open the case panels up and strap it to the roof of the car and then go like heck to the birthday party and back then put the covers back on and install back into the system.
      My Computer


  7. Posts : 5,956
    Win 7 Pro x64, Win 10 Pro x64, Linux Light x86
       #7

    linnemeyerhere said:
    Here's and idea open the case panels up and strap it to the roof of the car and then go like heck to the birthday party and back then put the covers back on and install back into the system.


    Hi Anak

    If you don't want to use Air I would think taking the complete assembly (fan, heatsink and horn) off to clean it may be less hard, and not forgetting new thermal paste.
      My Computer


  8. Posts : 25,847
    Windows 10 Pro. 64/ version 1709 Windows 7 Pro/64
       #8

    No doubt some serious cleaning needs to be done.
    I would do as Stephanie stated. I would remove the complete unit (heat sink, fan, horn) as a unit. At that time you might be able to see how the horn is attached. It would also be a good time to install new thermal compound. The way that radiator looks it has probably been running hot for sometime.
      My Computer


  9. Posts : 13,576
    Windows 10 Pro x64
       #9

    Here we go again
    Last edited by AddRAM; 22 Apr 2015 at 17:52.
      My Computer


  10. Posts : 11,424
    Windows 7 Ultimate 64
       #10

    Is it wrong that I'm getting a little excited?
      My Computer


Page 1 of 3 123 LastLast

  Related Discussions
Our Sites
Site Links
About Us
Windows 7 Forums is an independent web site and has not been authorized, sponsored, or otherwise approved by Microsoft Corporation. "Windows 7" and related materials are trademarks of Microsoft Corp.

© Designer Media Ltd
All times are GMT -5. The time now is 01:57.
Find Us