Recover a Solid State Drive For Use After a Failed Win7 Install Attemp


  1. Posts : 294
    Win 7 Pro 64
       #1

    Recover a Solid State Drive For Use After a Failed Win7 Install Attemp


    A couple of months ago I began the process of upgrading from XP/Pro to Win 7/Pro x64. It's been a 'rocky road' but I'm 'almost there now.'

    I started with the intention of running two 120 Gb SSDs in RAID1 as home for my OS and program files. At every turn I encountered the mantra "RAID is not a backup." Eventually I came to understand why.

    In the process I tried a clean install on one SSD and it failed. I studied harder, asked a lot of questions, and successfully installed on the other.

    This morning I finally physically rearranged the drives on my machine and discovered that if I included the SSD with the failed installation I could not boot. I hit a blue screen that informed me that Windows had encountered a situation dangerous to my system and that it was shutting down (rebooting, really) so I shut down and disconnected the drive.

    How do I recover that drive (reformat it) if I can't boot when it is attached to one of the ports on my motherboard?

    thanks,

    baumgrenze

    Relevant System Specs

    Board: Gigabyte Technology Co., Ltd. GA-EP35-DS3P
    Bus Clock: 266 megahertz
    BIOS: Award Software International, Inc. F6 06/18/2009
    1 x Intel Core 2 Quad Q6600 (2.4 GHz) Quad Core
    1 x CPU Retail Cooler
    1 x Gigabyte GA-P35-DS3P Intel P35 ATX
    2 x Crucial 4GB Kit (2GBx2) DDR2 (PC2-6400) DIMM 240-Pin Desktop Memory Modules CT2KIT25664AA800
    1 x Crucial M550 128GB SATA 2.5" 7mm Internal SSD, CT128M550SSD1 SATA-0
    1 x Crucial M550 128GB SATA 2.5" 7mm Internal SSD, CT128M550SSD1 SATA-11 x Western Digital Caviar 500 GB 7,200 RPM (WDC WD5000AAKS-00A7B0) SATA-2
    1 x Western Digital Caviar 640 GB 7,200 RPM (WDC WD6400AAKS-00E4A0) SATA-3
    1 x Sony Optiarc DVD RW AD-7241S
    1 x Sapphire Radeon HD 3870 PCIe 512 MB Retail

    To be installed as eSATA drives (they are my old OS/Program drives, to be reformatted for other use)
    1 x Western Digital Raptor 74GB 10,000 RPM (WDC WD740ADFD-00NLR5) SATA-4
    1 x Western Digital Raptor 74GB 10,000 RPM (WDC WD740ADFS-00SLR5) SATA-5
      My Computer


  2. Posts : 12,012
    Windows 7 Home Premium SP1, 64-bit
       #2

    Can you boot from a Windows installation disc and get to the first screen where it asks you to choose a language?

    If you can get that far, you should be able to then run Diskpart and wipe and reformat the suspect SSD.
      My Computer


  3. Posts : 294
    Win 7 Pro 64
    Thread Starter
       #3

    Thanks for the prompt reply.

    I installed from an ISO on a USB stick. What I saw when it finally worked is a blur in the past.

    Do you suggest that I shut down, disconnect all but the 'troublesome' disk, and try booting from the USB stick?

    Exactly what instructions do I want followed. I'm concerned that the content on the USB stick will want to prepare the drive to serve as a Win7 boot drive, complete with the special partitioning needed for that purpose.

    Please help me avoid going down the wrong path.

    thanks,

    baumgrenze
      My Computer


  4. Posts : 12,012
    Windows 7 Home Premium SP1, 64-bit
       #4

    See if you can do this:

    Disconnect all drives other than the problem drive

    Boot from your USB Windows installer.

    Hit Shift F10 at the first screen where you are asked to choose a language.

    A command prompt will appear. Type diskpart at that prompt.

    Type in the following commands one by one, followed by the Enter key.

    list disk (to show the ID number of the hard disk to partition, normally Disk 0, but could be Disk 1, Disk 2, etc; with only the single SSD connected, you should see only one drive)

    select disk 0 (change 0 to another number if applicable)

    clean (this wipes the drive of anything on it)

    create partition primary (this will create one primary partition covering the entire drive)

    select partition 1

    format fs=ntfs quick (this formats that partition)

    exit (this quits the diskpart program)

    exit (this closes the command prompt window)

    That should put you back at the language screen on the USB stick. Just cancel out of that and remove the USB drive.

    shut down

    Reconnect your other good SSD drive and reboot.

    The only heavier duty command available in diskpart is "clean all" rather than "clean", but it's not likely you would need to use "clean all".
      My Computer


  5. Posts : 294
    Win 7 Pro 64
    Thread Starter
       #5

    My apologies for being so slow in responding. A man who has been married over 50 years knows when to yield. In part, other activities took precedence to finishing this task quickly.

    I finally got time to follow through. I got part way through the process, but it did not run to completion.

    Here's my report:

    First I found it necessary to change my BIOS from AHCI to 'disabled' or PATA mode to avoid a black screen with a blinking arrow cursor. It also took more time than I anticipated to get each step to execute. I have digital photos of the monitor each step of the way, a sort of "poor-man's screen dump." I'll report what I think is useful below.

    I managed to 'select disk 0 and to enter the command 'clean.'

    Given enough time, DiskPart reported: "DiskPart has encountered an error: The request could not be performed because of an I/O device error..

    See the System Event Log for more information.

    My guess is that this log may prove hard to open. Is there any chance that DiskPart wrote it to the USB stick? If not, it was probably written to 'the ether.'

    Should I go back and try "clean all?"

    Since my old OS/Program disks are still intact, I also have the option of booting from one of them in 'disabled' or PATA mode. Each time I've done that the session was 'flakier' than the one before. I do have a copy of Partition Magic 8 that I used to format the SSDs to NTFS.

    I've also kept a floppy drive on my system. I rescued it from an old Dell. I've not used it in eons, but I guess I could create a 'rescue disk' if I were pointed to the proper instructions. Somehow I think it ought to load faster than the Win7 install ISO on the USB stick which must deal with the whole Win7 OS. Is it otherwise possible to create a much simpler USB stick with just the files needed to open a command prompt do the disk cleaning and repartitioning.

    What do you recommend I should try next?

    thanks,

    baumgrenze
      My Computer


  6. Posts : 294
    Win 7 Pro 64
    Thread Starter
       #6

    This issue is still unresolved. I tried 'clean all' with the same I/O error message. I tried 'recover' which executed very quickly, followed by clean, as well but it also failed. I tried "Repair" while exiting the install routine. It failed. I sent a 'log' to MS. I photographed the "Startup Repair" report. It does not look very helpful.

    Problem Event Name: StartupRepairOffline
    Problem Signature 01: 0.0.0.0
    Problem Signature 02: 0.0.0.0
    Problem Signature 03: unknown
    Problem Signature 04: 0
    Problem Signature 05: unknown
    Problem Signature 06: 1
    Problem Signature 07: unknown
    OS Version: 6.1.7601.2.1.0.256.1
    Locale ID: 1033

    Once I was rebooted in Win7, I checked the USB stick for any recently written 'log files' and found nothing I could access. There was a 'system hidden' pagefile that was written today. I could turn off the attributes in ZTree and 'view' it to see if there is any readable text.

    I tried, and I can no longer boot to XP on my old system disk. The boot goes into a loop at the "verifying DMI pool data" prompt during the boot process. This happens even when the mode is set to 'disabled' or PATA.

    I recently bought a Thermaltake BlacXDuet eSATA bay. I could unmount the SSD from its cradle and mount it in the eSATA bay. That would allow me to boot and then explore the drive using ZTree or Windows Explorer.

    Does anyone have any further approaches?

    Thanks

    baumgrenze
      My Computer


  7. Posts : 1,045
    Win8/8.1,Win7-U64, Vista U64, uncounted Linux distor's
       #7

    Download Partedmagic and install on disk or usb stick.
    Reboot and enter PartedMagic.
    Start Menu-->System Tools--> Erase Disk
    Select Internal: Secure Erase and hit Continue.
    Your drive may be locked, but PartedMagic gives you an option to enter sleep mode to unlock your drive. Say yes and your computer will sleep.
    Hit the power button to wake your computer and re-run Erase Disk. It should work now. If offered an option to Secure Erase, accept it.Takes about 2min to complete.
      My Computer


  8. Posts : 294
    Win 7 Pro 64
    Thread Starter
       #8

    Thank you for the reply madcratebuilder

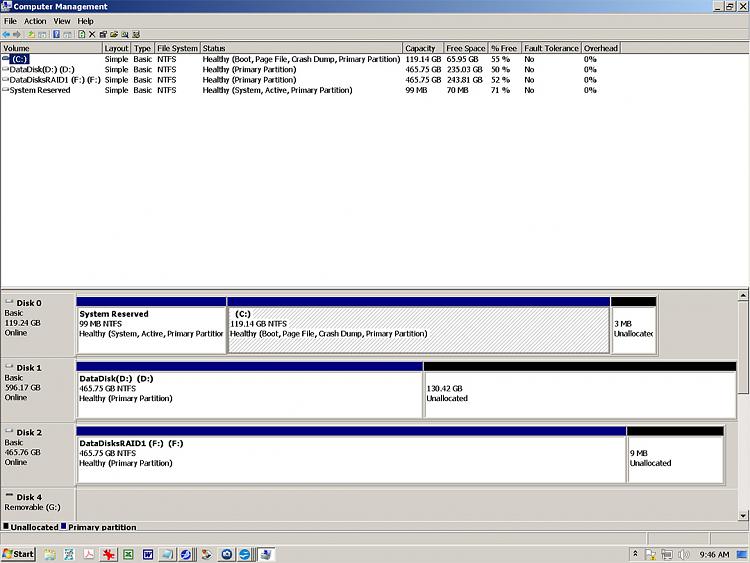
    Just to be sure, here is a Disk Management Screen from earlier today:

    Recover a Solid State Drive For Use After a Failed Win7 Install Attemp-diskmanagementscreen052214.jpg

    The drive is currently mounted as an eSATA device. Should I remount it so that it is directly connected to one of the MOBO SATA ports, best perhaps if Port0?

    Do I understand correctly, I download and install the PartedMagic on a CD? If I boot from it, I will be operating in a Linux environment (a strange place for me to be) to run PartedMagic

    Do I set the BIOS to boot from CD and disable all other options?

    Do I perhaps need to change the Mode from AHCI to PATA so that Partedmagic can see the disk?

    Is it true that PartedMagic can deal with this drive in its current state while Windows 7 DiskPart cannot? I can believe this as all to frequently the tools supplied by Microsoft are less than robust.

    Why is it that Windows Explorer, TreeSizeFree, and ZTree cannot find this drive?

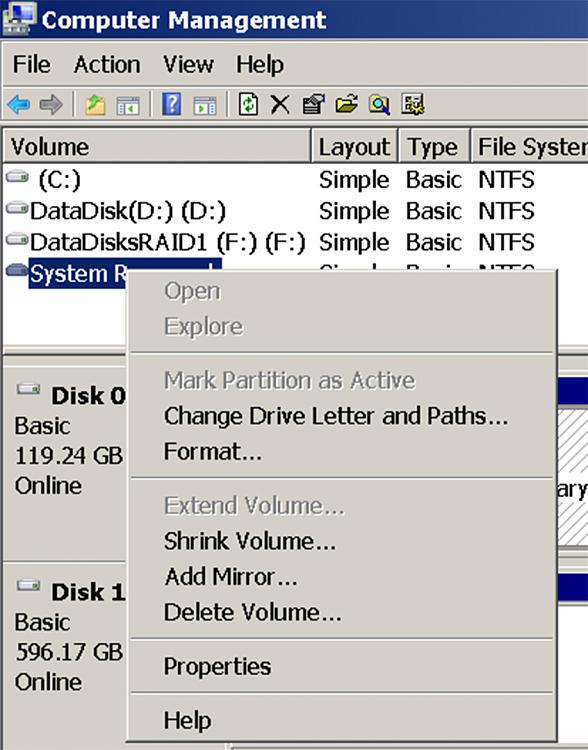
    I added a second, detailed look at the options for this System Reserved disk. It shows the options of Delete Volume and Format. Would trying these lead to the same frustration I encountered yesterday with DiskPart?

    Recover a Solid State Drive For Use After a Failed Win7 Install Attemp-diskmanagementscreen052214_detail.jpg

    Thanks,

    baumgrenze
      My Computer


  9. Posts : 294
    Win 7 Pro 64
    Thread Starter
       #9

    Frustrated Trying to Follow Suggestions


    madcratebuilder said:
    Download Partedmagic and install on disk or usb stick.
    Reboot and enter PartedMagic.
    Start Menu-->System Tools--> Erase Disk
    Select Internal: Secure Erase and hit Continue.
    Your drive may be locked, but PartedMagic gives you an option to enter sleep mode to unlock your drive. Say yes and your computer will sleep.
    Hit the power button to wake your computer and re-run Erase Disk. It should work now. If offered an option to Secure Erase, accept it.Takes about 2min to complete.
    I am very new to Win7 x64 and I am LOST.

    I downloaded PartedMagic. After over an hour of downloading I have 'pmagix_pxe-2014-04-28.tar.gz'

    I searched and downloaded 7-Zip as a recommended tool for unpacking the file.

    If I attempt to open the file from File Manager, Windows says it is a 7-Zip file but insists it should be opened with Acrobat Professional 8. Why is way beyond my skill level. I respond saying that I want to use alternatives and it presents some icons for other unrelated programs. I select 'browse' and I still do not find 7-Zip as an alternative. I searched in "Program Files" and it does not find the program. I tracked down its installation path and find this. Is it where it should be found as an alternative application to be used? I allowed the Wizard to install using the defaults.

    C:\ProgramData\Microsoft\Windows\Start Menu\Programs


    I tried dragging the tar.gz file to an open copy of 7-Zip and all it wants to do is to further compress it.


    Please tell me what I need to do to be able to run "PartedMagic."


    thanks


    baumgrenze
      My Computer


  10. Posts : 294
    Win 7 Pro 64
    Thread Starter
       #10

    I worked for a few more hours and finally got Win7 to associate 7-Zip with *.tar.gz files. I'm not sure I could repeat the process without some more trial-and-error.

    I opened 7-Zip and found the file:

    pmagic_pxe_2014_04_28.tar.gz

    I selected it and then selected extract. That gave me the file

    pmagic_pxe_2014_04_28.tar

    I repeated the process extract and I have this window in 7-Zip

    Is this what I burn to the CD or DVD to run PartedMagic?

    Honestly, I don't know where to find the files when I start up my system again tomorrow morning.

    Thanks,

    baumgrenze
    Attached Thumbnails Attached Thumbnails Recover a Solid State Drive For Use After a Failed Win7 Install Attemp-pmagicextractionscreen_2.jpg  
      My Computer


  Related Discussions
Our Sites
Site Links
About Us
Windows 7 Forums is an independent web site and has not been authorized, sponsored, or otherwise approved by Microsoft Corporation. "Windows 7" and related materials are trademarks of Microsoft Corp.

© Designer Media Ltd
All times are GMT -5. The time now is 23:50.
Find Us