
New
#21
SSD hard drive, deleted and quick formatted volumes
-
-
New #22
OK, that I found is acceptable. I deleted the two partitions ( the second and third) I recovered on my HDD and then quick formatted it. ( Can't recover the first partition for the simple reason the quickformat deletes the partition tables present in sector 0, writes a new partition table encompassing the whole drive, and overwrites the volume boot record on sector 2048 with a new volume boot record. That is all it does. It does not touch any other sector including the original volume boot record at the start sector of the second partition and the third partition, That is why partition Recovery Wizard could recover the two partitions and restore it as it was before and I could see all data in those partitions. In your case PRW could not find those volume boot sectors.)
I then ran the Partition Recovery Wizard with the specified range 3000 to 410000 sectors. While it didn't find any volume boot record in that range - the second partition boot record in my case is at sector 442144768 (screenshot @ post #10) - it did show the first partition volume bootsector as at 2048. So it appears to be the normal behaviour.
OK, let me find out whether any data is present at all. I will run PhotoRec on my trial drive and then give you a step by step process to do it.( In my case it will definitely find all the data since I know it is all there already after partition recovery. I will be doing it only to write the steps so that you can execute it.
In the meanwhile you can read this thread on how to use Photorec. Guide to using PhotoRec recovery software.
PhotoRec does not write anything to the drive under recovery and so you may use it without any fear. But be aware that Photorec carves out files in the absence of a filesystem and so you will only get a bunch files without any folder structure and original file names.. You will find photorec_win.exe in the TestDisk-7.0 folder
You can run it and check how it goes.
My steps will only come by tomorrow this time. (I have a slow computer and takes a lot of time to scan )
Do Not format your 250 GB SSD again. You had already quick formatted it. ( I formatted the drive in that thread only to show how one can get back the data even after formatting using PhotoRec)Last edited by jumanji; 20 Sep 2016 at 05:15.
-
New #23
By default PhotoRec will save the files to a folder recup_dir.1 in the TestDisk-7.0 folder.
It would be better if you create a folder named Recovery in another external drive with adequate space. Keep this external drive plugged in before you start photorec_win.exe. When it asks you for the destination drive where files are to be copied, navigate to this external drive folder Recovery and then copy into it.
-
New #24
First read my previous two posts.
Here are the steps to run PhotoRec. Please disconnect all external drives and plugin only your Destination external drive where you have created a folder named Recovery.
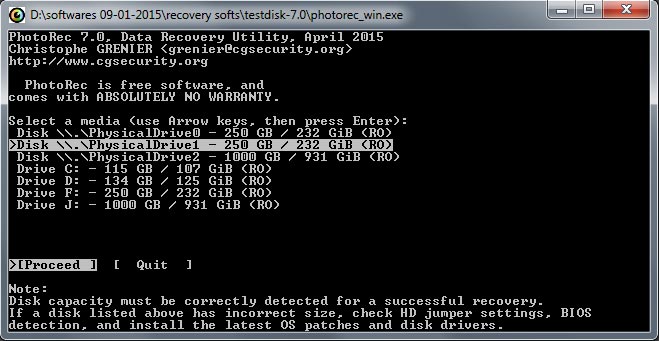
1. The first screen would show your system disk, your 250 GB SSD and your Destination disk. The partitions in your system disk, the single partition in your 250GB SSD and the partition/s on your destination external disk will be indicated by their drive letters.
Select your 250 GB SSD disk ( Select Disk , not drive; drive is the partition in it. You are working in DOS)
Also note the drive letter of your external destination disk. ( You will require this drive letter to navigate to it to copy the files)
[Proceed] is highlighted. Press Enter key
I shall take a break here and continue after another half an hour. Have to have my coffee to refresh.Last edited by jumanji; 20 Sep 2016 at 05:19.
-
New #25
Continuing ... ( I want to finish it before I go to bed so that I can sleep peacefully :))
2. The second screen will show the current single partition in your 250GB SSD highlighted. [Search] command is highlighted. Press Enter.
3."Other" is highlighted. ( If not, using the Up/Down arrow keys highlight it.) Press Enter
4. With Down arrow key select (highlight) " Whole" to search the whole disk and press Enter.
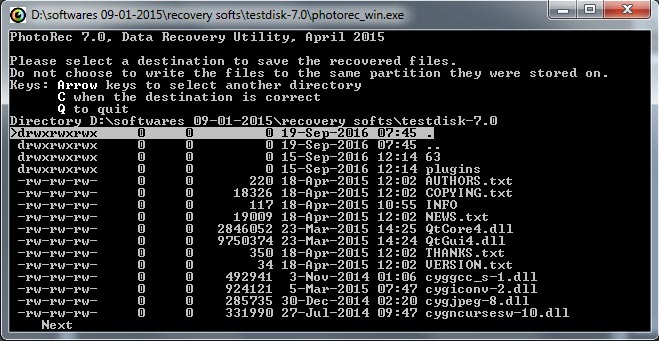
5. Here by default the testdisk folder will be shown as the destination. Press the left arrow key ( if necessary repeatedly) to show all the drives.
6. With the Up/down arrow keys select the destination drive letter you had noted in screen 1. Press Enter
7. You have arrived at your destination. Make sure you have arrived at
Directory <drive letter: >\Recovery ( You may also see my post here on copying files - screenshot seven onwards: https://www.sevenforums.com/hardware-devices/286181-my-external-hard-drive-suddenly-became-unllocated-3.html#post2395385 )
Press C
Copying the files starts.
Note: We have already found that the Volume Boot records of the Second and third partitions have been wiped out. That shouldn't happen with a quick format. Neither will it wipe out the data. This is an attempt to see whether the data exists. If the data also has been wiped out, there will be no files to copy.
But sometimes PhotoRec also may fail to find the data even if it exists in which case the author recommends the commercial software Getdataback. We shall run the free demo version and check whether it shows your data.
In case PhotoRec and also Getdataback do not find any data, we can also use a sector Editor ( I use bootice) to roll through all the sectors in the SSD to find whether it is really populated with data or it has been wiped out..
Anyway let us hope for the best.Last edited by jumanji; 19 Sep 2016 at 14:43.
-
New #26
Hi dear Jumanji
first of all thank you for your effort.
I did all steps as you've written, but at the destination folder selecting i can't see my destination external hard drive. Also right or left arrow key's are moving inside my D drive.
I attached the step by steps screenshots to see if i've done anything wrong.
regards


-
New #27
-
New #28
and finally the result: nothing found
it created an xml file that i'll attache to this post.

report.rar
-
New #29
You have misfired :). ( Perhaps my instructions were not very clear.) Not to worry.
In the second screenshot you put, you should not select the No partition line. By default the second line which reads "1 * HPFS - NTFS 0 32 33......." would have been highlighted. If not highlighted by default, press the down arrow key to highlight that second line which shows the single partition and press enter to [Search]
{"2. The second screen will show the current single partition in your 250GB SSD highlighted. [Search] command is highlighted. Press Enter."}
Then
"3."Other" is highlighted. ( If not, using the Up/Down arrow keys highlight it.) Press Enter
4. With Down arrow key select (highlight) " Whole" to search the whole disk and press Enter."
Perhaps I should have put the whole sequence in screenshots but I didn't have the time and patience to do it. May be I know pretty well that even if you make mistakes, it is not going to affect anything. :)
When you come to the last screen showing the default destination TestDisk folder, press the left arrow key which will take you one level above. If it does not show all your drives press the left arrow key once again. If needed repeat this till the screen shows all your drives. Then select drive J: That was the partition in your 1TB destination drive as shown in the first screenshot. ( When you rerun PhotoRec, please note the drive letter of your 1TB destination drive. It can be different)
Anyway see what happens in the current run. If it does not find any of your files, rerun PhotoRec adhering the above instructions. ( As I see it may take 10 hours but if it is seeing any files you should be getting to know how many files it has recovered. If you want you can stop it, close it and then run it again.
If PhotoRec asks whether it should continue from where it left say no and it will start from the beginning.
Edit: As I see it hasn't found any files. Rerun PhotoRec as per the instructions above.
-


 Quote
Quote


Related Discussions