
New
#11
Yes, it can. As was mentioned it is through the creation of a CUE file, which results in CD-TEXT written to the burned CD. And then the result will be playable by ordinary mechanical CD players (or computer software CD players) that move automatically from one track to the next. With the CD-TEXT written to the CD most players (including your car's CD player/screen, if you have one) will present that text (instead of going to the Internet for FreeDB, GraceNote, etc., to obtain info for commercial retail CD's).
The technique to use IMGBurn for creating audio CD's is more than just a single-click, and is well documented on various YouTube videos, but these go pretty quickly and you'll probably want to write things down. I'll present what actually is the approach, below, including pictures.
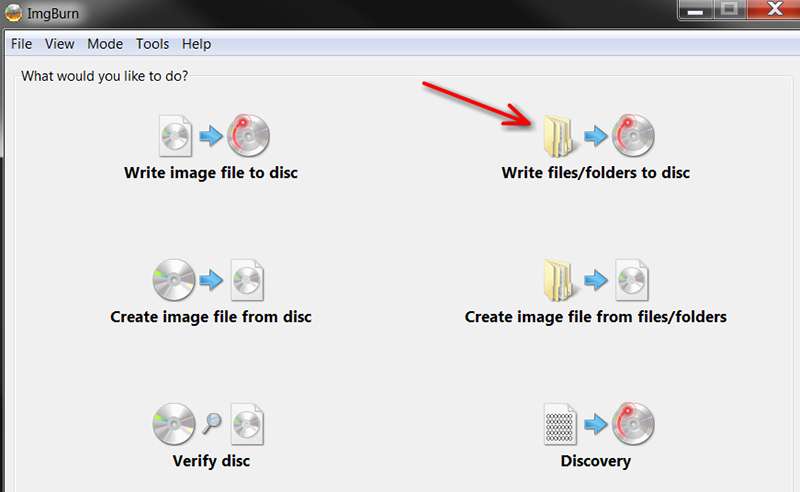
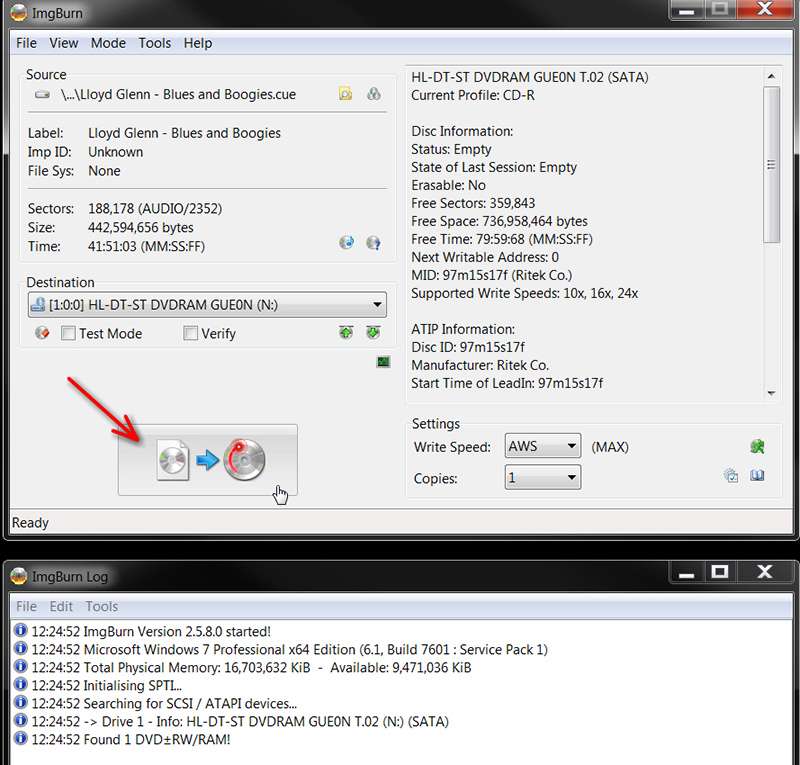
(1) Open IMGBurn, to see two windows (upper and lower). Push the "write files/folders to disk" button, upper-right in the upper window.
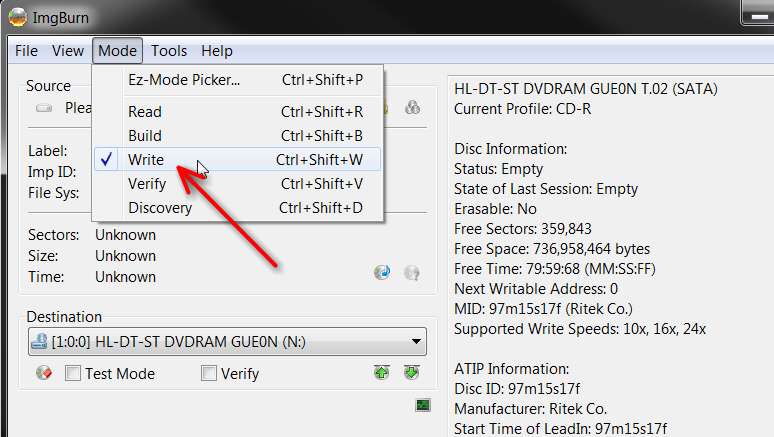
(2) From the Menu bar of the next screen presented, select Mode -> Write.
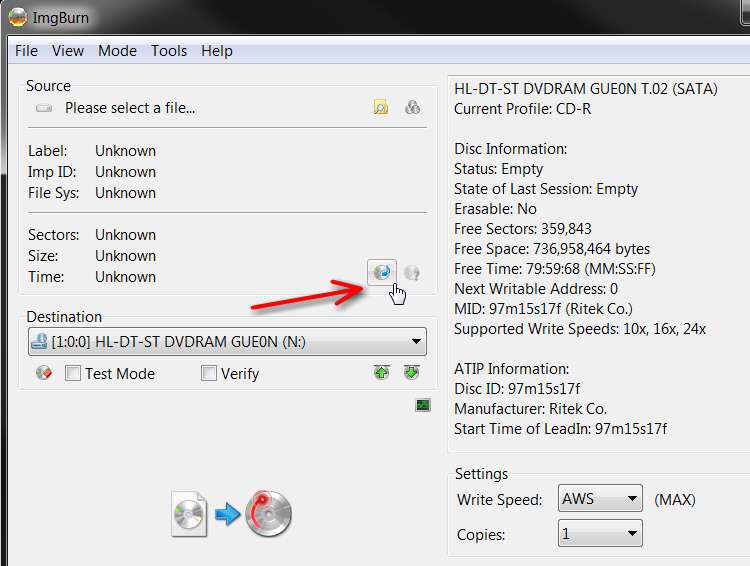
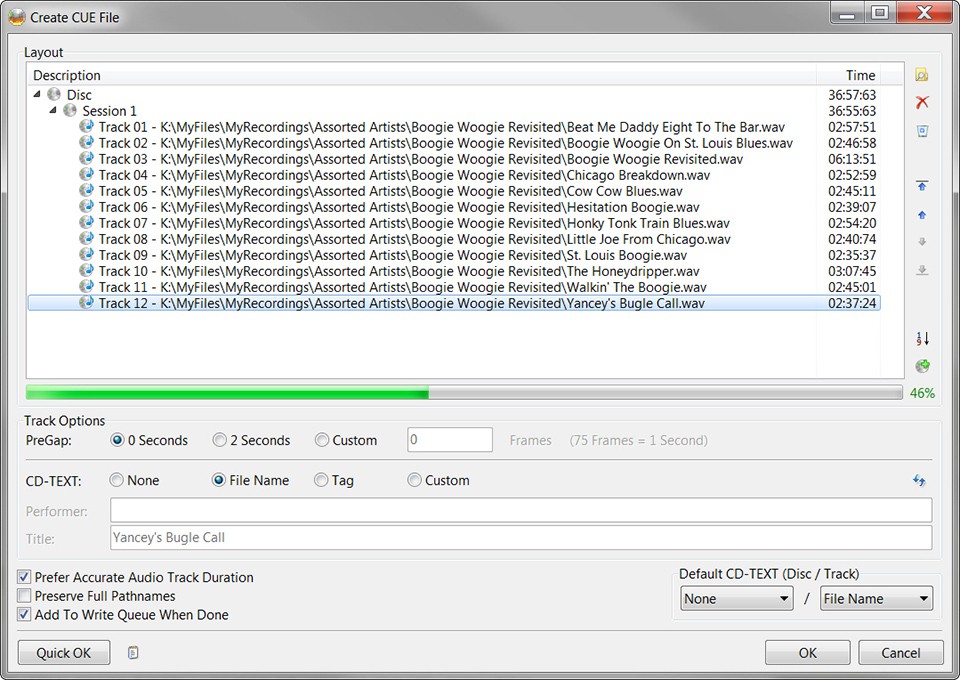
(3) On the next screen presented, push the "create CUE file" button
(4) On the next screen presented, push the "browse for a file..." button, to trigger an OPEN dialog window where you will be able to navigate to a filder and select one or more WAV files to be added to the CUE file under construction
Note that on this screen you should change "none" to "file name" for the track name option from the drop-down list in the "Default CD-TEXT (Disc/Track)" area. This will result in the WAV file name being used (by default, to pre-populate the area, which you can sitll change if you want to) the track name in the CUE file being constructed.
(5) From the OPEN dialog that results, select the one or more WAV files you want to pick from that folder for including into the CUE file being constructed. Note that the dialog will probably show the WAV files in alphabetical order (unless you've named the WAV files to have a numeric track number at the front). No matter what this initial assembly of WAV files is, you can still later rearrange them using IMGBurn into whatever order you want (e.g. track sequence, like the original CD, but without a numeric track number in the front of each track name so that it looks just like the original true retail CD).
(6) When you've pushed the Open button (on the OPEN navigation/selection dialog window) the one or more selected WAV files will be added to the list of files in the CUE file being constructed. You can continue adding additional WAV files by repeating step (5) and navigating/selecting as many times as you want. Each newly selected file(s) will be appended to the CUE list under construction, in whatever order you added them. Again, you will next be able to rearrange things to produce your desired track sequence in the burned CD.
(7) You will now proceed to modify the default pre-populated CUE file fields. First, select the "Disc" line at the top, in order to enter the Album Artist (i.e. "Performer") and Album Title (i.e. "Title") down below, after pushing the "Custom" button which will open up those data entry fields. Note that whatever you type in (for this instructions and subsequent ones) is automatically absorbed by IMGBurn. There is no need to press ENTER or push an OK button (until you're really done with all your customizations, since OK will terminate this CUE file customization process and move on to the next step... which you don't want to really do until you're really finished customizing.
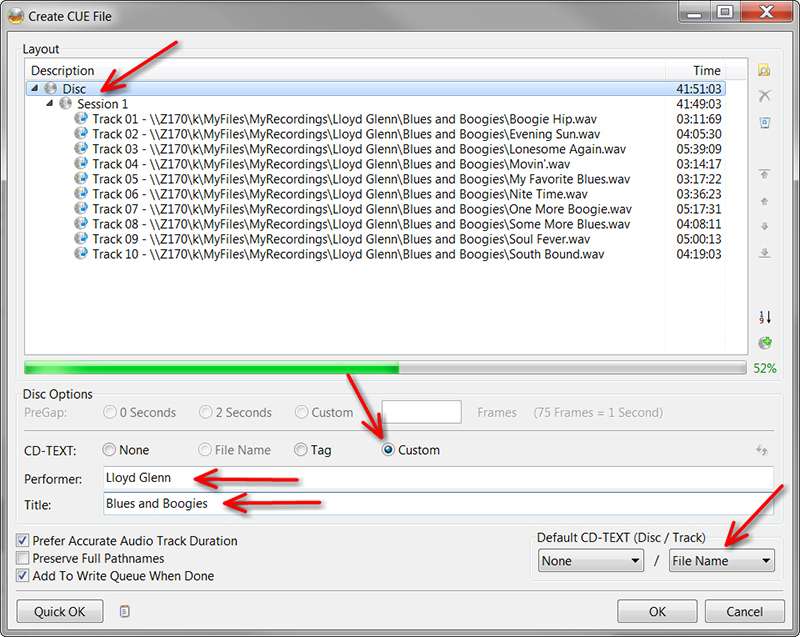
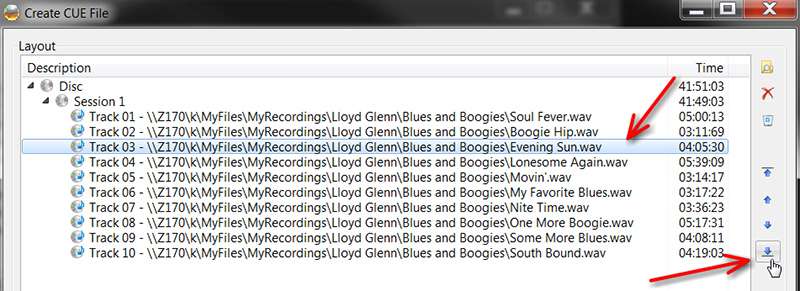
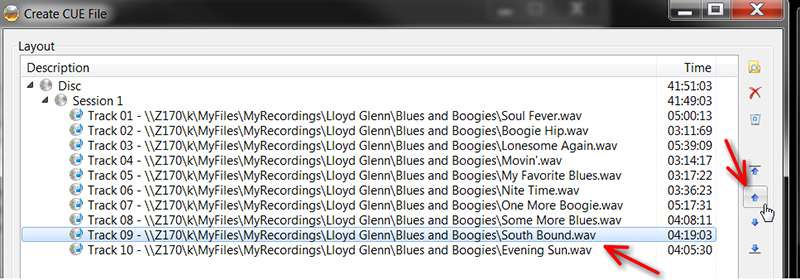
(8) Now you're going to select each track, one by one, to accomplish several objectives. You're going to rearrange them into the track order you want, using the UP/DOWN/TOP/BOTTOM buttons over on the right. As you select each track since you set "File Name" as the default track title, the WAV file name will be pre-populated into the "Title" field (which will also be grayed-out and unmodifiable sine the "File Name" radio button will also be pre-checked by default).
I usually start by selecting what I want to be the FIRST track, and push the "Top" button to immediately move it to position "Track 01".
Note that if you want to change this file name or add a specific Performer (e.g. if you are creating a compilation CD, with unique artists for each track), push the "Custom" radio button which will open up both Performer and Title fields which you can then change as you like.
(9) I then usually select the track I want to be the LAST track, and push the "Bottom" button to immediately move it to the very bottom of the track list.
(10) Now you will continue rearranging tracks (and customizing title/performer if required) by selecting tracks and moving up or down through the UP and DOWN buttons on the right.
(11) Eventually you will now have your desired track sequence properly and completely arranged. Only now should you push the OK button to indicate you're finished building your CUE file that describes the precise track sequence (and CD-TEXT contents) you are going to burn.
NOTE 1: IMGBurn has a major deficiency in that you cannot use IMGBurn to "edit" an existing CUE file you've previously built (using IMGBurn itself, or edited with Notepad, etc.). So you need to proceed from the previous step only when you are truly finished. I'm not sure you can even re-use a previously created CUE file to re-write the audio CD again and again. Major deficiency.
NOTE 2: If you plan to burn multiple copies of the same CD, you should instead create an ISO output rather than writing the folder/files to CD. Use the "Create image file from files/folders" button on the initial screen. This can still be an audio CD image, but you will be creating an ISO file from which you can then just burn the ISO to CD (using the "Write image file to disc" button on the initial screen). That way you can produce as many CD duplicates as you want without having to recreate the audio CD CUE file for each one.
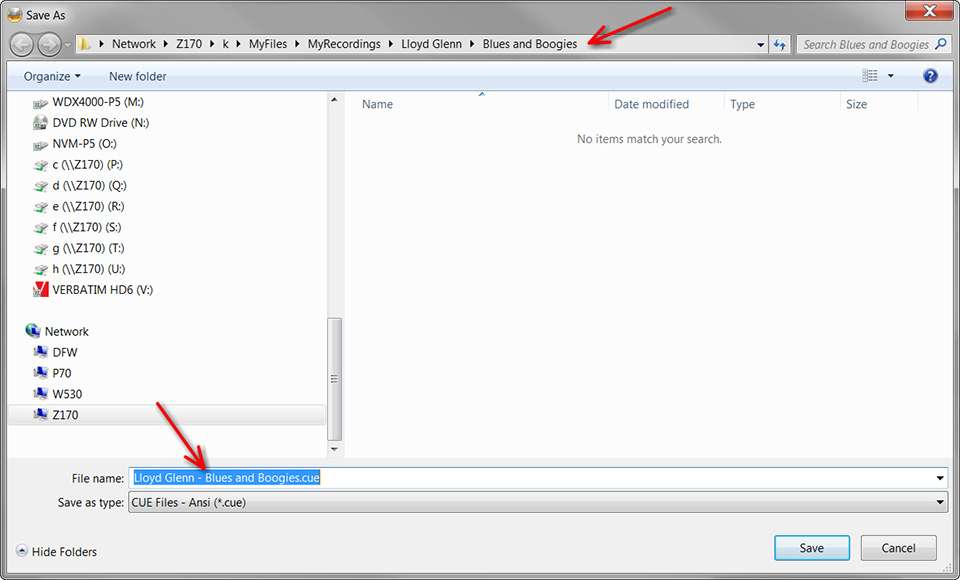
(12) After you push the OK button you will get a SAVE AS... dialog, allowing you to save the CUE file just constructed. By default the CUE file name will be a concatenation of album artist and album title (with a .CUE extension). And by default the folder pre-selected will be the last (or only) folder you browsed into to select WAV files from. This is typically fine, and you can just push the SAVE button to perform saving the CUE file which IMGBurn will next use to actually control the audio CD burning itself.
(13) You will now be brought back to the screen allowing you to push the BURN TO CD button
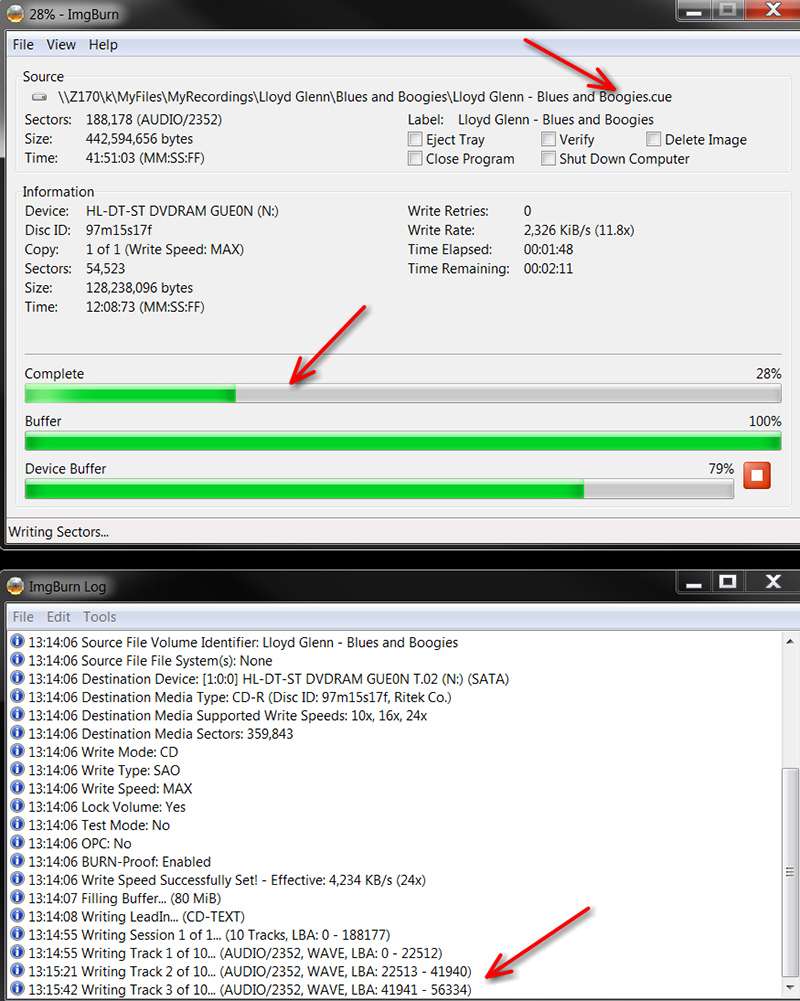
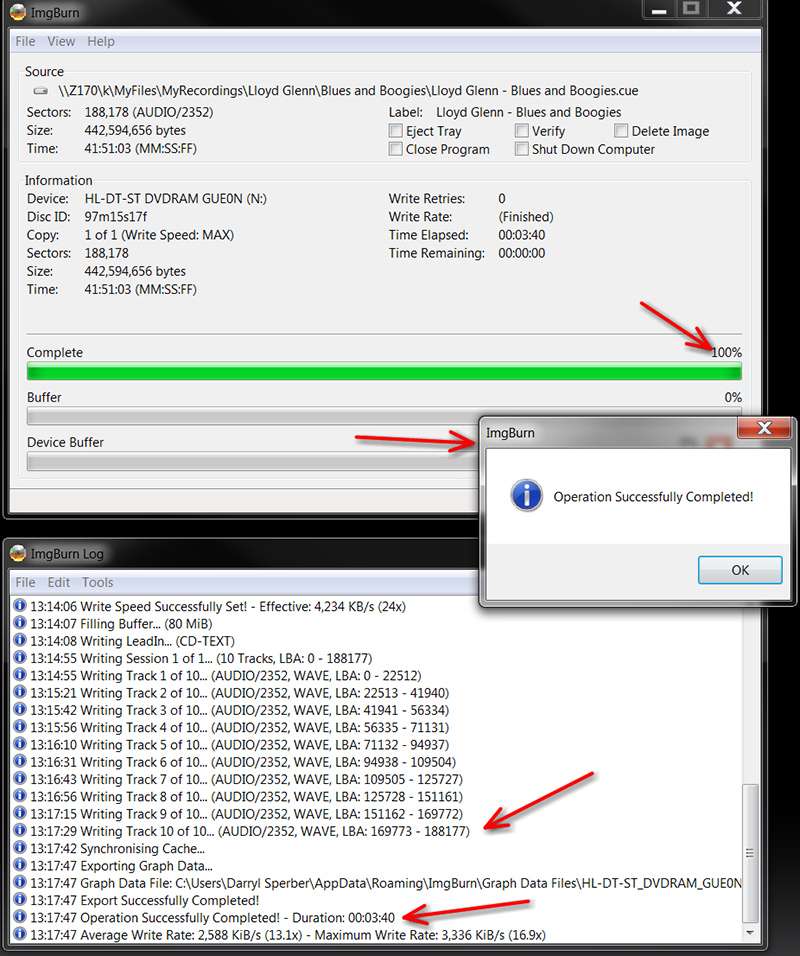
(14) IMGBurn will now begin the writing process, first formatting the "lead-in" data, then writing the individual tracks one at a time, and then finally closing out the session.
(15) The resulting CD, when played by software/hardware that is CD-TEXT aware, will present the information from the CUE file.
(16) The CUE file itself can be reviewed and edited with Notepad. Note that the CD-TEXT format will be slightly different depending on whether the CD represents a collection of tracks all by a single-artist or a compilation CD with tracks by assorted artists.
Note that CUE file format is rather "primitive" as it was invented and implemented a long time ago. It really has never been upgraded and modernized to reflect all of the other metadata fields now supported by ID3 tags associated with modern digital audio file formats (e.g. for MP3, FLAC, etc.) and which are supported by cloud-based services like FreeDB and GraceNote. So unfortunately there is no way to provide things like Year, Genre, etc. In fact mechanical players may not even display the "track artist" field properly when you've built a "compilation" CD.
Anyway, at least you can create an audio CD that plays properly.


 Quote
Quote