
New
#1
System Reserved : Create for Dual Boot
I have now created this as an actual tutorial that can be viewed at this link below.
This is what I started with, I'm going to use the free, bootable Partition Wizard CD to shrink the C:\Vista partition to create a partition for the Windows 7 "System Reserved" and a partition to install Windows 7 to ahead (to the left) of the C:\Vista partition.Note
This method goes with this tutorial at the link below but it was too much for the main body of the tutorial as it made the entire work, as a whole too long and involved a process to follow easily.
Dual Boot : Create Partitions Using PWBD
click any image to enlarge1) Boot the PWBD and right click the partition you want to shrink and click "Move/Resize" do not try to shrink an existing Windows Operating System (OS) smaller than its actual, current size as viewed by clicking the Computer button in the Windows start menu.
2) In the dialog box that opens, click and hold to drag the left slider to the size you want to shrink the C: partition.
3) Then in the left pane "Operation Pending" column click Apply and then Yes for the "Apply Changes" conformation dialog box.
4) You will get a Pending dialog box, just relax and let it work; it may take a while depending on your current partition structure.
5) You Must restart the PC after the shrink has completed so the existing OS can accept the changes to the partition structure and it will require a restart that you must do to complete the process.
Remove the PWBD and at the upper left corner at "General" click exit to restart the PC, it would be a good idea to do a couple restarts to let the OS accept the changes without issues.
We're going to do several steps all together so read through this section before you start so you will see the easiest way to go, they can be done as single steps but this is easier and quicker.
6) Boot back to Partition Wizard and right click the new unallocated space and click create.
7) Now click and hold to drag the left slider to create space for the "System Reserved" partition, PW is kind'a screwy here and you will get more space than you create so don't take too much time trying to get the sizes to match as I have in the past, just create as small a space as you can and accept the size you get, more is better anyway.
Just be sure to make it a Primary partition as PW defaults to logical, a Label here is not necessary as you will add the labels in the next step.
Don't be concerned with drive letters as the OS will give them letters when you boot back to let the OS accept these new changes, though they will have to be removed before the Windows 7 install.
8) Now do the same to create the SysResv, making sure that it's created as a Primary partition as Windows will not boot / is not able to boot from an "Extended/Logical" partition and the SysResv will be the partition where the boot files will be created for the dual boot.
If you are short on Primary partitions you could create the Windows 7 partition as a Logical for the install and then when/if you remove the existing Windows (Vista?) install you could use the PWBD to convert it to a primary at a later time.
9) Now both partitions have to be formatted to finish this part of the process; right click each in turn and click Format.
10) Then in the dialog box that opens for each give them a label; it is suggested you label the SysResv partition as System Reserved so the installer will recognize it without issue.
11) Now at the left pane Operations Pending column click Apply, then Yes for the conformation dialog box to finish creating/formatting the partitions; the snip below is what you will have.
Now boot back into the OS so it can accept these new changes to the partition structure and to make sure all is well, I suggest you restart the OS a couple times just to make sure.
You also need to remove the drive letters and mark the SysResv partition as "Active" so the boot files will be created there; I'll cover that briefly below.
12) Now back in Windows disk management, right click both partitions in turn and remove the drive letters, this will just cause less confusion for the installer; also it is best if the SysResv partition has no letter so that files/data can't be saved there accidentally.
13) Now right click the SysResv partition and click "Mark Partition as Active" and click yes for the conformation dialog box; the third snip down is what you will have when finished.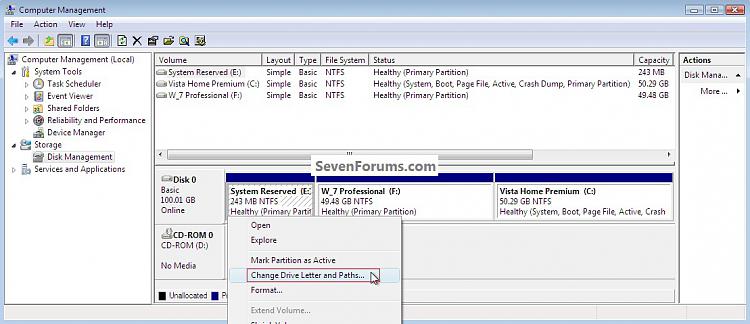
Note to XP users: Windows XP must be left as the "System, Active" partition for the install of Windows 7, if not you will have to use EasyBCD to first, repair the XP boot files, then you will have to run startup repairs to Windows 7 to get it booting again, then add an entry for XP for it to be added to the Windows (dual boot) boot menu; it is possible to accomplish though it's a lot of work.
14) Now insert the Windows install media into the Optical Disk Drive (ODD) and restart the PC to set the first boot device as the ODD in the BIOS and install Windows 7 to the created partition.
I suggest you use the installer to format both partitions during the installation to avoid any potential file system errors; click Drive Options (advanced) at this dialog box; don't change anything else though.
15) Here it is!
16) One last step to get back to Vista, an entry will have to be added to the Windows (dual boot) boot menu using EasyBCD from within Windows 7 but that's the easiest part of this process.


Last edited by Bare Foot Kid; 07 Nov 2010 at 07:04.

 Quote
Quote