Moving "System Reserved" partition

Page 2 of 3 FirstFirst 123 LastLast

  1. Posts : 7
    Windows 7 Home Premium 64bit
    Thread Starter
       #11

    Thanks mjf - hopefully I won't be needing that now but useful for anyone else who finds themselves in the same situation. Similarly in response to gregrocker in case it helps someone else (I'm happy with it now)...

    gregrocker said:
    The registry edit workaround to get it to accept Upgrade key after install to a clean HD is quite easy and fully legit: Clean Install with a Upgrade Windows 7 Version
    I looked at the post but my installation process seemed to differ, or I misread the post or terminology. I wasn't able to get into windows doing a vanilla install (ie just a blank hdd in the machine). I was asked for the product key during the install and irrespective of whether I selected validate now or later it wouldn't go further with the key (so I couldn't get into windows to adjust the registry). I could only get beyond entering the key if I booted with a disk connected that had a windows installation, then my best option was to install onto the second (blank) HDD which is what I did.

    gregrocker said:
    It seems you went to a lot of trouble to try to construct the 100mb SysReserved partition for your reinstall. Did you mark it Active before running Startup Repair from the booted DVD Repair console/Repair CD 3 full times with reboots, with all other HD's unplugged? This will normally construct it.
    Yes, I had to set it as active and I ran the DVD repair console 4 times. The first two times it reported it had done something and when I looked at the details it looked like it was making progress. The third time it reported it had fixed something but when I looked at the details it didn't indicate any changes - just said something like "confirmed it looks ok". I also ran it again after the BCD error booting from the HDD at which point it said it couldn't find any errors.

    gregrocker said:
    If you installed over the bootleg without using Custom>Drive Options to delete, repartition and format before install it might not have replaced or even used the old 100mb SysReserved partition. Is it currently marked System Active in Disk mgmt? Do you have the Repair console on Advanced Boot Tools accessed by tapping F8 at bootup?

    You can post back a screenshot of full Disk Mgmt drive map and listings if you want us to look it over.
    Just to recap what's where, disk 1 had a 100MB reserved partition and the original non genuine windows. From there I set up a "clean" W7 install on a reformatted drive 2 (albeit booting from disk 1). Then to get a clean install booting from disk 2 I disconnected disk 1, created a 200MB reserved partition at the start of disk 2 then reinstalled W7 over the first clean install (which was save in a windows.old folder).

    With just disk 2 connected it shows both the 200MB reserved and windows partitions as primary but only windows partition is active... so maybe it's not using the reserved partition (and perhaps I didn't set it to active originally, although I thought I remembered doing so)? Tapping F8 during install I have a repair install option.

    With both disks connected, and booting from disk 2 again, I see all 4 partitions as primary, my windows partition on disk 2 is active and (seems odd to me) the reserved partition on disk 1 is active (windows on disk 1 isn't active).

    I'm not sure whether I've explained that well, but I've several other data partitions on the disks and it's really difficult to look at the screen shots from disk management and make any sense of them which is why I've not posted them.

    So maybe setting up that 200MB partition was a waste of time as it's not being used, but then if it's not needed either (I can boot from the install or recovery/backup disks) then nothing is lost (except me, I'm now confused!).

    Thanks

    Andrew
      My Computer

  2.    #12

    Which partition is marked System? This is the one which contains your boot files and is booting Win7 now.

    May I ask why you are saving the bootleg Win7 installation? I would wipe the HD after moving any data you want saved off of it. Any Active partitions on that HD are a risk to derail your Win7 System MBR if you ever need to repair it.

    Again, if you want to post back a screenshot of your full Disk Mgmt drive map with listings we can help you sort this a lot easier.
      My Computer


  3. Posts : 22,814
    W 7 64-bit Ultimate
       #13

    Please post a snip of Winfows disk management for us to look at.


    In the Windows start menu right click computer and click manage, in the left pane of the "Computer Management" window that opens click disk management and post a snip of that.

    How to Upload and Post a Screenshot and File in Seven Forums
      My Computer


  4. Posts : 7
    Windows 7 Home Premium 64bit
    Thread Starter
       #14

    Here are the images.

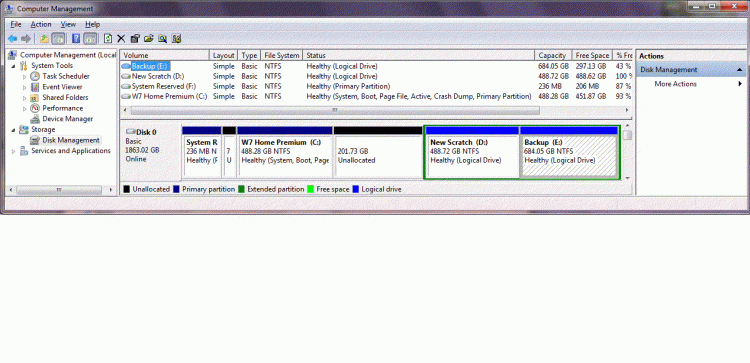
    First when booting with just the new disk/installation connected:

    Moving "System Reserved" partition-one-disk.gif

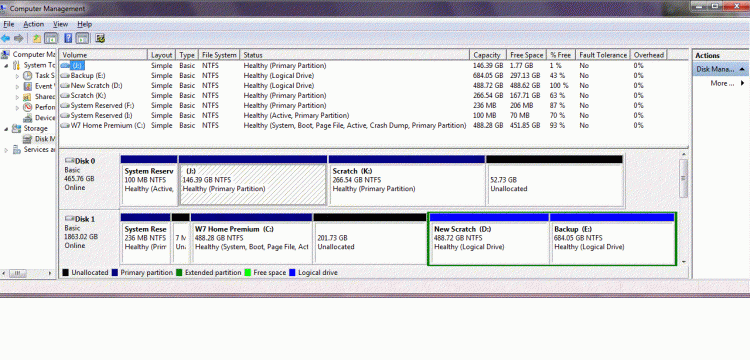
    Second with both disks connected:

    Moving "System Reserved" partition-two-disks.gif

    gregrocker said:
    May I ask why you are saving the bootleg Win7 installation? I would wipe the HD after moving any data you want saved off of it. Any Active partitions on that HD are a risk to derail your Win7 System MBR if you ever need to repair it.
    It's not a long term plan but it will take me some time to reinstall everything. I'm keeping a log of everything I install this time... the main apps are easy as I've the disks or download install files but I've a lot of small freeware utilities & codecs for video work which took a lot of playing with to get right. It's easy to forget one and then be stuck when you're trying to get something finished.

    Thanks for all your support.
      My Computer


  5. Posts : 22,814
    W 7 64-bit Ultimate
       #15

    OK here's what to do if you want to get this SysResv as the boot partition.

    With this as the only HDD connected, first using Windows disk management, remove the drive letter from the SysResv partition, then mark the SysResv as "Active" (right click, mark active) then boot the Windows 7 disk to do the 3 separate startup repairs with restarts.

    Startup Repair - Run 3 Separate Times


    You see how the Windows 7 partition is marked "System, Active" this is what you need the SysResv partition to be using the instructions I posted above.
    click to enlarge
    Moving "System Reserved" partition-5445.jpg
      My Computer


  6. mjf
    Posts : 5,969
    Windows 7x64 Home Premium SP1
       #16

    I didn't realize the new disk was a 2TB - doesn't matter.

    A couple of things seem odd
    1) Why doesn't the new disk remain disk 0 when you add the new disk? Have you swapped cables?
    2) I still think with the new disk connected to the disk 0 sata connector (by itself). You should be able to achieve your goal. You could try:
    Using the boot CD version of partition wizard,
    - move the right of the first partition to absorbed the bit of unallocated space.
    - set the first partition (system reserved) as active. The second partition should become inactive.
    - run the system repair 3 times.

    If this doesn't work then delete the bootmgr and boot folder from the second partition and repeat the above procedure. It may be that the system repair sees the presence of the bootmgr and Boot folders on the second partition and decides that's what it's going to repair as the system, boot partition.
      My Computer


  7. Posts : 7
    Windows 7 Home Premium 64bit
    Thread Starter
       #17

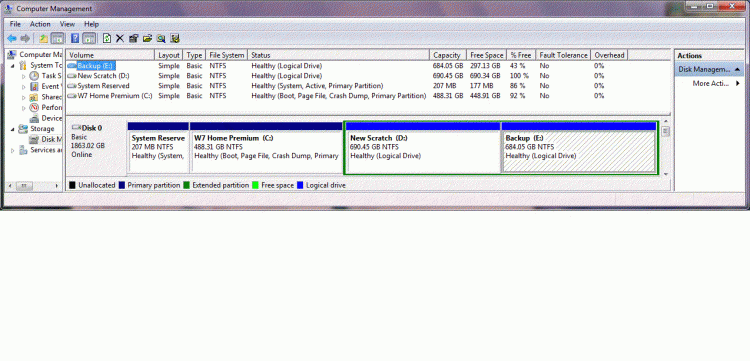
    I followed the steps Bare Foot Kid outlined, then tidied up the partitions as mjf suggested and all seems to be well:

    Moving "System Reserved" partition-one-disk-new.gif

    Many thanks again

    Andrew
      My Computer

  8.    #18

    Is the old Win7 on J? Does it still boot using one-time BIOS Boot Menu key when you plug it back in after doing the repair on the other HD?

    The reason I ask is because in the screenshot of both HD's it shows no System partition on former DISK0 containing J:


    If J will boot using the one-time BIOS Boot Menu key then I wouldn't worry about it, however if not it may require the same Repairs as done to the other HD when only it is plugged in.

    With separate HD's, you want to boot by setting preferred HD as first HD to boot in BIOS setup (after DVD drive) then boot the other HD using one-time BIOS Boot menu key.
      My Computer


  9. Posts : 22,814
    W 7 64-bit Ultimate
       #19

    Hello again Andrew, I'm glad that sorted it for you and thanks for the update.
      My Computer


  10. mjf
    Posts : 5,969
    Windows 7x64 Home Premium SP1
       #20

    Good to see it worked out for you but I'd follow up on Greg's comment. Any problems with attaching the 2nd disk should be easy to fix.
      My Computer


Page 2 of 3 FirstFirst 123 LastLast

  Related Discussions
Our Sites
Site Links
About Us
Windows 7 Forums is an independent web site and has not been authorized, sponsored, or otherwise approved by Microsoft Corporation. "Windows 7" and related materials are trademarks of Microsoft Corp.

© Designer Media Ltd
All times are GMT -5. The time now is 02:09.
Find Us