
New
#11
Dual boot not working
-
-
New #12
The dvd drive (drive D) is set to boot 1st, Drive c boots 2nd.
-
New #13
Did you try what I posted earlier?
Without having seen the bcd entries - you could try this:
Open an elevated command prompt and type:
bcdedit /set {ntldr} device partition=F:
then press enter.
If that doesn't help., then post the output of BCDEDIT. Open an elevated command, type :
bcdedit
then press enter.
Post up what it says.
Also, Go to folder options - MAke sure hidden files and protected operating system files are showing, and look for the 3 files ntldr, ntdetect.com and boot.ini.
They should be on the root of one of the drives. Probably F:
Hope it helps
-
New #14
Dual boot still doesn't work
I tried:
Unplug all drives except your XP and Windows 7, boot into Windows 7 drive and run a Repair install which will reconfigure the boot correctly. A repair install in Windows 7 is an Upgrade install over itself, which leaves programs, files and settings in place but reinstalls the OS and freshly configures the boot.
If unplugging your data drives causes you to lose the ability to boot Windows 7, run startup repair from the Windows 7 installer repeatedly until it boots.
Then I tried:
Went to a command line and entered: bcdedit /set {ntldr} device partition=F:
Message was Boot configuration data store could not be opened. Access denied.
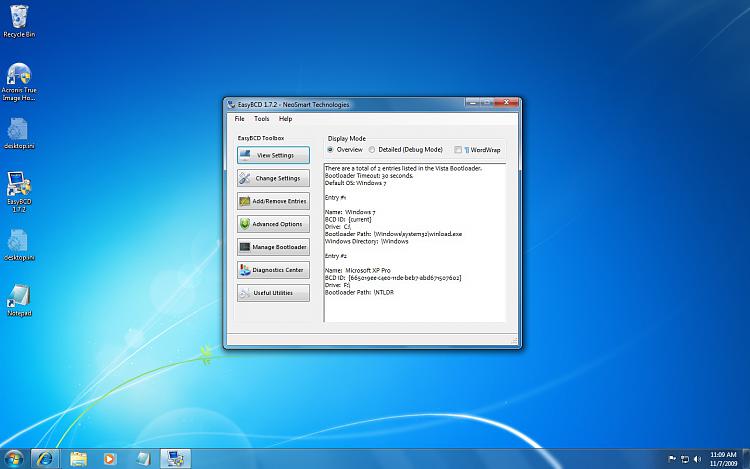
Easybcd printout
Any other ideas?
-
New #15
If at boot you don't have a sceen to select OS it is a boot loader problem. I have 4 systems on 2 HDs all show in boot screen prompt. I use easybcd for a boot loader (free) because of Macx. you can choose in bios, some PC have an f key to select at boot.
-
New #16
Did the repair install configure your boot properly with F:Games drive unplugged? Did it give you a boot menu which allowed you to boot into either OS?
Using this automated method should have reconfigured your boot onto the XP/7 drives and off of the F: drive. However if you then immediately ran the bcedit command to restore the boot to F: drive, it would put you back where you started.
You needed to run one fix (repair install with F:Games unplugged) or the other (bcedit) but not both, I believe.
-
New #17
I would use this option now if it is available since you will probably want out of the dual boot soon anyway (everyone else is).
So try using the BIOS shortcut key (normally f10) to choose either your XP or 7 drive to boot into at boot up. This makes it much easier later to unplug your XP drive or format and use it for data.
If you really want a dual boot menu, then try one of the methods given, automated (repair install) or bcedit, but not both as they self-canceled.
-
New #18
Workaround for Dual Boot XP/7
I have found that for whatever reason the standard (Vista or) Windows 7 dual boot methods often fail when XP is installed on a physically separate harddrive, you set up EasyBCD with the proper drive for XP and still it doesn't work, or you try the 'automatic' dual boot detection during a boot-repair install and it also fails.
There is a fairly simple way to make an XP dual boot work using EasyBCD. The magic that makes this work is that the XP bootloader already has the ability to redirect the computer to boot into any partition on any drive. What follows is a method to put the XP boot files in a place that is easy to find by the Windows 7 bootloader.
1. Go into your BIOS and determine the HD device number for the physical drive that XP is installed on. In BIOS you will find a list of the boot order of the installed harddrives. The HDs are numbered beginning with 0 (zero) so the first drive in the list is HD0, the second is HD1, the third is HD2 and so on. Get the number for the physical drive that XP is installed on from the BIOS, this is not the drive number that is reported inside Windows.
2. Copy (don't move them) these three files from the XP root folder to the 7 root folder:
If necessary mark the copied boot.ini file as NOT read-only.Code:ntdetect.com ntldr boot.ini
3. Open the copied boot.ini file (in the Windows 7 root folder) with a plain text editor like Notepad. It should look something like this:
Note that the Windows name in the file is dependent on which version of Windows is installed, this example is for HP Home Edition.Code:[boot loader] timeout=30 default=multi(0)disk(0)rdisk(0)partition(1)\WINDOWS [operating systems] multi(0)disk(0)rdisk(0)partition(1)\WINDOWS="Microsoft Windows XP Home Edition" /fastdetect /NoExecute=OptIn
4. There are two lines that contain 'rdisk(0)' which refers to the physical harddrive number. Replace the '0' (zero) in both instances of 'rdisk(0)' with the harddrive number that you got from your BIOS. If the harddrive that XP is installed on is HD1 (the second drive in the BIOS list) then the resulting boot.ini file should look something like this:
Change both instances of 'rdisk(0)' to 'rdisk(1)' (or whatever HD number the XP harddisk is in BIOS), save the file and mark it as read-only if you wish.Code:[boot loader] timeout=30 default=multi(0)disk(0)rdisk(1)partition(1)\WINDOWS [operating systems] multi(0)disk(0)rdisk(1)partition(1)\WINDOWS="Microsoft Windows XP Home Edition" /FASTDETECT /NOEXECUTE=OPTIN
In the example above you will also see 'partition(1)' which refers to the partition that XP is installed in. Partition numbers begin at 1 (one) and it is usual that XP is installed into the first partition on a harddrive. That 'partition(1)' can also be changed if necessary, for example if you had multiple installs or had moved the XP partition.
5. Run EasyBCD, remove the old XP entry if it is still there. It might be best to save the changes at this point. Now, add a new entry, select XP, the drive letter WILL be grayed-out and should read "C:". This is correct, you DO NOT select the drive letter for the XP partition, the XP boot files are now in the root folder of the Windows 7 partition which is the "C:" drive and have been properly detected by EasyBCD. Save the changes and exit EasyBCD.
You should now be able to dual boot 7 or XP. The XP boot files in the root folder of Windows 7 will now redirect the boot to the XP drive. When you boot XP it should see itself as the "C:" drive no matter what Windows 7 sees it as. It is also not necessary to set the XP partition as 'Active', the 'Active' flag is only needed for the disk which contains the initial bootloader (and MBR) which in this case is Windows 7. In any case the XP partition CAN be marked as 'Active' so that in an emergency that drive could be set to boot from BIOS, this in no way interferes with the Windows 7 bootloader.
[EDIT] Note that this example is intended for a single XP install. Should there be an XP style multi-boot the boot.ini file will have more entries for the XP style multi-boot. Those multi-boot entries will also need to have their 'rdisk(x)' entries changed as is appropriate for their physical harddisk drive and partition locations. I don't actually know if that XP style multi-boot will work in this case.Last edited by zBobG; 07 Nov 2009 at 19:07. Reason: Clarification for XP multi-boot entries.
-
New #19
When WIndows 7 is correctly installed last to dual- or multi-boots, it configures the boot menu correctly, providing there isn't some data drive also marked Active which confuses it - as has been the case with yours and other bollixed dual boots.
Unplug all other drives except the target and multi-boot drives. Install Win7 last.
-
New #20
zBobG and gregrocker's solutions fixed the problem along with changing the HDs sequence in the BIOS. Thanks for your help.
Jon

 Quote
Quote
Related Discussions