New
#1
Create a Windows 7 USB flash installation with new driver for new MB's
This tutorial is to help to install Windows 7 64 bits on new MB that has USB 3 and other devices that requires drivers that are not in Windows 7 installation disk.
Please read it first till the end before you begin to work.
At the end you'll find the PDF of this tutorial and a the Drivers7.zip folder with the commands on it.
I’d a hard time to install Windows 7 64 bits on my new Gigabyte Z170 MB because Windows 7 installation disk doesn’t have Intel USB 3 and new SATA (AHCI and / or RAID) drivers.
If you try to install Windows 7 without these drivers you will not have mouse (and keyboard, if it’s connected to USB port) and you will not see your disks.
Gigabyte provided a Windows USB Installation toll, which is intended to install USB 3 and NVMe disk drivers. It didn’t work as it should.
I guess, one reason was that my Windows 7 installation disk wasn’t SP1.
After downloading a Windows 7 SP1 installation disk from MS, it did install the USB 3 driver but did NOT my SATA (AHCI and / or RAID) drivers to the install wizard.
So I began to Google to find some other options.
I found on this site: http://codeabitwiser.com/2014/03/how-to-install-windows-7-with-only-usb-3-0-ports/ that gave me a line to follow (thanks to Travis Payton). It didn’t install other drivers, so I had to adapt it to my needs. You should read it and also this https://www.msigeek.com/2635/unmount-and-clean-up-a-wim-image-using-deployment-image-servicing-and-management-dism .
Here is my tutorial. My MB is a GA Z170, so it worked for my MB. If you have AMD or another kind of Intel MB, you will have to adapt it to your needs. You will also need a computer with Windows installed.
Hope it help you to build a Windows 7 installation disk with USB 3, new SATA (AHCI and / or RAID) and any other drivers to install or maintain windows 7.
- First of all, update your new MB BIOS.
- Configure the BIOS and set Storage Boot and PCI device to UEFI and XHCI Hand off to enable.
- Disable Secure Boot. It may be as Operating System (OS) = Other and / or CSM = Enable
- Disable Fast Boot. Fast boot disable USB ports and other hardware till OS is booted. You can enable it after Windows is installed.
On the computer with Windows installed:
- If your Windows 7 installation disk isn’t SP1, download it on MS site:
Windows 7 iso download:
https://www.microsoft.com/en-us/software-download/windows7
https://www.heidoc.net/php/Windows%2...Downloader.exe
- From your MB manufacture site, download the latest chipset USB 3, SATA drivers (32 and 64 bits) and any other drivers you need (like MVMe disk driver). They must be multi file type (*.inf, *.cat, *.sys) and not a *.exe, *.msi or *.msu type.
Some explanations: On the Windows 7 installation disk there are two wim files on \sources: Boot.wim and Install.wim. We are going to work on these two files.
- Boot.wim has the wizard for maintenance and to install Windows. It has two “programs” and we are going to work on both:
Windows PE (index 1).
Windows Setup (index 2).
- Install.wim has the four Windows 7 brands and we are going to work on the one you want to install:
Windows 7 Homebasic (index 1)
Windows 7 Homepremium (index 2)
Windows 7 Professional (index 3)
Windows 7 Ultimate (index 4)
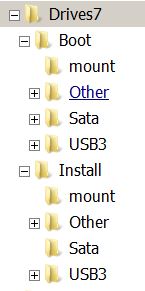
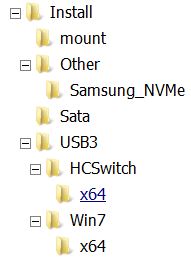
- Create a folder tree (any place you like) as below:
- Extract the Sata, USB 3 files and any other drivers (like MVMe disk driver) you have downloaded.
- Place the 32 and 64 bits Sata files as extracted (it can have folders and sub folders) on the Drives7\Boot\Sata folder.
- Place the 32 and 64 bits USB 3 files as extracted (it can have folders and sub folders) on the Drives7\Boot\USB3 folder.
- Place the 32 and 64 bits other files as extracted (it can have folders and sub folders) on the Drives7\Boot\other folder. If you don’t need any other drivers, leave it blank.
- Place the 64 bits Sata files as extracted (it can have folders and sub folders) on the Drives7\ Install \Sata folder.
- Place the 64 bits USB 3 files as extracted (it can have folders and sub folders) on the Drives7\ Install \USB3 folder.
- Place the 64 bits other files as extracted (it can have folders and sub folders) on the Drives7\ Install \other folder. If you don’t need any other drivers, leave it blank.
To work on boot.wim and Install.wim we are going to use C:\Windows\SysWOW64\dism
If your computer is 32 bits, replace C:\Windows\SysWOW64\dism with C:\Windows\System32\dism
Make this cmd files (make new text files, copy the text commands and rename as *.cmd)
- Clean.cmd:
C:\Windows\SysWOW64\dism /cleanup-wim
pause
- Mount_info.cmd:
C:\Windows\SysWOW64\dism /get-MountedWiminfo
pause
- Boot_info.cmd:
C:\Windows\SysWOW64\dism /Get-WimInfo /WimFile:boot.wim
pause
- Boot_1.cmd:
C:\Windows\SysWOW64\dism /mount-wim /wimfile:boot.wim /index:1 /mountdir:mount
pause
C:\Windows\SysWOW64\dism /image:mount /add-driver:"usb3" /recurse
pause
C:\Windows\SysWOW64\dism /image:mount /add-driver:"sata" /recurse
pause
Rem C:\Windows\SysWOW64\dism /image:mount /add-driver:"other" /recurse
pause
C:\Windows\SysWOW64\dism /unmount-wim /mountdir:mount /commit
pause
- Boot_2.cmd:
C:\Windows\SysWOW64\dism /mount-wim /wimfile:boot.wim /index:2 /mountdir:mount
pause
C:\Windows\SysWOW64\dism /image:mount /add-driver:"usb3" /recurse
pause
C:\Windows\SysWOW64\dism /image:mount /add-driver:"sata" /recurse
pause
Rem C:\Windows\SysWOW64\dism /image:mount /add-driver:"other" /recurse
pause
C:\Windows\SysWOW64\dism /unmount-wim /mountdir:mount /commit
pause
Remark: If you do have other drivers, remove the Rem from Boot_1.cmd and Boot_2.cmd.
- install_info.cmd:
C:\Windows\SysWOW64\dism /Get-WimInfo /WimFile:install.wim
pause
- Install_2.cmd: (Rem.: replace index number with the one related to your Windows (Basic=1, Homepremium=2, Professional=3 and Ultimate=4). If you want, you can create multi Install_X.cmd’s, one for each index and run one by one (see below how).
C:\Windows\SysWOW64\dism /mount-wim /wimfile:install.wim /index:2 /mountdir:mount
pause
C:\Windows\SysWOW64\dism /image:mount /add-driver:"usb3" /recurse
pause
C:\Windows\SysWOW64\dism /image:mount /add-driver:"sata" /recurse
pause
Rem C:\Windows\SysWOW64\dism /image:mount /add-driver:"other" /recurse
pause
C:\Windows\SysWOW64\dism /unmount-wim /mountdir:mount /commit
pause
Remark: If you want to make a Windows 7 installation disk for more than just one brand, for instance, Homepremium and Professional, create a Install_2.cmd and a Install_3.cmd as described above.
Remark: If you do have other drivers, remove the Rem from Install_X.cmd and Install_Y.cmd.
From \sources of your Windows 7 installation disk or iso file, copy Boot.wim to Drives7\Boot and Install.wim to Drives7\Install.
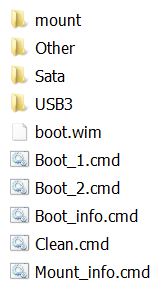
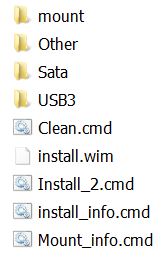
Place *.cmd as below:
Drives7\Boot:
Drives7\Install
Everything is now ready to work on boot.wim and install.wim.
If all the below steps are successful, run Clean.cmd and then Mount_Info.cmd. If Mount_Info still say you have a mounted images but there is nothing on the mount folder, simply shift+delete the mount folder and create a new one.
If any of the below steps gives an error, you will have to take a close look at your drivers and find a solution by your own. Anyway, run Clean.cmd and then Mount_Info.cmd. If Mount_Info still say you have a mounted images but there is nothing on the mount folder, simply shift+delete the mount folder and create a new one. You will have to start all over with a new copy of boot.wim and / or install.wim.
Go to Drives7\Boot.
Run Boot_info.cmd. You’ll see the two indexes.
Run Boot_1.cmd as administrator (right click).
Every step finishes with a pause so you can check if successful.
When all successful and done, run the Clean.cmd and then Mount_Info.cmd. Mount_Info should give you a No mounted images found. Congratulations: first step done
If all successful but still say you have a mounted images but there is nothing on the mount folder, simply shift+delete the mount folder and create a new one.
Run Boot_2.cmd as administrator (right click).
Every step finishes with a pause so you can check if successful.
When all successful and done, run the Clean.cmd and then Mount_Info.cmd. Mount_Info should give you a No mounted images found. Congratulations: second step done
If all successful but still say you have a mounted images but there is nothing on the mount folder, simply shift+delete the mount folder and create a new one.
If Run Boot_1.cmd and Run Boot_2.cmd were successful, congratulations, Boot.wim is ready.
Go to Drives7\Install.
Run Install_info.cmd. You’ll see the four indexes.
Run Install_X.cmd as administrator (right click).
Every step finishes with a pause so you can check if successful.
When all successful and done, run the Clean.cmd and then Mount_Info.cmd. Mount_Info should give you a No mounted images found. Congratulations: first step done
If all successful but still say you have a mounted images but there is nothing on the mount folder, simply shift+delete the mount folder and create a new one.
Remark: If you created another Run Install_Y.cmd, Run Install_Y.cmd as administrator (right click).
Every step finishes with a pause so you can check if successful.
When all successful and done, run the Clean.cmd and then Mount_Info.cmd. Mount_Info should give you a No mounted images found. Congratulations: second step done
If all successful but still say you have a mounted images but there is nothing on the mount folder, simply shift+delete the mount folder and create a new one.
If Run Install_X.cmd and Run Install_Y.cmd were successful, congratulations, Install.wim is ready.
Make a USB drive (4G minimum) bootable using Windows7-USB-DVD- Installer or Rufus with the Windows 7 installation disk or iso file.
When done, replace \sources\boot.wim and \sources\ Install.wim on the USB drive with the ones you created above.
If you want to have the same Windows 7 installation disk for multiple windows 7 brands, rename \sources\ei.cfg to \sources\ei.cfg.orig. When installing windows, it will ask witch brand you want to install. Of course, the related key must be used.
If everything successful, you are ready to install Windows 7 on your new MB.
The PDF of this tutorial
Windows 7 install.pdf
The Drives7 folder
Drives7.zip
Megahertz07
Last edited by Megahertz07; 25 Aug 2017 at 10:06. Reason: better title


 Quote
Quote