Got a New Case!

Page 20 of 37 FirstFirst ... 10181920212230 ... LastLast

  1. Posts : 9,600
    Win 7 Ultimate 64 bit
    Thread Starter
       #191

    Layback Bear said:
    Just a suggestion.

    When installing new connectors do a wiggle test using a DVOM to make sure the connection are okay. This will make sure you don't loose a good connection when moving the harness around during installation.
    Forgive my ignorance but what means DVOM?

    Never mind, it just dawned on me. Good advice. I've yet to have a problem with connections I've made failing once I've assembled a cable. I check the crimps I make on pins by giving them a good tug after crimping and before snapping them into a connector body. I also test them by hooking them up to a PSU and checking the voltages with my ancient DVOM just to make sure I connected everything correctly. I do have a new PSU tester that should tell me if I improperly wire a cable.
      My Computer


  2. NoN
    Posts : 4,166
    Windows 7 Professional SP1 - x64 [Non-UEFI Boot]
       #192

    Lady Fitzgerald said:
    This is the set I have.


    The top one is for removing ATX pins, such as the ones in PCI-e PSU cables or that plug into a PSU. That was the one I broke.

    The next one is (I recently learned) for removing pins from hooded male fan connectors. It also can be used on female fan connectors but can remove only one pin at a time which can be a bit tedious.

    The third on from the top is for removing female fan pins. It's the slickest one of the bunch since it can remove up to four pins at once.

    The bottom one is for removing pins from four pin Molex connectors. The small end is used to remove male pins and the large end is for removing female pins.
    Got this similar modding tool kit and that's a pretty handy tools set, working fine. If you mind well the inside metal tabs of the connectors. it can go fast and easy removing the cables from their slots and replace those horrible white, creamy sort of or translucent plastic connectors parts.

    I was a bit fed up using a pinhead to bend the tabs one by one to disconnect them! And soldering is just too much hassle when your broke one pin connector...

    Never mind, it just dawned on me. Good advice. I've yet to have a problem with connections I've made failing once I've assembled a cable. I check the crimps I make on pins by giving them a good tug after crimping and before snapping them into a connector body. I also test them by hooking them up to a PSU and checking the voltages with my ancient DVOM just to make sure I connected everything correctly. I do have a new PSU tester that should tell me if I improperly wire a cable.
    Always draw a little schema! I also double check everything is well plugged from PSU to hardwares, it leads to leak power.
    Attached Thumbnails Attached Thumbnails Got a New Case!-phobya-modding-tool-kit.jpg  
      My Computer


  3. Posts : 12,364
    8 Pro x64
       #193

    I really do love the look of that front fan. It looks the biz.
      My Computer


  4. Posts : 24,479
    Windows 7 Ultimate X64 SP1
       #194

    I really like the top fan housing mod.
      My Computer


  5. Posts : 25,847
    Windows 10 Pro. 64/ version 1709 Windows 7 Pro/64
       #195

    I like the pains taking time and thought that Lady puts into the project at hand.
      My Computer


  6. Posts : 9,600
    Win 7 Ultimate 64 bit
    Thread Starter
       #196

    smarteyeball said:
    I really do love the look of that front fan. It looks the biz.
    Thanks, Patrick! Pity it won't show once I put the front cover back on and there is a filter covering it.
      My Computer


  7. Posts : 9,600
    Win 7 Ultimate 64 bit
    Thread Starter
       #197

    Britton30 said:
    I really like the top fan housing mod.
    Thanks, Gary! I would have preferred a flatter look to the top of the case but the shroud was so much easier to use to replace the ridiculous top grill and still look good and the extra room will let me rotate my CPU cooler for better access to many things.
      My Computer


  8. Posts : 9,600
    Win 7 Ultimate 64 bit
    Thread Starter
       #198

    Layback Bear said:
    I like the pains taking time and thought that Lady puts into the project at hand.
    Thanks, Jack!

    Talking about painstaking time, I spent over six hours yesterday working on the SATA power cable for the two stacks of HDDs and I still have more to do. I'm using #14 AWG wire to avoid excessive voltage drop (and I had a bit over 1/2 of a 100' spool of the stuff on hand). I calculated there will be just under 0.1% voltage drop which is just a hair under 0.1v on the 12v rail. Since my PSU is running slightly over 12v when loaded with only the two top fans (around 0.6A), well within the allowable 5% tolerance, the HDDs will be getting plenty of juice. The problem with using #14 AWG is it is hard to jam into punch down type SATA power connectors. I have to strip the insulation from the conductor where it goes into the connector to get it to fit. Even then, it's a rather tight fit that requires considerable "encouragement". Since I have to work one wire and connection at a time, it's very tedious work. That will be by far the hardest cable of the lot so, at least, I'm getting it out of the way.
      My Computer


  9. Posts : 9,600
    Win 7 Ultimate 64 bit
    Thread Starter
       #199

    When I broke a mounting lug on the rear fan when I installed it temporarily so I could glue the aluminum plate on so I could lay out the acoustic foam on the rear panel, I had though I had had one more fan I had bought for a spare but I didn't see it anywhere. Late last night, I saw the darned thing right where I had though it was supposed to be, setting right in plain view. I swear, I need to get new glasses or check into the funny farm. Before resuming work on the cable I had been working on, I installed the fan and the grill on the back of the case. No problems this time since the foam cushioned the surface unevenness that caused the first fan to break.

    Got a New Case!-img_000.2.jpg

    I put in another six hours on that miserable, misbegotten, no good for nothing, cotton pickin', stinkin', rotten, lousy, stupid cable. Seems if anything could go wrong, it did (curse Murphy and his stupid law anyway). The part that gave me the most fits was trying to crimp the pins onto the wires at the PSU end of the cable. I just couldn't get a good bite on the insulation. Why, I don't know since these were pins left over from the cables I made for my current rig and the wire was the same wire and I didn't have any trouble then. I finally gave up and just crimped both crimps to the wire itself. I'm seriously considering making another Ace Hardware run and getting a spool of #16 AWG for the remaining cables instead of using the #14 AWG I've been using.

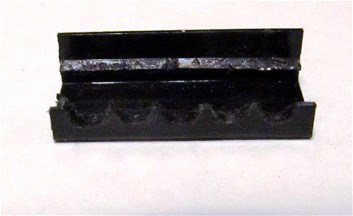
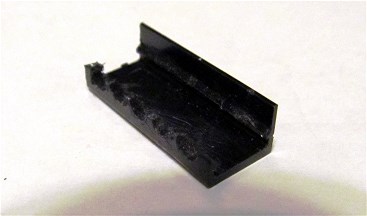
    All but one of the punch down connectors I used for the cable were cannibalized from unused cables from my two old HX750 PSUs. The caps on those are made in a way that will accommodate larger wires better than most other styles. However, the last connector on the string had to have a terminal type cap and the connectors I cannibalized only had inline type clamps so I used a connector I had left over from when I modded my present case. Since those did such a poor job of accommodating the large wire, I made some notches in the cap to make more room for the wire insulation.

    Got a New Case!-img_000.3.jpg

    Got a New Case!-img_000.4.jpg

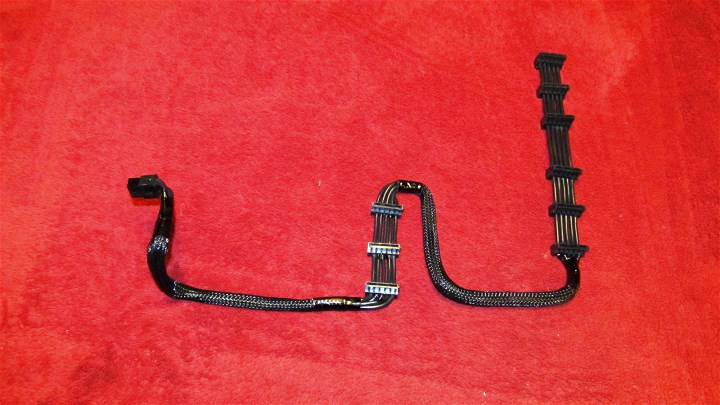
    I'll spare you any more of the gory details of the problems I had making this cable and just show it to you.

    Got a New Case!-img_0001.jpg

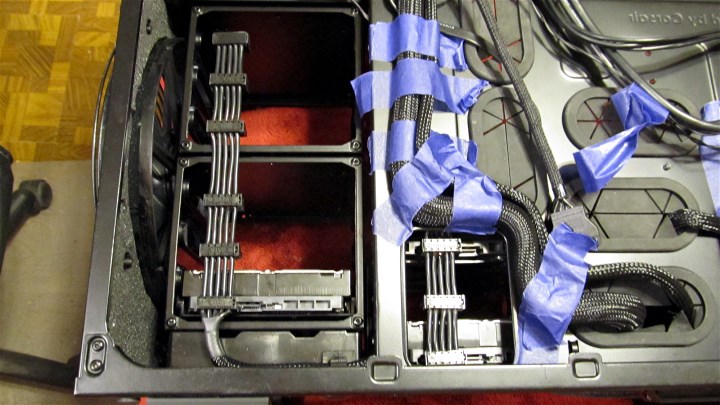
    Here it is inside the case viewed from the left side. The arrows point to what can be seen of the cable from this side. I hadn't "painted" the heat shrink sleeves with a felt pen yet (although the previous picture shows them already being "painted").

    Got a New Case!-img_0003.jpg

    The next two shots show the cable from the right side.

    Got a New Case!-img_0007.jpg

    Got a New Case!-img_0009.jpg

    Before installing the cable from hell for the final time, I tested it with my PSU tester and it had a short. (CENSORED)! I had checked for shorts when I finished with the first six connectors I installed so the short had to be in the next three. I popped the caps off those three and took my DVOM to them to determine which pair of wires were shorted. Then I spent 15-20 minutes with a flashlight and a magnifier trying to find the stupid short. It was a tiny broken strand that was bridging two wires buried where it was almost impossible to see it, let alone get to it to remove it. I was able to get it out (eventually, after some more of the colorful dialogue I'd been using while working on this "thing") and recapped the three connectors. When I reconnected it to the PSU tester, everything was fine.

    Besides being low on supplies for making cables (I "killed" four punch down connectors and 10 pins), I need to take a break from this project to cool down since, right now, I'm madder than a cat getting a bath. At least the hardest cable of the bunch is done. Hopefully, some of the stuff I need will come in on Tuesday.
      My Computer


  10. Posts : 25,847
    Windows 10 Pro. 64/ version 1709 Windows 7 Pro/64
       #200

    Just curious, have you figured out what load will be put on that one harness when all the hardware is hooked to it. (Amp draw) 14 AWG should handle it with no problems and the odds of having a heavy load on all 9 connectors at the same time is slim.
    Just curious.

    I truly like that harness you made. If we lived 10 or 15 miles closer I would pay you to make my cables.
      My Computer


Page 20 of 37 FirstFirst ... 10181920212230 ... LastLast

  Related Discussions
Our Sites
Site Links
About Us
Windows 7 Forums is an independent web site and has not been authorized, sponsored, or otherwise approved by Microsoft Corporation. "Windows 7" and related materials are trademarks of Microsoft Corp.

© Designer Media Ltd
All times are GMT -5. The time now is 02:42.
Find Us