Got a New Case!

Page 9 of 37 FirstFirst ... 789101119 ... LastLast

  1. Posts : 9,600
    Win 7 Ultimate 64 bit
    Thread Starter
       #81

    Britton30 said:
    Very pro looking fan mod Jeannie, good work...
    Thanks!

    Britton30 said:
    ...I feel the need to say be very careful with such a big hole saw, it can transmit a LOT of torque to the drill and you hands, which you say you have Arthur problems with. It should be used in a drill press, be sure to hold down the case very firmly while drilling the 140mm holes.

    I once let a big (3") hole saw get out of control, neither I nor the project was hurt, but it pulled the power cord out of the drill.
    Thanks for the warning! The largest hole saw I ever used was to cut a 4" hole in the steel floor of a bus. That was the hardest sheet metal I ever had the misfortune of working with. That was around 20 years ago, when I was younger and healthier.

    To be honest, cutting those two holes has me more nervous than a long-tailed cat in a room full of rocking chairs. Unfortunately, I don't have access to a drill press. I have a nice 1/2" electric drill but it has a lot of torque so methinks I'll use my 2 speed 1/2" 18v Ryobi instead. I can set it to the lower speed and just not pull the trigger all the way in to keep it even slower. I'll also set the clutch fairly loose so if the saw should snag or jam, the clutch will slip rather than yank the drill out of my hands. I'll put down a board to set the panel on, then stand on the panel to keep it from spinning while cutting the hole. If these are the last two large holes I ever have to cut, I'll be a happy camper.

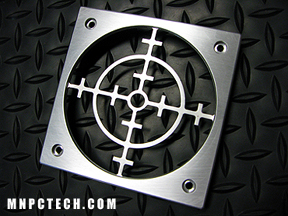
    On another note...I was going to do this tomorrow but there was nothing on the boob tube tonight and I didn't feel like watching a movie, so I got ambitious and decided to cut the center out of the aluminum fan grill I got to cover up that ugly hole I had to make on the back of the case to get rid of the original grill and make room for a 140mm fan. I didn't take a before picture but this is what it looked like before my meatball surgery:

    Got a New Case!-fan-grill-before.jpg

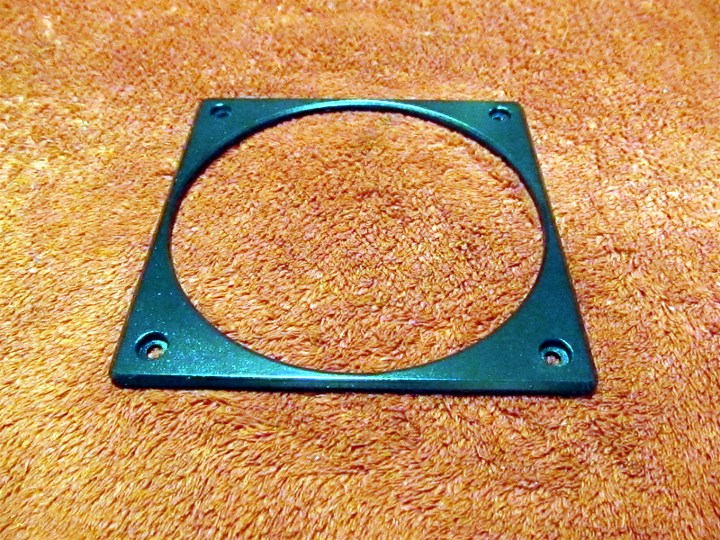
    The bulls-eye center looks nice but does little to protect my fingers (and I bleed like a stuck pig due to my aspirin regimen). If I put a wire grill over it, it would look a bit dorky so the bulls eye had to go. I used a cutoff wheel in a Dremel tool to cut the legs of the bulls-eye as close to the edge as possible, which wasn't all that close since I didn't want to take a chance of messing up anything (yes, I am a coward...and proud of it), then used files to clean up the cuts (which took a lot of filing).

    Here are the final results:

    Got a New Case!-img_0004.jpg

    I still need to paint it to more or less match the case but I'm going to wait until Wednesday to do that since we are going to have a cool spell that will be better suited for painting than temps in the high 90s (it hit 100°F yesterday).
      My Computer


  2. Posts : 24,479
    Windows 7 Ultimate X64 SP1
       #82

    The aluminum fan grille looks nice and industrial, I like it.

    Added note, the sheet metal in the case, of course, is very thin and one side will cut through first and may catch the hole saw. Good idea to use a 18V drill too.
      My Computer


  3. Posts : 5,956
    Win 7 Pro x64, Win 10 Pro x64, Linux Light x86
       #83

    Lady Fitzgerald said:
    Layback Bear said:
    From post # 51

    I'm debating on if I want to cut out the grill under the PSU or not.
    Normally a power supply fan doesn't run fast or often enough to worry about the grill. If it was my case I would leave it alone.
    Taking strength out of the bottom of the case where all the weight is might not be helpful. It might allow the bottom of the case to get a twist and the side panels wouldn't fit properly.
    Of course I don't have the case in front of me so these are just my thoughts.
    ZaLiTH said:
    Some PSU fans don't even run until the temp gets higher.. Seasonic Platinums, for example, only turn on the fan at 25 degrees Celsius.
    Thanks for the thoughts, guys! I'm leaning the same way myself. Because of the filter and the rails it rides in, the hole would be small enough to not be likely to weaken the case any but why take chances if it isn't really necessary. Besides, there just isn't any way to keep a hole like that from looking all raggitty.

    From what I've read, the Seasonics actually determine when to turn on the fan by the amount of load (70%) on them. In my house, 25°C would have them running constantly much of the year; it's 27°C where I and the computer are in my house right now.

    I'll be glad when all the pollen and dust stirring wind we have been having goes away. My allergies and sinuses are driving me nutz! It's supposed to let up by tomorrow so, hopefully, I'll be able to run a few errands, including picking up a bunch of the stuff I ordered.

    I've decided to just cut away the mesh on the top of the case and cover the hole with a Koolance radiator shroud. This is an example of how it would look:

    Attachment 316132

    Besides simplifying things dramatically, it will give me a bit more room between the top of my CPU cooler and the top fans (it was going to be a bit snug up there otherwise).
    That looks great Lady Fitzgerald
      My Computer


  4. Posts : 9,600
    Win 7 Ultimate 64 bit
    Thread Starter
       #84

    Thanks, Stephanie! Nice sig, btw. I love that cat!
      My Computer


  5. Posts : 5,956
    Win 7 Pro x64, Win 10 Pro x64, Linux Light x86
       #85

    Lady Fitzgerald said:
    Thanks, Stephanie! Nice sig, btw. I love that cat!
    Thank you, I am looking forward to seeing the results of your modding :)
      My Computer


  6. Posts : 9,600
    Win 7 Ultimate 64 bit
    Thread Starter
       #86

    Today was a busy day for me and now my tired hurts!

    I got up early this morning to paint the remains of the rear fan grill before the wind could get up. I'm going to have to give it a light sanding after the paint has set 48 hours and fog on another coat.

    Got a New Case!-img_001.jpg

    After getting all the paint coats on, I made an Ace hardware run. I got most of what I went there for but left there feeling rather P.O.ed. What the big fat hairy heck do they have against 6-32 Phillips head screws? They weren't just out; they don't carry them! I picked up some goodies that came in at my mail service and did my grocery shopping, then went home and ordered a box each of 6-32 x 1 1/2" pan head and flat head screws from McMaster-Carr. I can easily cut them to whatever length I need using my crimper/stripper. That should hold me for a few years.

    After a late lunch, I tackled the 5 1/4" holes in the left side panel. The teeth in the hole saw I got were a bit too coarse for the job, causing some snagging, and the drill bit cut the side of the pilot hole so the holes went a bit oversized; I'm glad I decided to cut the hole a bit undersized to begin with. The first hole went OK but the second started snagging so badly I gave up with just a 1 1/4" piece of the perimeter left to cut. I removed the cut out center by bending it back and forth until it broke off, then trimmed the break with snips. After a bit (quite a bit) of filing, the holes cleaned up OK. It looks a bit rough but the filters, fans, and acoustic foam will cover that up. If I ever have to do this again (God forbid!), if I can't find a smooth mandrel point to replace the drill bit that came with it, I'll make one from some cold roll.

    Here's the panel after filing the holes to clean them up and touching up the paint. The top hole is the one that gave me grief.

    Got a New Case!-img_0005.jpg

    And here is the panel after I reinstalled the latches and set the filter housings on top of the holes to see how they would look.

    Got a New Case!-img_0008.jpg

    I'll work on laying out the mounting holes for the fan and filters tomorrow or later. It's going to be tricky to get things to line up correctly because of the tight fits (which will give me fits) and I'm just too darned tired and liable to mess up.

    I also got this little goodie from my mail service.

    Got a New Case!-img_0010.jpg

    That's the shroud going on top of the case to house two 140mm exhaust fans. I'm going to have to cut away the existing top grill but that's going to be tricky because the mounting holes line up with edge of where the top sheet metal bends down to go to the grill. I could cut out the grill only and leave the flange that would remain in place and give some metal for sheet metal screws but, being the anal (OCD, perfectionist, whatever) old bit...broad I am, I would prefer something a bit more sanitary so I'm going to have to cut away the flange except where I need a tab I can bend up and drill for the shroud's mounting holes. That would also allow me to use machine screws and Nylocks which will be more secure than sheet metal screws and won't have any sharp points. That's going to be a royal PITA.
      My Computer


  7. Posts : 24,479
    Windows 7 Ultimate X64 SP1
       #87

    Good job on the 5¼" holes Jeannie, they look fine in the pic.

    Did you paint the grille metallic blue or is it a camera fluke?
      My Computer


  8. Posts : 9,600
    Win 7 Ultimate 64 bit
    Thread Starter
       #88

    Britton30 said:
    Good job on the 5¼" holes Jeannie, they look fine in the pic...
    Thanks, Gary! The holes are 5 3/8" now because of that aforementioned pilot hole enlargement byt the drill bit in the mandrel.

    Britton30 said:
    ...Did you paint the grille metallic blue or is it a camera fluke?
    Camera fluke. The filter housings are actually a dark graphite gray, just shy of black. Oops, I thought you were asking about the filter housings. The answer is still camera fluke. The grill I painted was painted satin black.
    Last edited by Lady Fitzgerald; 08 May 2014 at 20:28. Reason: Cerebral Flatulence. That's my story and I'm sticking to it!
      My Computer


  9. Posts : 9,600
    Win 7 Ultimate 64 bit
    Thread Starter
       #89

    I knew that laying out the mounting holes for the 140mm filters and fans on the side panel was going to be tricky but I can't believe how long it took for me to figure out where to put 16 lousy little holes. Part of the problem was having to position the fans and filters just right so my uh-ohs! from when I "drilled" the big fan holes wouldn't show from the outside but the biggest issue was the oddball 140mm fan filter. I had a choice of using 120mm fan filters, which were easy to find and install with the fans I'm using (140mm but can be mounted on either 140mm fan mounting holes or on 120mm fan mounting holes) but would restrict airflow, or try to find a 140mm filter I liked. The only 140mm filters I could find that I liked were some oddball ones that used a 111mm mounting hole spacing instead of the 125mm spacing 140mm fans use or the 105mm spacing 120mm fans use. The filters were cheap enough, I decided to take a chance on them, order three of them from China, and just eat the cost if they didn't work out. I had been thinking I could modify the mounting ears used to mount the fans in 140mm fan mounting holes that could be modified to fit the 111mm hole spacing. I was wrong. And there was no other way to use the 140mm mounting without the hardware showing or getting in the way of mounting the filter. I did figure out if I bolted the filter bases to the side panel, I could rotate the fans slightly and mount them using the 120mm mounting holes and still be able to hide the hardware under the filter. It was a tight fit, though. Once I worked out where the holes were supposed to go, drilling the holes was fairly easy.

    Here are the fans after they have been installed.

    Got a New Case!-img_0003.jpg

    Note below how the fan mounting screws have been rotated slightly. The empty holes are for bolting on the filter bases.

    Got a New Case!-img_0004.jpg

    Here, the filter bases are attached...

    Got a New Case!-img_0007.jpg

    ...and the filter housings snapped onto the bases.

    Got a New Case!-img_0011.jpg

    All the uh-ohs! are covered on the outside. The acoustic foam will cover the remaining uh-ohs! on the inside. I'll have to remove everything to install the foam but, first I have another little problem. The large holes in the panel have weakened it and it now noticeably "oil cans". I was stumped about how I could brace it without hardware showing on the outside when I noticed the unused mounting holes on the fan flanges on the face of the fans opposite of the ones against the panel itself. I can use two lengths of aluminum angle stock to bridge the fans into a single, rigid assembly by screwing them to the fans using those unused mounting holes. I'm going to have to make an Ace Hardware or Home Depot run tomorrow to get some 1/16" x 1" x 1" aluminum angle stock. Laying out and drilling the holes in the angle stock will be easy. What will be more time consuming is cutting half-round notches in the top angle stock. I can use a cutoff wheel in a Dremel to hog out most of the metal that would block airflow, then I get to do some more industrial strength filing. Oh joy!

    One good piece of news. I was a little worried that the fan cable from the top fan wouldn't be quite long enough to reach the fan hub but I was wrong; it reaches just fine.

    (If any one noticed, I mounted one of the fans the wrong way but did not notice it until I had already taken the photos. Since I'm so anal, I reinstalled it even though I will have to take everything apart to install the acoustic foam,)
      My Computer


  10. Posts : 24,479
    Windows 7 Ultimate X64 SP1
       #90

    Nice looking job on the fans and filters/housing.
    Very clever to use the aluminum angle to reinforce the side panel too.
      My Computer


Page 9 of 37 FirstFirst ... 789101119 ... LastLast

  Related Discussions
Our Sites
Site Links
About Us
Windows 7 Forums is an independent web site and has not been authorized, sponsored, or otherwise approved by Microsoft Corporation. "Windows 7" and related materials are trademarks of Microsoft Corp.

© Designer Media Ltd
All times are GMT -5. The time now is 11:07.
Find Us