Got a New Case!

Page 24 of 37 FirstFirst ... 14222324252634 ... LastLast

  1. Posts : 9,600
    Win 7 Ultimate 64 bit
    Thread Starter
       #231

    Layback Bear said:
    Could you post a page where you got that type of sleeving?...
    Sure. Mod/Smart - High Density Kobra | Page 1 | Sort By: Product Title A-Z - FrozenCPU.com. Scroll down the page a bit to find the individual sizes sold per foot instead of in a kit. I bought a few feet each of 1/4", 3/8", 1/2", 3/4", and 1". The only one I didn't use any of was the 1" (it was a contest between 3/4" and 1" for the big sleeve in the center of the photo I posted earlier; the 3/4" barely won).

    I had to use some 3-1 heat shrink sleeving I had leftover from the previous case I modded; 4-1 would have been better but I couldn't find it.

    I cut the sleeving with an old Telco knife I keep knocking about for just that purpose. I heat the blade up in the flame of my gas range until it's just hot enough to more melt than cut its way through the sleeving. That automagically seals the end if the sleeve so it won't unravel but it still can be expanded by opening a pair of pliers or scissors inside the end or by forcing it over a tapered object, such as a pen with a tapered end. Once expanded, it will return to its original size and still won't unravel.
      My Computer


  2. Posts : 25,847
    Windows 10 Pro. 64/ version 1709 Windows 7 Pro/64
       #232

    Thanks for the product website.
      My Computer


  3. Posts : 9,600
    Win 7 Ultimate 64 bit
    Thread Starter
       #233

    No problem. I'll send you a bill at the end of the month.
      My Computer


  4. Posts : 25,847
    Windows 10 Pro. 64/ version 1709 Windows 7 Pro/64
       #234

    Save the stamp and bring it in person.
      My Computer


  5. Posts : 9,600
    Win 7 Ultimate 64 bit
    Thread Starter
       #235

    Yeah, right! I'll do that.

    All seriousness aside, I needed to do something about the super shiny front of the storage drawer. I had thought of sanding the front to emulate the brushed aluminum finish. I tried testing that on the bottom of the little tray that goes in the drawer. The texture worked out great but the color was a bit too brown for even my old colorblind eyes. I tried using a wee bit of furniture polish to try to bring the black (or extremely dark brown; it looks black to me) back out. That didn't work so cleaned the furniture polish off, resanded it, and tried coloring it with a large black felt pen. The color came out just right but it looked a bit blotchy. Ok, scratch sanding (pardon the pun) and back to ye olde drawing board.

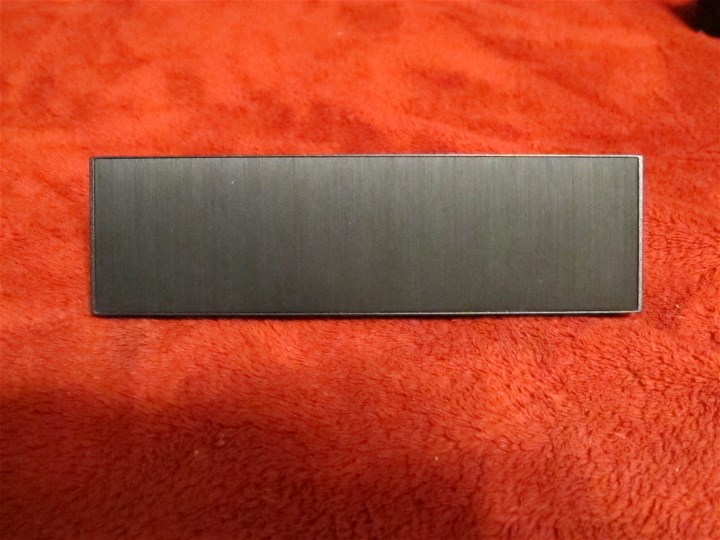
    I took one of the 5.25" bay blank covers and tried soaking it overnight in a small tray of 91% isopropyl alcohol to see if I could remove the brushed aluminum inlay. It took some alternate gentle prying with my fingers and more soaking to get it off but off it did come. I soaked the aluminum itself for another hour or so to soften the adhesive some more, then scraped the adhesive off with my old driver's license (it was handy; I have no idea why they gave that back to me since it's no longer legal).

    After thoroughly cleaning up the aluminum, I put some double sided cellophane tape on the backside of the aluminum, then stuck the aluminum to the front of the drawer. It fit perfectly on the top and bottom (that was a pleasant surprise) but it was a tad short on the ends (I was expecting that considering how the bay cover was made). It's a bit proud of the swap bay above it as well as being a smidge too short but it should look OK once I put the front panel back on (I removed it so I could get at things a bit better while doing the cable management and fabrication).

    Here is what a bay blank cover looks like.

    Got a New Case!-img_0014.jpg

    Since the brushed aluminum front is inlaid, the top, bottom, and side should be a tad short.

    Here is the drawer with the aluminum piece attached. Note that the aluminum is a bit short on the ends but doesn't look much different than the bay cover did (I used the bay cover to prop the drawer up so it could be seen better).

    Got a New Case!-img_0006.jpg

    This shot, with flash, gives a better idea of how the texture of the brushed aluminum looks even though the color is washed out by the flash.

    Got a New Case!-img_0004.jpg

    After I posted last night, I put in clips to corral the 8-pin CPU power cable and the SATA power cable for the top swap bay and tied down the 24-pin cable using twist ties (I prefer those to zip ties), then called it a night (even though, technically, it was morning). I didn't get enough sleep last night this morning so I'm going to eat a light, early lunch and take a short nap.
      My Computer


  6. Posts : 9,600
    Win 7 Ultimate 64 bit
    Thread Starter
       #236

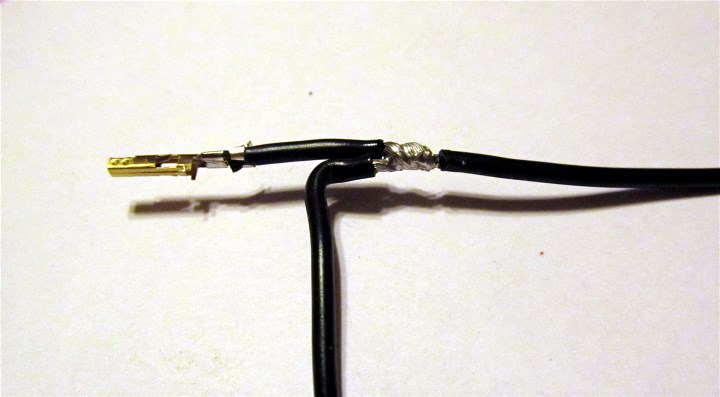
    I tackled the Siamese hot swap bay SATA power cables today. I started by crimping the ATX pins on the ends of some #18 wire I had knocking about. I went with #18 since there will be only two HDDs at most on this cable so I didn't need to worry about excessive voltage drop although I did split the cable to make sure I didn't have any dropouts when plugging in a second HDD; I also didn't feel like fighting with crimping the pins. I then stripped 1/4" of insulation from the wire a little ways from the pin and spliced a second wire to the first, then soldered the connection.

    Got a New Case!-img_0001.jpg

    After that, I shrunk a heat shrink sleeve over the splice...

    Got a New Case!-img_0002.jpg

    ...then plugged the pins into the PSU connector. That actually worked out cleaner than what I expected, despite the crowding.

    Got a New Case!-img_0003.jpg

    This what the entire cable looked like at this point.

    Got a New Case!-img_0005.jpg

    The top bunch of wires going straight out from the connector are for the 3.5" swap bay I added in the 5.25" cage. The wires heading south of the connector are for the built in swap bay.

    After this I developed cerebral flatulence and forgot to take pictures until I had the cable finished and installed. I had "fun" installing it so I'm not taking it back out for pictures.

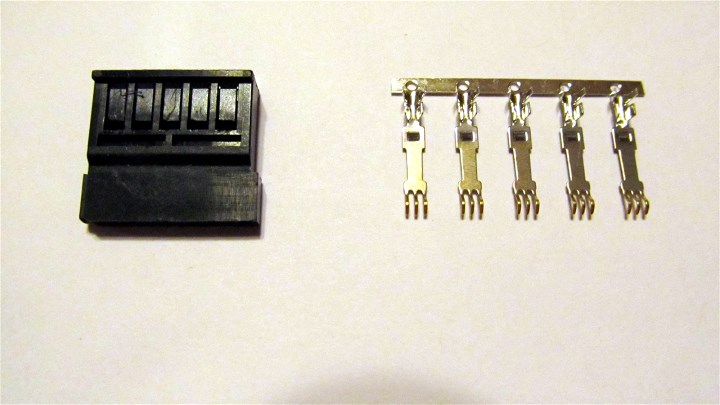
    After cutting the wires to length and slipping some sleeving and heat shrinks over each bunch of wires (five in each bunch), I crimped the SATA power connector pins on the ends of each bunch of wires (ten pins total) and plugged the pins into SATA power connector bodies (two). Here are what the pins and connector bodies look like.

    Got a New Case!-img_0001-2-.jpg

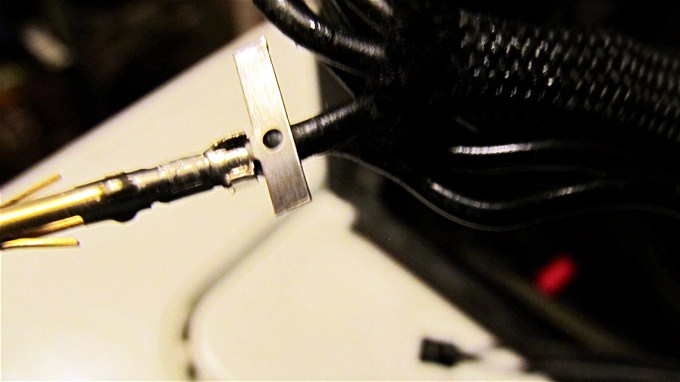
    The first five pins crimped just fine but I couldn't break off the little "tree" they come on. I normally cut the "tree" and leave a bit of it attached to the end of the pin to give my fat, little fingers something to hang onto when I'm crimping the pin. This an example of what I'm talking about from when I built my current case.

    Got a New Case!-img_.0052.jpg

    Normally, all I have to do is just bend the tree back and forth a few times and it will break right off, which is what happened after I crimped the five ATX pins. Not with these miserable, misbegotten, malevolent pins. I had to cut the bloody things off and it was a bugger getting in there to cut them, even with the tiny dikes I have. On the second cable, I had trouble crimping the first two pins to the insulation. I have no idea why; the remaining three crimped just fine and dandy. At least the problem crimps held up to the pull test. After inserting the pins into the connector bodies, I stretched the sleeving out and shrunk the heat shrink sleeves on the ends. I also used some brush on Krazyglue to make sure everything stayed put (I like that stuff; it's much better than the nail glue I've been using).

    Each leg of the Siamese cable goes through a different wire management hole. The leg going to the 3.5" swap bay was easy to route. I don't have it tied down yet because I have other cables that will be running alongside it I haven't made yet. The one going to the power cable for the built in swap bay was tricky (by this time, I was bluing up the air a bit because of the silly little but plentiful frustrations I had been dealing with plus my back and the arthritis in my left thumb were protesting with language bluer than what I was using). I finally got the second cable from Hell clipped into place where the miserable, misbegotten, little bugger is going to stay until the place it came from freezes over! At that point, I was ready to call it quits. I'll post some pictures of the installed cable in the next day or two.

    I did some looking around online for a Bluray combo ODD to add to the one I already have. I found an LG that looks just like the one I have already except it doesn't have Litescribe. It is also a BD burner, instead of BD-ROM like I have, which is a bit overkill since I will probably never burn a BD (but, then again, I've been wrong before). Since it would, at least, match the ODD I already have, I went ahead and ordered it for store pickup at my friendly, neighborhood Fry's Electronics. I'll pick it up either tomorrow or Tuesday. Making a cable for the two ODDs and the Molex socket on the MOBO will actually be simpler than the single SATA power and two Molex connectors (one for the MOBO and one in case I decide to put my internal card reader back in) I originally planned on making. This way, I can use two punch down type SATA power connectors (I still have a few left) and a single Molex connector daisy chained together without having to crimp two wires to single pins. If I ever decide to replace the second ODD with the internal card reader, I can always make an adapter cable to go from the punch down connector into a Molex connector. I'll probably use #16 AWG for that cable. I now just need to decide which of the two ODDs will go on top and which will go under it. I'll be using the new one almost 100% of the time and the old one only when burning a Lightscribe disk.

    I also need to make a power cable to go to the sound card. I'm not quite sure how I will route that one yet; I may Siamese it with the cable going to the ODDs and MOBO Molex connector. I'm also still debating on how to route the front panel audio to the sound card. The socket for it is in a stupid place on the side of the sound card.
    Last edited by Lady Fitzgerald; 09 Jun 2014 at 02:57.
      My Computer


  7. Posts : 24,479
    Windows 7 Ultimate X64 SP1
       #237

    Nice again Jeannie but two of your pics, the last ones, only show as the white "X" in a black square.
      My Computer


  8. Posts : 9,600
    Win 7 Ultimate 64 bit
    Thread Starter
       #238

    Britton30 said:
    Nice again Jeannie but two of your pics, the last ones, only show as the white "X" in a black square.
    Sigh! I had problems with the attachments when I first sent it and had to fix it. The pictures show at my end but I'll try to get them fixed...again.

    Thanks for the compliment and the heads up!

    Edit: I went back and reuploaded (is that a word?) the last two pictures and reattached them. This is the second time I've run into this problem and had to fix it (this time was worse). Lrt me know if they made it or not.

    Yeesh! I shoulda "stood" (sic) in bed.
    Last edited by Lady Fitzgerald; 09 Jun 2014 at 03:02. Reason: Follow up on FUBAR.
      My Computer


  9. Posts : 24,479
    Windows 7 Ultimate X64 SP1
       #239

    Yup, it's all good now. What are the connectors that look like a fork? Is that the end that you crimp?
    Yeah I've used reuploaded often, even if it does have a red line under it.
      My Computer


  10. Posts : 9,600
    Win 7 Ultimate 64 bit
    Thread Starter
       #240

    Britton30 said:
    Yup, it's all good now. What are the connectors that look like a fork? Is that the end that you crimp?...
    A SATA power connector has 15 tiny contact points even though there are only five wires going to it (most of the time; some cables drop the 3.3v since it's not used anymore). Each wire is connected to a pin that has three fingers (the fork tines you observed); five wires times three fingers equals 15 contacts points. The wire is crimped at the end opposite from the (fork tines). There are five pins in that illustration, all connected to a metal strip often called a tree. Clear as mud?

    Britton30 said:
    ...Yeah I've used reuploaded often, even if it does have a red line under it.
    Cool! Safety in numbers!
      My Computer


Page 24 of 37 FirstFirst ... 14222324252634 ... LastLast

  Related Discussions
Our Sites
Site Links
About Us
Windows 7 Forums is an independent web site and has not been authorized, sponsored, or otherwise approved by Microsoft Corporation. "Windows 7" and related materials are trademarks of Microsoft Corp.

© Designer Media Ltd
All times are GMT -5. The time now is 09:52.
Find Us