How To Radically Improve (or Worsen) Sound Quality in Windows 7

Page 1 of 2 12 LastLast

  1. Posts : 13
    Windows 7 Ultimate x64
       #1

    How To Radically Improve (or Worsen) Sound Quality in Windows 7


    This a quick mini-tutorial on how to radically change the sound quality in Windows 7 - especially important for laptop users, but also significant for those who for instance have accidentally managed to worsen their sound on a hi-fi connected system and cannot find their way back!

    There are essentially five tiers of potential sound-affecting entities within a Windows7 PC:
    1. Application
    2. Add-on CODECs or plug-ins
    3. Mixer
    4. System
    5. Sound card driver


    It is important to realize that ALL of these may have settings that can alter the sound quality, and that using the correct tier first is fairly crucial when you want to use different output devices at different times (Headphones, Extension Speakers, Hi-Fi, Built-in Laptop speakers, etc). A setting altered to suit one output device that is made to a "common" tier will potentially wreck the careful settings you made for another output device! Thankfully, Windows 7 improves greatly over Windows XP in this respect - it helps you manage settings specifically for a particular output device, as long as you realize this and work with it, rather than against it.

    I'm fortunate enough to possess a Toshiba Qosmio laptop with moderately good built-in speakers, a good quality USB-headset (Freetalk) and the very cleverly designed Logitech Z305 USB speaker-bar to use as an experimentation base. So I will discuss altering the various settings in the context of these output options. Read across to your own needs and experiment accordingly on your own system.

    In order to break this all up a bit, I shall section-up this tutorial into separate posts on this thread, so please bear with me as it may take a while to complete. You can always subscribe to the thread (get e-mail notifications) if you don't want to miss anything. I shall post a specific "end" reply when I've covered it all and would appreciate if you keep any replies on hold till then (for the sake of continuity of the tutorial).
      My Computer


  2. Posts : 13
    Windows 7 Ultimate x64
    Thread Starter
       #2

    Step One - Identifying the five tiers

    Tier One: The Applications that you may be considering may be the obvious: Windows Media Player, the ubiquitous: Cyberlink PowerDVD or Media Player Classic, or the less versatile but annoyingly in-your-face: Adobe Flash or Microsoft Silverlight & BBC IPlayer in the Internet browsers.

    All of these have, to a varying degree, their own indigenous settings (or not). And for the sake of commonality, they are actually the LAST place you want to tweak sound quality if you are likely to want to switch between output devices frequently. So resist for now the equalizers, wow-settings, or bass-boosts built into some of these. Indeed - start by disabling them all. Better - use a "reference application" without such enhancements for all your setting up, and later use these individual application settings as "condiments" (salt-and-pepper to taste).

    Tier Two: Note that you may have installed some "extra" CODEC-based or plug-in enhancements that either operate at DirectX level (for some but not all apps), or are introduced for specific media types (AVI, MP3, FLAC etc), or for specific applications. Try and neutralize these too, if you can. They may not be helping. For example, you can actually download and install a graphic equalizer that operates like a CODEC. If you did, then disable it for now. Also, choose a set of reference items from your media collections (one or two each from MP3, Video, FLAC, whatever) that you will consistently use for your setting up, which hopefully will help ensure CODEC consistency, or at least identify any inconsistency, during your experiments. However, if you are using Windows "out-of-the-box" and haven't installed any special CODECs, then don't worry too much about this tier.

    Tier Three: The Windows 7 Mixer can usually be accessed by double-clicking the speaker icon in the notification area of the task bar. This is the main port of call when you are setting up your system under this tutorial. Familiarize yourself with how it looks when you click it whilst you are running different apps and when you have plugged in different output devices. Note that you may have to close and reopen it after physically changing (connecting or disconnecting) the output devices.

    To get there, locate the speaker icon:
    How To Radically Improve (or Worsen) Sound Quality in Windows 7-speakericon.png

    When clicked this will give you the Volume Control:
    How To Radically Improve (or Worsen) Sound Quality in Windows 7-volumecontrol.png

    And from that you can open the Mixer:
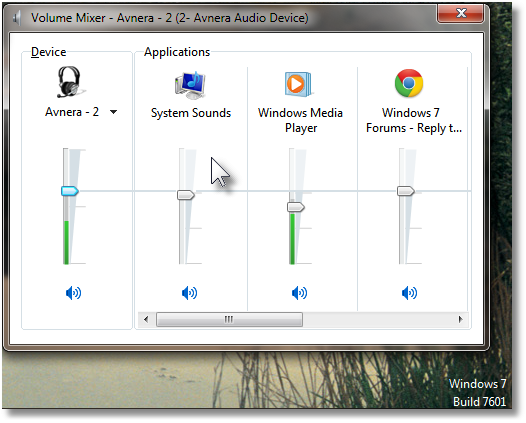
    How To Radically Improve (or Worsen) Sound Quality in Windows 7-mixer.png


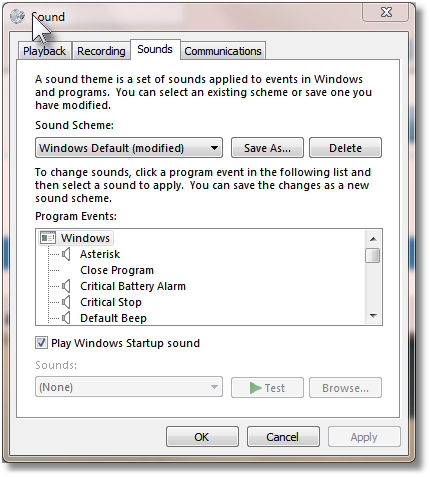
    Tier Four: You now have easy access to this tier, by clicking the SYSTEM SOUNDS icon in the MIXER applet that you have just opened. This should beget you a dialog something like the one shown below. We use this to get to the options that fundamentally set the SPEAKER arrangements at system level for each output device you connect to your PC. Note that you should try and physically connect your outputs to the same USB ports every time, since Windows treats each USB-port and Device Driver combination as a distinct output entity, and remembers settings for each of these.

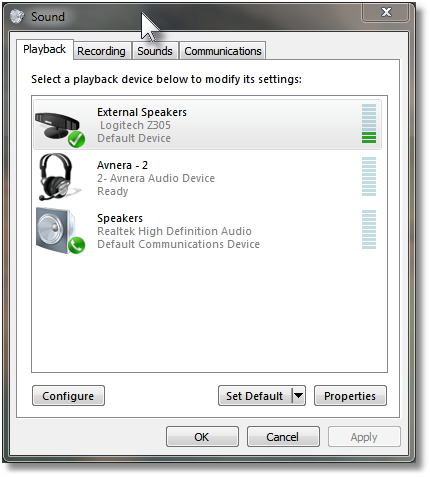
    We are specifically interested in the PLAYBACK TAB.
    How To Radically Improve (or Worsen) Sound Quality in Windows 7-system-sounds.pngHow To Radically Improve (or Worsen) Sound Quality in Windows 7-playbacktab.png

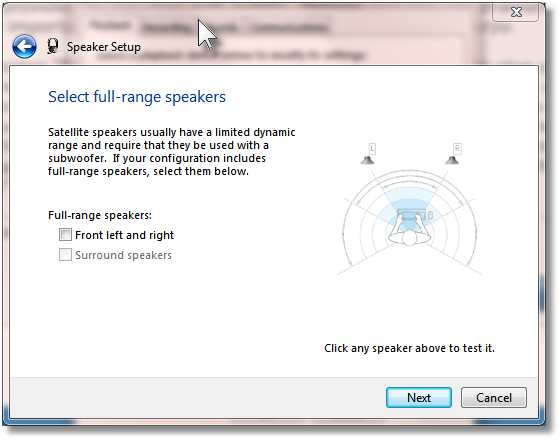
    We are still in "Tier Four" when we click one of these icons listed in this tab. We get to Tier Five by a different route (be patient). Tier Four however allows us to get at some special settings that Windows provides via its "default" driver mechanism. It allows us to specify whether our speakers have a woofer or multiple satellites (2.1, 5.1, etc). Also it defines whether or not full-range speakers are in use. If you change this here, then the "enhancements" provided by Tier Five will subtly change and this can dramatically affect the sound quality achievable - very important if you like your bass to be either bassy or burpy.

    For instance, choosing "full range" stereo speakers for a headset will later give you different options than specifying a non-existent woofer. For good headphones capable of bass, it may actually be better to lie and say there is a (non-existent) woofer. In my system, this allows the headphones to reproduce the "air-woof" thud of a bass drum, rather than have Windows "assume" bass should not be "separately controlled". As an aid-de-memoir, think of "Full Range" being the same as "Don't Allow Me to Control Bass Separately in Tier Five". Or if your speaker farts - think of it as "Please take control of bass away from me, for I am a danger to my speaker coils!".

    Click CONFIGURE to get to these speaker settings after selecting the icon representing your output device (in my case, the Headphones).
    How To Radically Improve (or Worsen) Sound Quality in Windows 7-configure.pngHow To Radically Improve (or Worsen) Sound Quality in Windows 7-fullrange.png

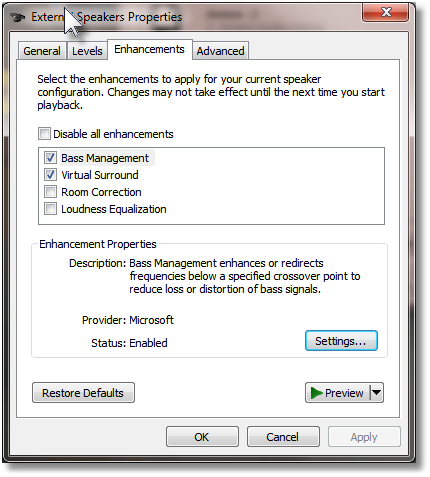
    Tier Five: If you bring back the PLAYBACK TAB page you had in Tier Four, you can select the output icon and click PROPERTIES instead of CONFIGURE. This will allow you to set up the Device Driver of your output device. This is Tier Five. For your built-in laptop speakers, this is most probably going to get you the settings dialog of your sound card. For most USB connected output devices, it will most likely be the Windows default driver dialog with the settings specifically for that particular USB-port/Output Hardware combo. In either case, there will usually be an "Enhancements" tab (or equivalent). On the default Windows driver, this allows you to set some very important quality controls: "Bass Management", "Virtual Surround", "Room Correction" and "Loudness Equalization". Note that these settings will be in effect over and above what you do in an application. So if you have maxed the bass in an app, doing it here as well is a recipe for dull farting sounds. Do it here first, after having reigned in (better still, disabled) your more enthusiastic application settings.
    How To Radically Improve (or Worsen) Sound Quality in Windows 7-threeoutputs.pngHow To Radically Improve (or Worsen) Sound Quality in Windows 7-defaultdriver.png

    You will notice that for the above screen caps I have plugged in my Logitech Z305 bar, which uses the default Windows Driver. As a result, the properties page "Enhancements" tab is actually very standard. Note the aforementioned "Bass Management" option, which will provide different properties depending on whether you configured "Full Range Speakers" in Tier Four. You get at those specifics by selecting "Bass Management" and clicking settings.

    Incidentally, you can also get directly to Tier Five from the Mixer - just click the icon of the output device instead of System Sounds.
    How To Radically Improve (or Worsen) Sound Quality in Windows 7-mixer.png
    Last edited by BigAlUK; 05 Nov 2012 at 10:31.
      My Computer


  3. Posts : 13
    Windows 7 Ultimate x64
    Thread Starter
       #3

    Step Two: Normalize your Devices

    As suggested earlier, the idea is to work in Tiers Four and Five to make your devices produce the best sound they can in an application-independent way.

    This means you need to keep your application settings reigned in or turned off entirely.

    Then use the tier-access methods discussed earlier to interactively set up each output device to be as "normal" as possible. Play the chosen reference sound sources from one "neutral" application and tweak the speaker and enhancements to aim to get nice tight round bass and crystal clear treble without the muddy mid-ranges - as much as is possible with this lower tier. Your sound card will usually be the most tweak-able, because it will probably incorporate a graphic equalizer, but oddly enough this is probably self-defeating if it only drives the severely limited quality built-in speakers of your laptop PC. If the speakers you use most are USB-based, your internal sound card driver most likely has no effect. Worry more about the simpler controls provided via the USB-specific driver to optimize the higher quality devices: headphones and external speakers.

    Only after you are satisfied that Windows has been set up fairly consistently for all its individual output devices should you then reach for the salt-and-pepper: tweaking the application's enhancements.

    Here are a couple of examples:

    For my Logitech Z305 external speaker bar, I have chosen to come clean with Windows that there is no woofer. This means that the "Bass Management" option allows either a "Theater" or "Office" setting, instead of micro-managing the bass cut-off and gain explicitly. I also enabled "Virtual Surround" because it reduced the potential muddiness in mid-ranges without splitting the stereo field too far (taste-thing, I know). I did not bother with the "Room Correction" settings, since we are dealing with a laptop here, and a high quality microphone should really be used to take advantage of this: it "listens" to a series of chirps to auto-configure an equalizer (fine if you are lazy, but it assumes a good microphone is being used). "Loudness Equalization" annoys me because I tend to notice when sound is being gain-damped to avoid overloads, but again, taste.

    For my Freetalk Headphones, however, I lied about the absence of a woofer to Windows. This allowed me to use Bass Management to set a cut-off frequency of 75Hz and gain of 6dB, which helps make these headphones woof without getting muddy. If you are planning to use Windows Media Player SRS Wow effects, you may want to forego "Virtual Surround". Room Compensation is pointless for headphones - you would be asking Windows to use a microphone to frequency-analyse your headphones effect on the room acoustics (duh?). And did I mention that I hate Loudness Equalization? It is even more obvious and annoying in headphones, though it may help protect your ears in the long term.

    As for the Harman/Kardon built-in speakers, the settings (and the graphic equalization in the non-default sound driver) are best used to stop these tiny speakers from farting too much (or being too screechingly tinny, to my ears). Realize that trying to get these to reproduce anything nice below 250Hz is definitely a waste of time. They are designed to make louder and clearer sounds than most laptops (they are good), but they are not "God".

    It is perhaps unfortunate that a typical sound card driver will provide non-standard settings for your crappy internal speakers, which means that you may not be able to use the "double-lie" trick: say there is a woofer and then use the more detailed "Bass Management" to CUT the bass gain at a crucial frequency, thus sparing your ears from the vain attempts to react to 10dB Woomph with a tiny 1 cm wide speaker! However, if your sound card does have an EQ, then here is a very good use for it. Shame if you only have analogue headphones though. This is one very good reason why USB headphones are such a good purchase: you make them independent of the laptop speakers in every sense.
    Last edited by BigAlUK; 05 Nov 2012 at 10:40.
      My Computer


  4. Posts : 13
    Windows 7 Ultimate x64
    Thread Starter
       #4

    Step Three: Salt and Pepper to Taste

    As said several times before: once you have the basic sound outputs operating within an acceptable norm, then you can do the more enjoyable task of accentuating those fine tones of your favorite sounds with the application-specific settings. Play with SRS-Wow or Graphic Equalization to your hearts content, eking out those tonal variations of your favorite piece with your favorite app.

    And then enjoy the fact that it still doesn't sound too horrible when played via Adobe Flash in the browser via the laptop's built-in speakers.

    ==== THE END ======

    :) P.S. Please remember to give me reputation points if you have enjoyed this tutorial and found it useful. I cannot get it "pinned" as a tutorial since I'm still a very Junior member! Points will change that

    (Sneeky bit: There are four places to give me lotsa rep-points in this thread!)
    Last edited by BigAlUK; 05 Nov 2012 at 10:16.
      My Computer


  5. Posts : 11,424
    Windows 7 Ultimate 64
       #5

    BigAIUK,
    Audio issues are a source of a lot of threads here, many will find this information very helpful.
      My Computer


  6. Posts : 133
    windows 7 x64 pro sp1
       #6

    this is great! thanks for posting this.
      My Computer


  7. Posts : 235
    Windows 10 Pro Version 22H2 64-bit Edition
       #7

    Qosmio X505_894


    I don't have all setting you have mention, as we both own same Brand and Model laptop.

    Thank you for you post!
      My Computer


  8. Posts : 17
    Windows 7 Ultimate, 64 bit
       #8

    Your testing equipment is utter rubbish. It might help to listen with decent quality. Start with a decent DAC and headphones. That will vault you miles ahead of where you are now.
      My Computer


  9. Posts : 60
    Windows 7 Home Premium 64 bit Service Pack 1
       #9

    I've been working on transferring mp3 files of OLD Country & Western and Hillbilly songs from 78s to cassettes. After a lot of experiments I finally ended up with the following:

    1. I transfer the mp3 files from my W7 pc to my old XP eMachine by a USB stick.
    2. The eMachine has a nForce 6-channel audio card with nvMIXER.
    3. I send the audio to a SANSUI Micro Component System with an Integrated Stereo Amp, Quartz Synthesizer, etc.
    4. While recording the cassettes I listen to the music over some old but good 8 ohm speakers.

    Phredtx
      My Computers


  10. Posts : 17
    Windows 7 Ultimate, 64 bit
       #10

    > "I've been working on transferring mp3 files of OLD Country & Western and Hillbilly songs from 78s to cassettes."

    Does this make any sense to you? How could 78s have mp3 files on them? I think you may mean you are transferring 78's to cassettes and then converting them to mp3's. But really, why bother? What is so valuable on a 78? They weren't even in stereo. They sounded horrible, didn't they? In all the decades I was into high end audio I've never run across a single person who owned a single 78. Need something? Just get it from YouTube. Or Archive.org which should have millions of old files.

    - - - Updated - - -

    Sorry but I can't edit my last post. Is that normal? We can't edit a post once its up? I've rarely seen that before on forums. Its so easy to make a mistake posting.
    I read your post carelessly.
    I still don't understand why you would use cassettes for holding anything at all. Plus where would you even get one fixed these days? They are highly mechanical. Have you invested in a good DAC? Have you heard the differences? Do you have decent speakers to hear those differences? What do you use for a turntable and cartridge? Its the cartridge or DAC and speakers that really make the most difference for the money spent. The other stuff is mainly support for those things. Like you need a minimum amount of power for speakers, the power amp needs a minimum amount of gain from the preamp which needs a minimum amount of output from the phono cartridge. If you're not using a turntable you can often dispense with the preamp and just use a power amp with a volume control and input selector box unless there are some impedance matching problems which is rare.
      My Computer


Page 1 of 2 12 LastLast

  Related Discussions
Our Sites
Site Links
About Us
Windows 7 Forums is an independent web site and has not been authorized, sponsored, or otherwise approved by Microsoft Corporation. "Windows 7" and related materials are trademarks of Microsoft Corp.

© Designer Media Ltd
All times are GMT -5. The time now is 17:30.
Find Us