Partition or Volume - Extend

How to Extend a Partition or Volume in Windows 7

   Information
This will show you how to extend a hard disk partition or volume into a empty unallocated space on the same hard disk to make it larger using Disk Management or Diskpart in Windows 7.
   Warning
You must be logged on in an administrator account to do this tutorial.

If you disable the Disk Defragmenter service, then you will get the error below when you try to do anything in Disk Management. If you get this error, then make sure that the Disk Defragmenter service is set to only Manual.

Error.jpg


OPTION ONE

Using Disk Management


1. If you have not already, you will first need to delete the partition or volume that you want to extend into to make it unallocated space.

2. Open the Control Panel (icons view), and click on the Administrative Tools icon. then close the Control Panel window.

3. Click on Computer Management in Administrative Tools, then close the Administrative Tools window.

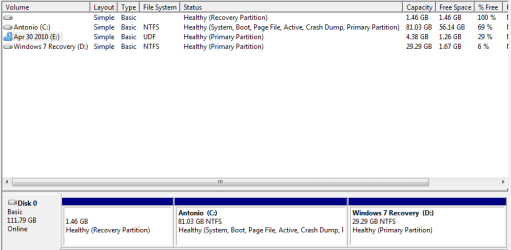
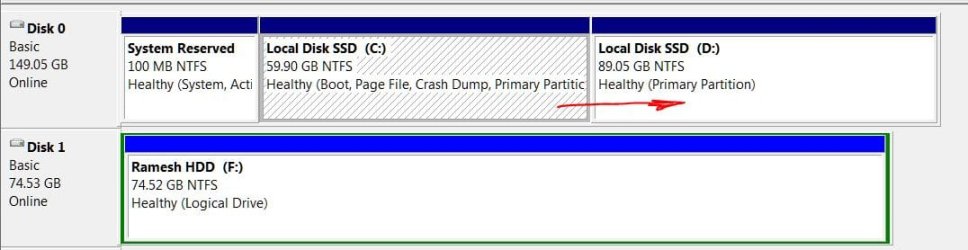
4. In the left pane under Storage, click on Disk Management. (See screenshot below)
Extend_Step1.jpg
5. In the middle pane, right click on the partition or volume directly adjacent (left) of the unallocated space that you want to extend into, and click on Extend Volume. (See screenshot above)

6. Click on the Next button. (See screenshot below)
Extend_Step2.jpg
7. Type in how many MB (1 GB = 1024 MB) you want to use from the unallocated space to extend the selected partition (step 5) into, then click on the Next button. (See screenshot below)
NOTE: If you want to use all of the unallocated space to extend into, then type in the maximum available space shown for the unallocated space.
Extend_Step3.jpg
8. Click on the Finish button. (See screenshot below)
Extend_Step4.jpg
9. The partition or volume has now been extended into the assigned unallocted space (step 7). (See screenshot below)
Extend_Step5.jpg
10. Close the Computer Management window. (See screenshot above)


OPTION TWO

Using Diskpart in a Elevated Command Prompt


1. If you have not already, you will first need to delete the partition or volume that you want to extend into to make it unallocated space.

2. Open a elevated command prompt, or a command prompt at boot.

3. In the elevated command prompt, type diskpart and press Enter. (See screenshot below)
CMD_Extend_Step1.jpg
4. In the elevated command prompt, type list disk and press Enter. (See screenshot below)
NOTE: This is to help you ID the disk that has Free space that you want to extend into, and to see the disk size to make it easier to ID it's volume number in step 5. For example, Disk 1.
CMD_Extend_Step2.jpg
5. In the elevated command prompt, type list volume and press Enter. (See screenshot below)
NOTE: Look for the volume number that has the same Size as from the size in step 4 minus the Free space. For example, Volume 2.
CMD_Extend_Step3.jpg
6. In the elevated command prompt, type select volume # and press Enter. (See screenshot below)
NOTE: You would substitute # for the volume number listed that you want to extend. For example, I want to extend the listed volume 2 since, so I would type select volume 2 and press Enter.
CMD_Extend_Step4.jpg
7. To Extend into All of the Unallocated Space
A) In the elevated command prompt, type extend and press Enter. (See screenshot below)
NOTE: The unallocated space will be removed and added completely to the selected partiton or volume (step 6).
CMD_Extend_Step5.jpg
B) Go to step 9.
8. To Extend into the Unallocated Space by a Specified Size
A) In the elevated command prompt, type extend size=(# in MB) and press Enter.
NOTE: You would substitute (# in MB) for how many MB (1 GB = 1024 MB) you want to use of the unallocated space (free space shown in step 4) to be extended into. For example, if I only wanted to extend into 5 GB of the unallocated space, then I would type extend size=5120 and press Enter.
9. In the elevated command prompt, type exit and press Enter. (See screenshot below)
CMD_Extend_Step6.jpg
10. Close the elevated command prompt.

11. The selected partition or volume (step 6) has now been extended into the unallocated space to make it larger.
NOTE: If you did step 8 instead of 7, then you can use the rest of the unallocated space to create a new partition with if you like.
That's it,
Shawn


Last edited:
You're welcome Kasparovski, and welcome to Seven Forums. :)
 

My Computer

Computer type
PC/Desktop
Computer Manufacturer/Model Number
Self built custom
OS
64-bit Windows 11 Pro for Workstations
CPU
Intel i7-8700K OC'd to 5 GHz
Motherboard
ASUS ROG Maximus XI Formula Z390
Memory
64 GB (4x16GB) G.SKILL TridentZ RGB DDR4 3600 MHz
Graphics Card(s)
ASUS ROG-STRIX-GTX1080TI-O11G-GAMING
Sound Card
Integrated
Monitor(s) Displays
2 x Samsung Odyssey G7 27"
Screen Resolution
2560x1440
Hard Drives
1TB Samsung 990 PRO M.2,
4TB Samsung 990 PRO PRO M.2,
TerraMaster F8 SSD Plus NAS
PSU
Seasonic Prime Titanium 850W
Case
Thermaltake Core P3
Cooling
Corsair Hydro H115i
Keyboard
Logitech wireless K800
Mouse
Logitech MX Master 4
Internet Speed
2 Gb/s Download and 100 Mb/s Upload
Antivirus
Malwarebyte Anti-Malware Premium
Browser
Google Chrome
Other Info
Logitech Z625 speaker system,
Logitech BRIO 4K Pro webcam,
HP Color LaserJet Pro MFP M477fdn,
APC SMART-UPS RT 1000 XL - SURT1000XLI,
Galaxy S23 Plus phone
Need advice on my "partition management" (please)

Hello everyone,

I have attached a picture of my hard drive partition setup from the Computer Management screen because it would have been too hard to try and explain my question in words.

Referring to the picture, you will see that the unlabeled, 1.46 GB Healthy (Recovery Partition) is 100% free space. I feel kind of stupid because I thought that the Toshiba system recovery data was there. Maybe it was before I installed Windows 7 on my Vista machine... Anyway, since it is free space, can I use it for data?

Here is what I am trying to accomplish:

1. Increase partition size of Windows 7 Recovery ( D: by decreasing the size of Antonio ( C:; and
2. If the "Recovery Partition" is not necessary, combine that partition with Antonio ( C: [or D:, whatever is easier].

I have read the tutorials here, but I am a bit confused because this Recovery Partition with 100% free space threw me off.

Can someone please give me a little direction and insight into how I should proceed? I sure do appreciate any help!

Thanks!

~Antonio :geek:
 

Attachments

  • Partition Window.png
    Partition Window.png
    28.3 KB · Views: 299

My Computer

Computer Manufacturer/Model Number
HP Pavilion Media Center PC m7350n
OS
Microsoft Windows 7 Home Premium 32-bit 7601 Multiprocessor Free Service Pack 1
CPU
Intel(R) Pentium(R) D CPU 2.80GHz
Motherboard
ASUSTek Computer INC. EMERY
Memory
2.00 GB
Graphics Card(s)
NVIDIA GeForce 6200SE TurboCache(TM)
Sound Card
Realtek High Definition Audio
Monitor(s) Displays
HP L1710 LCD Display
Screen Resolution
1280 x 1024 x 32 bits (4294967296 colors) @ 60 Hz
Hard Drives
(1) SAMSUNG SP2504C (2) EPSON Stylus Storage USB Device (3) Generic USB CF Reader USB Device (4) Generic USB MS Reader USB Device (5) Generic USB SD Reader USB Device (6) Generic USB SM Reader USB Device (7) Seagate FA GoFlex Desk USB Dev
Internet Speed
20+mbps
Hello Antontio,

I'm sorry, but you will not be able to do that using Disk Management. You would need to use something like the free program Partition Wizard instead to do so. Use that program to shrink C: to create unallocated space, then extend D: into that unallocated space.

Hope this helps,
Shawn
 

My Computer

Computer type
PC/Desktop
Computer Manufacturer/Model Number
Self built custom
OS
64-bit Windows 11 Pro for Workstations
CPU
Intel i7-8700K OC'd to 5 GHz
Motherboard
ASUS ROG Maximus XI Formula Z390
Memory
64 GB (4x16GB) G.SKILL TridentZ RGB DDR4 3600 MHz
Graphics Card(s)
ASUS ROG-STRIX-GTX1080TI-O11G-GAMING
Sound Card
Integrated
Monitor(s) Displays
2 x Samsung Odyssey G7 27"
Screen Resolution
2560x1440
Hard Drives
1TB Samsung 990 PRO M.2,
4TB Samsung 990 PRO PRO M.2,
TerraMaster F8 SSD Plus NAS
PSU
Seasonic Prime Titanium 850W
Case
Thermaltake Core P3
Cooling
Corsair Hydro H115i
Keyboard
Logitech wireless K800
Mouse
Logitech MX Master 4
Internet Speed
2 Gb/s Download and 100 Mb/s Upload
Antivirus
Malwarebyte Anti-Malware Premium
Browser
Google Chrome
Other Info
Logitech Z625 speaker system,
Logitech BRIO 4K Pro webcam,
HP Color LaserJet Pro MFP M477fdn,
APC SMART-UPS RT 1000 XL - SURT1000XLI,
Galaxy S23 Plus phone
Thank you for the fast answer!

Shawn,

Thanks for the prompt response. :)

I will definitely do that! What about the unlabeled volume, that says, "Healthy (Recovery Partition)"? I just noticed that there is no File System specified for that as well. Can that space be recovered for my use, or is there an OS need for it, even though there is no data currently in it?

~Antonio
 

My Computer

Computer Manufacturer/Model Number
HP Pavilion Media Center PC m7350n
OS
Microsoft Windows 7 Home Premium 32-bit 7601 Multiprocessor Free Service Pack 1
CPU
Intel(R) Pentium(R) D CPU 2.80GHz
Motherboard
ASUSTek Computer INC. EMERY
Memory
2.00 GB
Graphics Card(s)
NVIDIA GeForce 6200SE TurboCache(TM)
Sound Card
Realtek High Definition Audio
Monitor(s) Displays
HP L1710 LCD Display
Screen Resolution
1280 x 1024 x 32 bits (4294967296 colors) @ 60 Hz
Hard Drives
(1) SAMSUNG SP2504C (2) EPSON Stylus Storage USB Device (3) Generic USB CF Reader USB Device (4) Generic USB MS Reader USB Device (5) Generic USB SD Reader USB Device (6) Generic USB SM Reader USB Device (7) Seagate FA GoFlex Desk USB Dev
Internet Speed
20+mbps
Antonio,

The "Healthy (Recovery Partition)" may have been a OEM recovery partition. Since it's empty, then yes you can delete it and recover it's unallocated space as well. :)
 

My Computer

Computer type
PC/Desktop
Computer Manufacturer/Model Number
Self built custom
OS
64-bit Windows 11 Pro for Workstations
CPU
Intel i7-8700K OC'd to 5 GHz
Motherboard
ASUS ROG Maximus XI Formula Z390
Memory
64 GB (4x16GB) G.SKILL TridentZ RGB DDR4 3600 MHz
Graphics Card(s)
ASUS ROG-STRIX-GTX1080TI-O11G-GAMING
Sound Card
Integrated
Monitor(s) Displays
2 x Samsung Odyssey G7 27"
Screen Resolution
2560x1440
Hard Drives
1TB Samsung 990 PRO M.2,
4TB Samsung 990 PRO PRO M.2,
TerraMaster F8 SSD Plus NAS
PSU
Seasonic Prime Titanium 850W
Case
Thermaltake Core P3
Cooling
Corsair Hydro H115i
Keyboard
Logitech wireless K800
Mouse
Logitech MX Master 4
Internet Speed
2 Gb/s Download and 100 Mb/s Upload
Antivirus
Malwarebyte Anti-Malware Premium
Browser
Google Chrome
Other Info
Logitech Z625 speaker system,
Logitech BRIO 4K Pro webcam,
HP Color LaserJet Pro MFP M477fdn,
APC SMART-UPS RT 1000 XL - SURT1000XLI,
Galaxy S23 Plus phone
i did follow method 2 in the tutorial and it did not work so I downloaded the free partition manager wizard mentioned in some post above and left the program running doing the resizing. it was at 62 % that I left to prepare for going to work.

on my way out i checked my PC and lo and behold, a major error - windows boot manager failed - status [cant recall the number], but is asking for me to reboot with installation CD and select repair. Not sure what happened but I thought the part manager was cool as per related posts above.

Now I am stuck with a system that don't boot and not sure whether the resizing [enlarging] was completed or not

any ideas? suggestions?
 

My Computer

OS
windows 7
Hello Jojouk, and welcome to Seven Forums.

What disk/partition were you trying to resize, and what did it say when you tried using Disk Management?

How are your drive(s) layed out? (ex: multiple partitions, how many partitions, etc...) Do you have a screenshot of Disk Management?
 
Last edited:

My Computer

Computer type
PC/Desktop
Computer Manufacturer/Model Number
Self built custom
OS
64-bit Windows 11 Pro for Workstations
CPU
Intel i7-8700K OC'd to 5 GHz
Motherboard
ASUS ROG Maximus XI Formula Z390
Memory
64 GB (4x16GB) G.SKILL TridentZ RGB DDR4 3600 MHz
Graphics Card(s)
ASUS ROG-STRIX-GTX1080TI-O11G-GAMING
Sound Card
Integrated
Monitor(s) Displays
2 x Samsung Odyssey G7 27"
Screen Resolution
2560x1440
Hard Drives
1TB Samsung 990 PRO M.2,
4TB Samsung 990 PRO PRO M.2,
TerraMaster F8 SSD Plus NAS
PSU
Seasonic Prime Titanium 850W
Case
Thermaltake Core P3
Cooling
Corsair Hydro H115i
Keyboard
Logitech wireless K800
Mouse
Logitech MX Master 4
Internet Speed
2 Gb/s Download and 100 Mb/s Upload
Antivirus
Malwarebyte Anti-Malware Premium
Browser
Google Chrome
Other Info
Logitech Z625 speaker system,
Logitech BRIO 4K Pro webcam,
HP Color LaserJet Pro MFP M477fdn,
APC SMART-UPS RT 1000 XL - SURT1000XLI,
Galaxy S23 Plus phone
i did follow method 2 in the tutorial and it did not work so I downloaded the free partition manager wizard mentioned in some post above and left the program running doing the resizing. it was at 62 % that I left to prepare for going to work.

on my way out i checked my PC and lo and behold, a major error - windows boot manager failed - status [cant recall the number], but is asking for me to reboot with installation CD and select repair. Not sure what happened but I thought the part manager was cool as per related posts above.

Now I am stuck with a system that don't boot and not sure whether the resizing [enlarging] was completed or not

any ideas? suggestions?

Do you have a backup of your system, and data?

Do you have another computer you could create a Partition Wizard boot disc?

Just my 2 cents, I will follow up after your answers are posted. I have been thru this upside down and inside out, so I hope I can help you. In fact, just last night, I went from a sluggish system with the new Data partition, System Partition, and Recovery Partition, to restore back to my last good image, which was before the Data partition. So, I restored the Clean, Efficient, System Image to both the partitions that I had recently created, then tried to use Windows to resize the new C: partition for my data, but that did not work, so I downloaded and used Partition Wizard, which is what I used successfully before, and it worked beautifully at resizing my C: partition. Then, I moved all of the data folders to the new partition, deleted the data, then restored the most current partition using the Image Explorer tool in Macrium. Now, I have an almost perfect system, ready to run a NEW clean system image so I don't have to do all this in the future. FWIW, I am using Mozy for my Data backup until I can get around to finding some external method(s).

Hope you get your system working! Like I said, I will follow and help if I can...
 

My Computer

Computer Manufacturer/Model Number
HP Pavilion Media Center PC m7350n
OS
Microsoft Windows 7 Home Premium 32-bit 7601 Multiprocessor Free Service Pack 1
CPU
Intel(R) Pentium(R) D CPU 2.80GHz
Motherboard
ASUSTek Computer INC. EMERY
Memory
2.00 GB
Graphics Card(s)
NVIDIA GeForce 6200SE TurboCache(TM)
Sound Card
Realtek High Definition Audio
Monitor(s) Displays
HP L1710 LCD Display
Screen Resolution
1280 x 1024 x 32 bits (4294967296 colors) @ 60 Hz
Hard Drives
(1) SAMSUNG SP2504C (2) EPSON Stylus Storage USB Device (3) Generic USB CF Reader USB Device (4) Generic USB MS Reader USB Device (5) Generic USB SD Reader USB Device (6) Generic USB SM Reader USB Device (7) Seagate FA GoFlex Desk USB Dev
Internet Speed
20+mbps
I wish to extend (increase volume) of my Local Disk (C:) to the adjoining on right hand side, Local Disk (D:).
Here I see a similar querry by ccchan discussed and solved by the guidance from Mr.Brink and Mr.Dave76.
Before I proceed in the same footsteps I wish to reconfirm if my problem is the same and has the same solution
i.e. to use Partition Wizard Home Edition, as suggested by Dave.
Here is the screen snap.
Please.
 

Attachments

  • Capture.JPG
    Capture.JPG
    65.2 KB · Views: 307

My Computer

Computer Manufacturer/Model Number
Self assembled.
OS
Windows 7 Ultimate x64 Version 6.1.7600 Build 7600
CPU
Intel Core2 Quad Q9650 3.00GHz, 2888 Mgz, 4 Cores, 4 Logica
Motherboard
Intel: DX48BT2
Memory
4x2 (8gb)Corsair DDR3 1333
Graphics Card(s)
ATI:Radeon:4870 GPU (2 nos. Crossfire Disabled)
Sound Card
Maudio:Firewire Solo
Monitor(s) Displays
3 nos LCD AOC
Screen Resolution
1920 x 1080
Hard Drives
2nos: Non Raid: Intel: SSDSA2MH160G2C1
2nos: Seagate 80gb (just connected/enabled)http://www.sevenforums.com/profile.php?do=extra
Added 1 Seagte 250gb.
PSU
Corsair HX1000W Modular
Case
Coolermaster HAF 932
Cooling
Liquid: Coolermaster Aquagate
Keyboard
TVS: mechanical
Mouse
Microsoft:Arc
Internet Speed
download:1.9Mb/s Upload:0.71Mb/s (keeps varying !)
Other Info
just added a BambooFun pen tablet.
Hello Ramesh,

If you do not want the D: partition, then you could delete the D: partition so it will be unallocated space. Afterwards, extend C: into the unallocated space using Disk Management.

If you wanted to keep the D: partiton, then yes you will need to use a program like Partition Manager to shrink D and extend C into the space you shrunk from D: .

Hope this helps,
Shawn
 

My Computer

Computer type
PC/Desktop
Computer Manufacturer/Model Number
Self built custom
OS
64-bit Windows 11 Pro for Workstations
CPU
Intel i7-8700K OC'd to 5 GHz
Motherboard
ASUS ROG Maximus XI Formula Z390
Memory
64 GB (4x16GB) G.SKILL TridentZ RGB DDR4 3600 MHz
Graphics Card(s)
ASUS ROG-STRIX-GTX1080TI-O11G-GAMING
Sound Card
Integrated
Monitor(s) Displays
2 x Samsung Odyssey G7 27"
Screen Resolution
2560x1440
Hard Drives
1TB Samsung 990 PRO M.2,
4TB Samsung 990 PRO PRO M.2,
TerraMaster F8 SSD Plus NAS
PSU
Seasonic Prime Titanium 850W
Case
Thermaltake Core P3
Cooling
Corsair Hydro H115i
Keyboard
Logitech wireless K800
Mouse
Logitech MX Master 4
Internet Speed
2 Gb/s Download and 100 Mb/s Upload
Antivirus
Malwarebyte Anti-Malware Premium
Browser
Google Chrome
Other Info
Logitech Z625 speaker system,
Logitech BRIO 4K Pro webcam,
HP Color LaserJet Pro MFP M477fdn,
APC SMART-UPS RT 1000 XL - SURT1000XLI,
Galaxy S23 Plus phone
I wish to extend (increase volume) of my Local Disk (C:) to the adjoining on right hand side, Local Disk (D:).
Here I see a similar querry by ccchan discussed and solved by the guidance from Mr.Brink and Mr.Dave76.
Before I proceed in the same footsteps I wish to reconfirm if my problem is the same and has the same solution
i.e. to use Partition Wizard Home Edition, as suggested by Dave.
Here is the screen snap.
Please.

You don't need to run that bootable disc since the space you want to gain is to the right of the partition.

Simply backup what you need that's in your D drive, then right click on the D drive and hit Delete Volume. That partition will then say unallocated space.

Then right click on the C drive and hit Extend Volume, and next on the following screen.

Now your C drive will gain that space.

Good luck,
Eldin
 

My Computers

System One System Two

  • Computer type
    PC/Desktop
    Computer Manufacturer/Model Number
    PowerSpec G164
    OS
    WIN10
    CPU
    AMD Ryzen 5 3600 6-Core Processor 3.59 GHz
    Memory
    16.0 GB
    Internet Speed
    VERY FAST>>>!!!
  • Antivirus
    ESET Security Premium
I wish to extend (increase volume) of my Local Disk (C:) to the adjoining on right hand side, Local Disk (D:).
Here I see a similar querry by ccchan discussed and solved by the guidance from Mr.Brink and Mr.Dave76.
Before I proceed in the same footsteps I wish to reconfirm if my problem is the same and has the same solution
i.e. to use Partition Wizard Home Edition, as suggested by Dave.
Here is the screen snap.
Please.

Hi Ramesh,

As mentioned above, If you want to remove the D partition you can delete it and expand C partition to the unallocated space.

If you want to make the D partition smaller and expand the C partition into the new unallocated space you can easily do it with Partition Wizard Home Edition.

You can do this with the CD bootable version or download and install the complete version, setup the moves you want, when it re-starts it will complete the moves before booting into Win7.

This method will not loose any data or files you currently have in the D partition.

Let us know if you have any questions.
 

My Computer

Computer type
PC/Desktop
Computer Manufacturer/Model Number
76~2.0
OS
Windows 7 Ult x64 - SP1/ Windows 8 Pro x64
CPU
Intel Core i5-3570K 4.6GHz
Motherboard
Gigabyte GA-Z77X UD3H, f18
Memory
8GB (2X4GB) DDR3 1600 Corsair Vengeance CL8 1.5v
Graphics Card(s)
Sapphire HD 7770 Vapor-X OC 1GB DDR5
Sound Card
Onboard VIA VT2021
Monitor(s) Displays
22" LCD Dell
Screen Resolution
1680x1050
Hard Drives
Samsung 840Pro 128GB SSD,
Seagate Barracuda 500GB SATA2 7200rpm 32MB cache, Seagate Barracuda 1TB SATA2 7200rpm 32MB cache,
PSU
Corsair HX650W
Case
Cooler Master Storm Scout
Cooling
Corsair H80 2x12cm Noctua NF P12 , 2x14cm case fans
Keyboard
Logitech Wave
Mouse
CM Sentinel
Internet Speed
Dismal
Antivirus
Avast
Browser
Opera Next
Other Info
Haswell laptop: HP Envy 17t-j, i7-4700MQ, GeForce 740M 2GB DDR3, 17.3" Full HD 1920x1080, 16GB RAM, Samsung 840 Pro 128GB, 1TB Hitachi 7200 HDD,
Desktop: eSATA ports,
External eSATA Seagate 500GB SATA2 7200rpm,
External WD USB 500GB
Shawn, Eldin and Dave THANKS;
for your response and guidance.
As I do not have any data on D, I will delete it.
By the way I did download, Partition Wizard, but it did not allowed me to
do the 'merge' action. It is much possible that I could not understand the
steps/actions.
But with Disk Management I will be comfortable.
Will do this now.
regards
Ramesh
PS: I just did it.
:)
Thanks
 
Last edited:

My Computer

Computer Manufacturer/Model Number
Self assembled.
OS
Windows 7 Ultimate x64 Version 6.1.7600 Build 7600
CPU
Intel Core2 Quad Q9650 3.00GHz, 2888 Mgz, 4 Cores, 4 Logica
Motherboard
Intel: DX48BT2
Memory
4x2 (8gb)Corsair DDR3 1333
Graphics Card(s)
ATI:Radeon:4870 GPU (2 nos. Crossfire Disabled)
Sound Card
Maudio:Firewire Solo
Monitor(s) Displays
3 nos LCD AOC
Screen Resolution
1920 x 1080
Hard Drives
2nos: Non Raid: Intel: SSDSA2MH160G2C1
2nos: Seagate 80gb (just connected/enabled)http://www.sevenforums.com/profile.php?do=extra
Added 1 Seagte 250gb.
PSU
Corsair HX1000W Modular
Case
Coolermaster HAF 932
Cooling
Liquid: Coolermaster Aquagate
Keyboard
TVS: mechanical
Mouse
Microsoft:Arc
Internet Speed
download:1.9Mb/s Upload:0.71Mb/s (keeps varying !)
Other Info
just added a BambooFun pen tablet.

My Computer

Computer type
PC/Desktop
Computer Manufacturer/Model Number
76~2.0
OS
Windows 7 Ult x64 - SP1/ Windows 8 Pro x64
CPU
Intel Core i5-3570K 4.6GHz
Motherboard
Gigabyte GA-Z77X UD3H, f18
Memory
8GB (2X4GB) DDR3 1600 Corsair Vengeance CL8 1.5v
Graphics Card(s)
Sapphire HD 7770 Vapor-X OC 1GB DDR5
Sound Card
Onboard VIA VT2021
Monitor(s) Displays
22" LCD Dell
Screen Resolution
1680x1050
Hard Drives
Samsung 840Pro 128GB SSD,
Seagate Barracuda 500GB SATA2 7200rpm 32MB cache, Seagate Barracuda 1TB SATA2 7200rpm 32MB cache,
PSU
Corsair HX650W
Case
Cooler Master Storm Scout
Cooling
Corsair H80 2x12cm Noctua NF P12 , 2x14cm case fans
Keyboard
Logitech Wave
Mouse
CM Sentinel
Internet Speed
Dismal
Antivirus
Avast
Browser
Opera Next
Other Info
Haswell laptop: HP Envy 17t-j, i7-4700MQ, GeForce 740M 2GB DDR3, 17.3" Full HD 1920x1080, 16GB RAM, Samsung 840 Pro 128GB, 1TB Hitachi 7200 HDD,
Desktop: eSATA ports,
External eSATA Seagate 500GB SATA2 7200rpm,
External WD USB 500GB
Hi Guys, I'm at work at the moment, so I don't have access to my home PC. I transfered my old files and setting to Windows 7 last night (with WET), but, from what I wreckon, I also transfered info in my old recovery partition to my new recovery partition. This has caused my partition to be full. (red at the bottom when I click on it) and WET not fully completing because disk was too full. I'm enquiring, if I right click on the Recovery partition as in the tutorial, and click extend volume, will it work. Or do I have to create a third partition, delete it to make free space and then extend it into the Recovery partition??

UPDATE:
Okay, after doing more research on the matter.... Is it best for me to shrink my C: Drive (Main Hard Drive) by example 5GB (5120MB) and then restart the computer and go back into Disk Management and extend the F: Drive (Recovery Backup) with the 5GB unallocated space!!!!

Thanks in advance guys.... Greatly appreciated.
 
Last edited by a moderator:

My Computer

OS
Windows 7Home Premium 32bit
Hello Lub, and welcome to Seven Forums.

You might consider transfering the files to your C: drive instead, perhaps to a folder on your desktop. Afterwards, be very careful to only delete what was transferred to your recovery partition originally. The recovery partition is what is used to restore your Windows 7 with. If you delete the wrong files in it, you may not ever be able to restore your Windows 7 again.

Hope this helps,
Shawn
 

My Computer

Computer type
PC/Desktop
Computer Manufacturer/Model Number
Self built custom
OS
64-bit Windows 11 Pro for Workstations
CPU
Intel i7-8700K OC'd to 5 GHz
Motherboard
ASUS ROG Maximus XI Formula Z390
Memory
64 GB (4x16GB) G.SKILL TridentZ RGB DDR4 3600 MHz
Graphics Card(s)
ASUS ROG-STRIX-GTX1080TI-O11G-GAMING
Sound Card
Integrated
Monitor(s) Displays
2 x Samsung Odyssey G7 27"
Screen Resolution
2560x1440
Hard Drives
1TB Samsung 990 PRO M.2,
4TB Samsung 990 PRO PRO M.2,
TerraMaster F8 SSD Plus NAS
PSU
Seasonic Prime Titanium 850W
Case
Thermaltake Core P3
Cooling
Corsair Hydro H115i
Keyboard
Logitech wireless K800
Mouse
Logitech MX Master 4
Internet Speed
2 Gb/s Download and 100 Mb/s Upload
Antivirus
Malwarebyte Anti-Malware Premium
Browser
Google Chrome
Other Info
Logitech Z625 speaker system,
Logitech BRIO 4K Pro webcam,
HP Color LaserJet Pro MFP M477fdn,
APC SMART-UPS RT 1000 XL - SURT1000XLI,
Galaxy S23 Plus phone
Hello Lub, and welcome to Seven Forums.

You might consider transfering the files to your C: drive instead, perhaps to a folder on your desktop. Afterwards, be very careful to only delete what was transferred to your recovery partition originally. The recovery partition is what is used to restore your Windows 7 with. If you delete the wrong files in it, you may not ever be able to restore your Windows 7 again.

Hope this helps,
Shawn


Hi Shawn thanks for the info and welcome.... The only thing is that I don't know how to access the files as I get a warning saying that this is a recovery folder and that anything removed could damage your rcovery.... Its a HP PC.

Also, If I didn't want to risk deleting the files (How would I know they were deff transferred yesterday?) would it still be possible to shrink my C:drive and then extend my F: drive, with Disk Management??
 

My Computer

OS
Windows 7Home Premium 32bit
You don't want to mess with your recovery partition. Doing so can mess it up, and leave you without a way to recover Windows 7.

To be safe, I would recommend to create a set of recovery discs for your HP before doing anything else. This way if the recovery partition gets messed up by mistake, you will be able to use the recovery discs to restore your Windows 7 with if ever needed.

Since your recovery partition has a drive letter F: , you should be able to open it in the Computer window to delete only the files that you transferred into it. You would just need to approve the warning message to continue with the deletion of only the transferred files.

Next, transfer the files again, but to the C: drive instead.
 

My Computer

Computer type
PC/Desktop
Computer Manufacturer/Model Number
Self built custom
OS
64-bit Windows 11 Pro for Workstations
CPU
Intel i7-8700K OC'd to 5 GHz
Motherboard
ASUS ROG Maximus XI Formula Z390
Memory
64 GB (4x16GB) G.SKILL TridentZ RGB DDR4 3600 MHz
Graphics Card(s)
ASUS ROG-STRIX-GTX1080TI-O11G-GAMING
Sound Card
Integrated
Monitor(s) Displays
2 x Samsung Odyssey G7 27"
Screen Resolution
2560x1440
Hard Drives
1TB Samsung 990 PRO M.2,
4TB Samsung 990 PRO PRO M.2,
TerraMaster F8 SSD Plus NAS
PSU
Seasonic Prime Titanium 850W
Case
Thermaltake Core P3
Cooling
Corsair Hydro H115i
Keyboard
Logitech wireless K800
Mouse
Logitech MX Master 4
Internet Speed
2 Gb/s Download and 100 Mb/s Upload
Antivirus
Malwarebyte Anti-Malware Premium
Browser
Google Chrome
Other Info
Logitech Z625 speaker system,
Logitech BRIO 4K Pro webcam,
HP Color LaserJet Pro MFP M477fdn,
APC SMART-UPS RT 1000 XL - SURT1000XLI,
Galaxy S23 Plus phone
You don't want to mess with your recovery partition. Doing so can mess it up, and leave you without a way to recover Windows 7.

To be safe, I would recommend to create a set of recovery discs for your HP before doing anything else. This way if the recovery partition gets messed up by mistake, you will be able to use the recovery discs to restore your Windows 7 with if ever needed.

Since your recovery partition has a drive letter F: , you should be able to open it in the Computer window to delete only the files that you transferred into it. You would just need to approve the warning message to continue with the deletion of only the transferred files.

Next, transfer the files again, but to the C: drive instead.

Thanks for that info,

Do you know if there is a clear identification from the transfered files to the PC files?

If I do successfully delete the files and then procede to transfer the files again... How do I know that they are going to the C: Drive? I can see this clearly on Windows Vista WET but not on Windows 7 WET. Also, will I transfer the full WET file? if so, would they duplicate all the successful files transferred last night or over write them?

Sorry for all the Q's man, just a bit battered with this last night.
 

My Computer

OS
Windows 7Home Premium 32bit
Back
Top