

How to Add or Remove User Accounts from Groups in Vista, Windows 7, and Windows 8
InformationThis will show you how to limit the ability of users to be able to perform certain actions by adding or removing their user accounts from being a member of groups and the group's default rights and permissions. Belonging to a local group gives a user the rights and abilities to perform various tasks on the local computer.
You can add local user accounts, domain user accounts, computer accounts, and group accounts to local groups.
You must be logged in as an administrator to be able to do this tutorial.
WarningBe sure to always have at least one user account that is a member of the Administrators group. You will lose access to everything that a standard user (Users group) cannot open if you do not.NoteThe following table provides descriptions of the default groups that are located in the Groups folder. The table also lists the default user rights for each group. These user rights are assigned in the local security policy.
OPTION ONEThrough "Users" Folder in Local Users and Groups
1. Open Local Users and Groups, and click on the Users folder in the left pane. (see screenshot below)
2. In the middle pane, double click on a user account name that you want to add or remove a user from being a member of groups. (see screenshot above)
3. To Remove a User Account from being a Member of a Group
A) Click on the Member Of tab. (see screenshot below)4. To Add a User Account to be a Member of a Group
B) Select (highlight) the group(s) that you want to remove the user from being a member of, and click on the Remove button. (see screenshot above)
NOTE: You can press and hold the CTRL key to select more than one listed group.
C) When finished, click on OK. (see screenshot below)
A) Click on the Member Of tab, and click on the Add button. (see screenshot below)5. When finished, close the Local Users and Groups window. (see screenshot below step 1)
B) Click on the Advanced button. (see screenshot below)
C) Click on the Find Now button. (see screenshot below)
D) In the bottom pane under Search results, select the group(s) that you want to add the user account to be a member of and click on OK. (see screenshot below)
NOTE: You can press and hold the CTRL key to select more than one listed group
E) Click on OK. (see screenshot below)
F) When finished, click on OK. (see screenshot below)
OPTION TWOThrough "Groups" Folder in Local Users and Groups
1. Open Local Users and Groups, and click on the Groups folder in the left pane. (see screenshot below)
2. In the middle pane, double click on a group that you want to add or remove a user account from being a member of. (see screenshot above)
3. To Remove a User Account from being a Member of a Group
A) Select (highlight) the user account name(s) that you want to remove the from being a member of this group, and click on the Remove button. (see screenshot below)4. To Add a User Account to be a Member of a Group
NOTE: You can press and hold the CTRL key to select more than one listed group.
B) When finished, click on OK. (see screenshot below)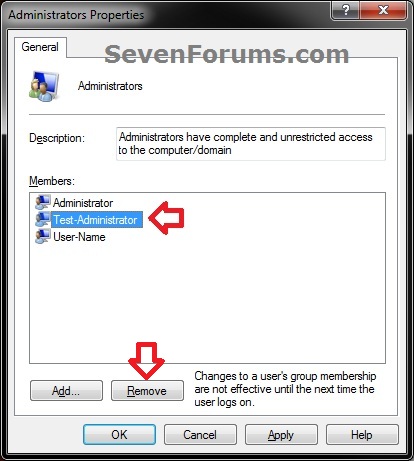
A) Click on the Add button. (see screenshot below)
B) Click on the Advanced button. (see screenshot below)
C) Click on the Find Now button. (see screenshot below)
D) In the bottom pane under Search results, select the user account name(s) that you want to add to be a member of this group and click on OK. (see screenshot below)
NOTE: You can press and hold the CTRL key to select more than one listed user account.
E) Click on OK. (see screenshot below)
F) When finished, click on OK. (see screenshot below)
5. When finished, close the Local Users and Groups window. (see screenshot below step 1)
OPTION THREEUsing an Elevated Command Prompt
1. Open an elevated command prompt.That's it,
2. To Add a User Account to be a Member of a Group
A) In the elevated command prompt, type the command below and press Enter. (see screenshot below)3. To Remove a User Account from being a Member of a Group
NoteYou would substitute the items in red in the command below with this:
GroupName = The actual name of the group.
ComputerName = The computer name or domain name that the user account is located on within quotes.
UserName = The actual name of the user account.
net localgroup "GroupName" ComputerName\UserName /addB) Go to step 4.
For example: If I wanted to add the user account named Standard to be a member of the Administrators group on my computer named Brink-PC, I would type the command below and press Enter.
net localgroup "Administrators" Brink-PC\Standard /add
A) In the elevated command prompt, type the command below and press Enter. (see screenshot below)4. When finished, close the elevated command prompt.
NoteYou would substitute the items in red in the command below with this:
GroupName = The actual name of the group.
ComputerName = The computer name or domain name that the user account is located on within quotes.
UserName = The actual name of the user account.
net localgroup "GroupName" ComputerName\UserName /delete
For example: If I wanted to remove the user account named Standard from being a member of the Administrators group on my computer named Brink-PC, I would type the command below and press Enter.
net localgroup "Administrators" Brink-PC\Standard /deleteB) Go to step 4.
Shawn
Related Tutorials
- How to Create and Delete a User Group in Windows 7 and Vista
- How to Open the Local Security Policy Editor in Windows 7 and Windows 8
- How to Open Local Users and Groups in Windows 7 and Windows 8
- How to Change a User Account Type in Windows 7
- How to Enable or Disable a User Account in Windows 7
- How to Allow or Deny Permissions to Users and Groups
- How to Add or Remove Users and Groups from "User Rights Assignment"
- How to Allow or Prevent Users and Groups to Shut Down the Computer
- How to Allow or Prevent Users and Groups to Take Ownership
- How to Allow or Prevent Specific Users and Groups from Changing the Date and Time
- How to Allow or Prevent Specific Users and Groups from Changing the Time Zone
- How to Create a User Account in Windows 7
- How to Delete a User Account in Windows 7
- How to Change Behavior of User Account Control (UAC) Prompt for Administrators in Windows
- How to Change Behavior of User Account Control (UAC) Prompt for Standard Users
User Accounts - Add or Remove from Groups
-
New #1
The tutorial has been updated by adding OPTION THREE to be able to add or remove users from or to groups in a elevated command prompt no matter what edition of Windows 7 you have installed. :)
-
New #2
Dear Shawn, hi how are you? this is KP.
I have a simple question, but i apologize in advance that the explanation would be quite long. Yesterday I found out I have a lock icon on My Documents folder. I was looking for a way to remove the icons, and then I found this post (which is exactly my case).
How to remove lock icon over my folder
I shared to homegroup and then unshared My Docs folder and the inheritance isn't restored. I followed that post and all is well.
However, before I found that post, I followed this instruction first, Remove Lock Icon from An Article
I will put the images from that article here, (apologies for hotlinking i will remove it soon)


I want to remove the Computer-Name\Users account. Im using windows 7 Home Premium, now I'm stuck with 2 user account because i followed the above tutorial, Computer-Name\Administrators and Computer-Name\Users. I wanted to delete the Computer-Name\Users, may i ask how to delete that with Win 7 home premium? (since i cant go to lusrmgr.msc)
sidenote: I've tried net localgroup "Users" Computer-Name\Users /delete, but i still cant delete it "there is no such global user or group:Computer-Name\Users"
thank you in advance for your continued help to my Qs about win 7. here's a virtual beer :beer:
KP!
-
New #3
Hello KP,
I'm doing fine thank you. I hope you are as well. :)
If your "C:\Users\(user-name)\My Documents" folder no longer has inheritable permissions from your users folder, then go through the steps below to restore them. Afterwards, please post screenshots showing your security and permission settings of your My Documents folder to see what we're working with the rest.
- Right click on your "C:\Users\(user-name)\My Documents" folder, and click on Properties.
- Click on Security tab, and click on Advanced button.
- In Permissions tab, click on Change Permissions button.

- Check both options, and click on OK.

- Click on Yes, and OK your way out until finished.

-
New #4
hi brink, tq for your help as always!!
regarding lock icon, yes i've managed to removed the lock icon from My Docs before posting yesterday, i followed someone's post on this thread on sevenforums How to remove lock icon over my folder
it's basically the same instruction as you've just posted and my inheritable permissions are fine now. :)
however, before i found that tutorial,... i followed this tutorial from howtogeek Remove the Lock Icon from a Folder in Windows 7
and since i did that, now i have...
Authenticated User
System
Administrators (Kungfu\Administrator)
and Users (Kungfu\Users)
on my security. i want to delete the Users that i got from following that tutorial >_<. i cant access lusrmgr.msc and i tried net localgroup "Users" Computer-Name\Users /delete to no avail.
What should I do to delete Users? I prefer my Group to return to Authenticated Users, System, and Admin like before.
cheers,
KP!
-
New #5
KP,
What you are wanting is to add or remove users and groups for access permission of a specific file, while the tutorial is for having user accounts added or removed to/from groups instead.
While in properties, are you able to click on Edit in Security tab, select Users (Kungfu\Users) group, and click on the Remove button, and on OK twice to remove that group?
Permissions - Allow or Deny Users and GroupsLast edited by Brink; 10 Jun 2013 at 13:06. Reason: added tutorial link
-
New #6
brink,
tq for the fast response. :)
There is a misunderstanding here. Idk how to say it in a concise manner, so apologies for having to bear with me. I suck at explaning but I hope after this long post, it clears it all.
Yes, what i wanted is to remove Users (Kungfu\Users) completely, not only from My Docs.
so... Users (Kungfu\Users) was created because i followed the howtogeek tutorial. So previously I only have Authenticated Users SYSTEM and Administrators (Kungfu\Administrators) on every folder. Like this...,
Now in every folder i have, i.e. my Work folder, play folder, random folder, etc, I have those three Accounts, and Users (Kungfu\Users). Like this...
If I click Edit Remove on security tab as you suggested, it only removed that Users (Kungfu\Users) on that specific folder. I want to remove that (Kungfu\Users) group completely that I accidentally created.
-----------------------
ps1: I copy-pasted the images repeatedly because I am aware that I am lacking in explaining department (as evident by this exchange), and I assume that copy-pasting the picture would provide context.
ps2: I wrote about My Docs Lock initially as a context on how I ended up inadvertently created the Users (Kungfu\Users) and how at this point, I want to delete that User group completely.
ps3: So... no hard feeling and its not like I'm not following your explanation or anything, I just suck at explaining.
(Your 1st reply steps, I did that before I posted my first post. Your second reply steps, I didnt do that because I want to remove Users Kungfu\Users completely).
So.. I sort of sucks at explaining. Can't put that on bold enough. lol
Thank you for being generous as always btw. Hope this long post clears the misunderstanding.
Cheers,
KP
-
New #7
KP,
No worries. :)
Is "Kungfu" your computer name?
If so, you may have added it to the permissions list of the folder, but you didn't create it. It shows as Kungfu/Users for (Computer name)/"Users" group.
You cannot delete the actual "Users" group as it's part of Windows and is needed to allow members of the users group access to files, folders, etc....
You'll have to manually remove "Users" from any folder that you do not want to allow user accounts that are members of the "Users" group access to. Be very careful to make sure that either your user account or the "Administrators" group is listed in the permissions of the folder. If not, then you will block yourself access to it when you remove "Users".
Permissions - Allow or Deny Users and Groups
-
New #8
I want to delete 1*******2\Administrator want to delete only Administrator. What should i do ?
-
New #9
Hello Dave, and welcome to Seven Forums.
I think you want to use the tutorial below for deleting a user account instead. :)
User Account - Delete

User Accounts - Add or Remove from Groups
How to Add or Remove User Accounts from Groups in Vista, Windows 7, and Windows 8Published by Brink


 Quote
Quote


Related Discussions