

How to Enable or Disable Write-Caching for a Storage Device in Windows 7 and Windows 8
InformationWrite caching in a connected storage device refers to the use of high-speed volatile memory to collect write commands sent to data storage devices and cache them until the slower storage media (either physical hard disks or low cost flash memory) can accommodate them. Most devices that use write caching require that power be supplied continuously.
This will show you how to enable write caching to have better performace for a storage device, or disable write caching for quick removal of a storage device without having to use Safely Remove Hardware.
TipIf high data transfer performance is your main concern, you should enable both of these settings in OPTION TWO below:
- In the Removal Policy section, select the Better Performance option.
- In the Write-caching policy section, select Enable write caching on the device (if the system hardware and storage device support these features).
WarningYou must be logged into a administrator account to be able to do the steps in this tutorial.
OPTION ONEDisable Write Caching for Quick Removal
NoteThis option is usually the best choice for storage devices that you are likely to remove from the system frequently, such as USB flash drives, SD, MMC, Compact Flash, or similar memory cards, and other similar externally attached storage devices.
When you select the Quick Removal option, Windows 7 manages commands sent to the device using a method called write-through caching. In write-through caching, the device operates on write commands as if there were no cache. The cache may still provide a small performance benefit, but the emphasis is on treating the data as safely as possible by getting the commands to the storage device. The main benefit is that you can remove the storage device from the system quickly without risking data loss. For example, if a flash drive were to be accidentally pulled out of its port, the data being written to it is much less likely to be lost.
1. Open the Control Panel (icons view) in Windows 7 or Windows 8, and click on the Device Manager icon.
2. In Device Manger, double click on Disk drives to expand it, then double click on the listed storage device that you want to disable write caching for. (See screenshot below)
3. Click on the Polices tab. Under the upper Removal policy section, select (dot) Quick removal, or check the Turn off Windows write-cache buffer flushing on the device box, and click on OK. (See screenshot below)
4. Click on Yes to restart the computer to apply. (See screenshot below)
WARNING: This will restart the computer immediately. You should save and close anything else that you are working on first.
OPTION TWOEnable Write Caching for Better Performance
NoteThis option is usually the best choice for storage devices that must provide the highest possible performance and that you intend to not remove from the system frequently, such as internal hard disk drives. If you choose this option and the device is disconnected from the system before all of the data is written to it (such as if you remove a USB flash drive), you could lose data. When using this option for a storage device (ex: USB flash drive), you must use Safely Remove Hardware to disconnect the device safely to prevent possible data loss.
When you select the Better Performance option, Windows 7 uses a method known as write-back caching. In this method, the storage device itself is allowed to determine whether using the high-speed cache will save time completing the write commands. If it will, the device signals to the computer that the data has been stored successfully even though the data may not actually be present in the storage device yet (such as the hard disk or flash memory). This method markedly increases the throughput of storage operations, which are often a major bottleneck for system performance overall. However, if the power supplied to the device (ex: external hard drive) fails for any reason, any data still in the cache (that the computer system believes is safely stored) could be lost.
By default, Windows uses cache flushing. This means that the system will periodically instruct the storage device to write all data waiting in the cache to the storage device. When you select Turn off Windows write-cache buffer flushing on the device, you turn can turn off these periodic commands to transfer the data. Not all devices support all of these features.
1. Open the Control Panel (icons view) in Windows 7 or Windows 8, and click on the Device Manager icon.That's it,
2. In Device Manger, double click on Disk drives to expand it, then double click on the listed storage device that you want to enable write caching for. (See screenshot below)
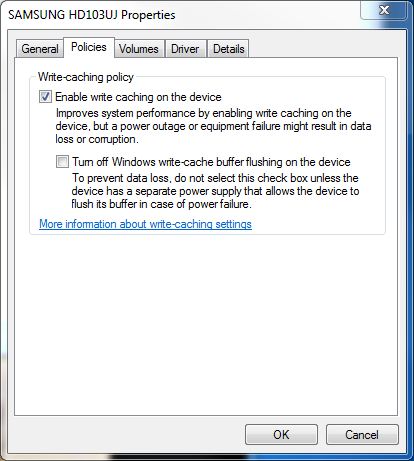
3. Click on the Polices tab. Under the upper Removal policy section, select (dot) Better performance. (See screenshots below)
NOTE: By default, Enable write caching on the device is also checked. If not, then check it as well.
4. To Turn Off Windows Write-cache Buffer Flushing on the Device
WARNING: To Prevent data loss. Do not check this option unless the storage device has a separate power supply that allows the device to flush it's buffer in case of a power failure.
A) Select (check) the Turn off Windows write-cache buffer flushing on the device box. (See screenshots above)5. Click on OK. (See screenshot below step 3)
6. Click on Yes to restart the computer to apply. (See screenshot below)
WARNING: This will restart the computer immediately. You should save and close anything else that you are working on first.
Shawn
Write-Caching - Enable or Disable
-
New #1
What happens if the "policies' tab does not show up?
I am running a sans-digital TR5M external box. All hard drives show up in device manager, but none have the policies tab.
-
-
New #3
I have heard some people taking about disabling this for SSDs since they don't have a cache. Does anybody know if this would be a good idea - or would it even make a difference?
-
New #4
Hi Nate,
You can give it a try with the write cache enabled and disabled to see how it runs for you, but it was faster with my SSD with it still enabled.
-
New #5
Okay, thanks Brink. I think I'll just leave it. The more I read about these things the more I want to keep needless writing off of them. I just want to make it last a long time at these speeds. It's very, very nice to have an SSD with 8GB of 1066 RAM. (looks like you have the same) Thanks again for answering.
-
-
New #7
Oh, that would be my dream. I sure wish there was something out there. They say Windows 7 treats SSDs different but I have seem no evidence of this. I hope the final release does.
-
New #8
Mine looks like this:
Looks like half the page is missing.
-
New #9
Mine too Swarfega. I guess I will leave it. I am just concerned about needless write activity on my SSD that I really don't need. I read on some forums that this is needless (on SSDs) since they have no cache. Some have a buffer though. I am confused. I hope I the 2.5 million hour estimated life span is right on mine.
Write-Caching - Enable or Disable
How to Enable or Disable Write-Caching for a Storage Device in Windows 7 and Windows 8Published by Brink


 Quote
Quote


Related Discussions