


How to Show and Hide Fonts in Windows 7 and Windows 8
InformationThis will show you how to Show and Hide fonts automatically by Windows 7, Windows 8, and manually by you to be available to select the font or not in your programs input language settings. You will also see how to restore the default Show and Hide settings.
For a list of all default fonts that come supplied with Windows 7, see: Windows 7 font list
For a list of all default fonts that come supplied with Windows 8, see: Windows 8 font list
For a list of all default fonts that come supplied with Windows 8, see: Windows 8.1 font list
NoteFonts that are set to Hide are faded, and fonts that are set to Show are not faded.
OPTION ONETurn Automatic Show and Hide Fonts by Windows On or Off
NOTE: Windows can hide fonts that won't work with your input language settings in your programs. This may not apply to all of your programs though. You will still be able to manually show and hide fonts in OPTION TWO below.
1. Open the Control Panel (icons view) in Windows 7 or Windows 8.
2. Click/tap on the Fonts icon.
3. Click/tap on the Font settings link in the left pane. (See screenshot below)
4. To Turn On Automatic Show and Hide Fonts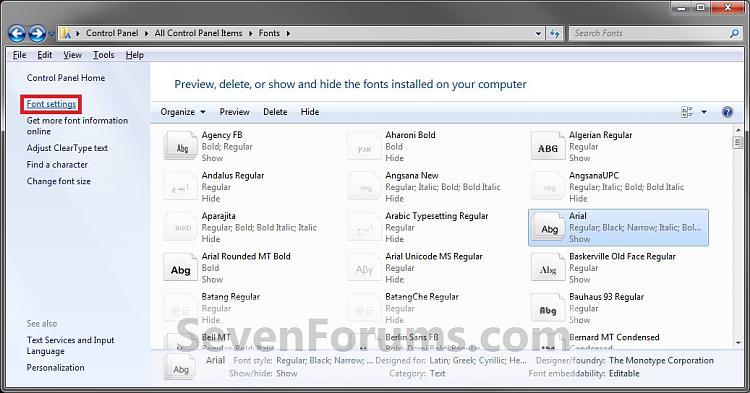
A) Check the Hide fonts based on language settings box. (See screenshot below step 6)5. To Turn Off Automatic Show and Hide Fonts
NOTE: This is the default setting in Windows 7.
B) Go to step 6.
A) Uncheck the Hide fonts based on language settings box. (See screenshot below step 6)6. Click/tap on OK. (See screenshot below)
NOTE: This will have all the fonts set as Show except for the fonts that you manually set to Hide afterwards in OPTION TWO below.
OPTION TWOTo Manually Set Fonts to Show and Hide
NOTE: This will allow you to manually set fonts to show or hide to be available to select the font or not in your programs input language settings.
1. Open the Control Panel (icons view) in Windows 7 or Windows 8.
2. Click/tap on the Fonts icon.
3. To Set a Font to Show
A) Select a individual font or font family that you want to set to Show. (See screenshots below)4. To Set a Font to Hide
TIP: To select more than one font at a time, press and hold down the Ctrl key while you click on each font.
NOTE: A individual font only has a single page on it's icon. A font family has more than one page stacked on it's icon. It means that it has more individual fonts included in that font family. If you wanted to only set a individual font to Show in the font family, then you will need to click on the font family to see the individual fonts inside the font family first.
B) Click on the Show button on the toolbar. (See screenshots above)
NOTE: You can also right click on the font and click on Show. If you do this on a font family, then you will set of all the individual fonts in that font family to Show instead. If you have both the Show and Hide option available, then that means that the individual fonts in the font family have some fonts set to Hide and Show and not just one or the other.
A) Select a individual font or font family that you want to set to Hide. (See screenshots below)5. Close the Fonts window when done. (See screenshot below step 3A or 4A)
TIP: To select more than one font at a time, press and hold down the Ctrl key while you click on each font.
NOTE: A individual font only has a single page on it's icon. A font family has more than one page stacked on it's icon. It means that it has more individual fonts included in that font family. If you wanted to only set a individual font to Hide in the font family, then you will need to click on the font family to see the individual fonts inside the font family first.
B) Click on the Hide button on the toolbar. (See screenshots above)
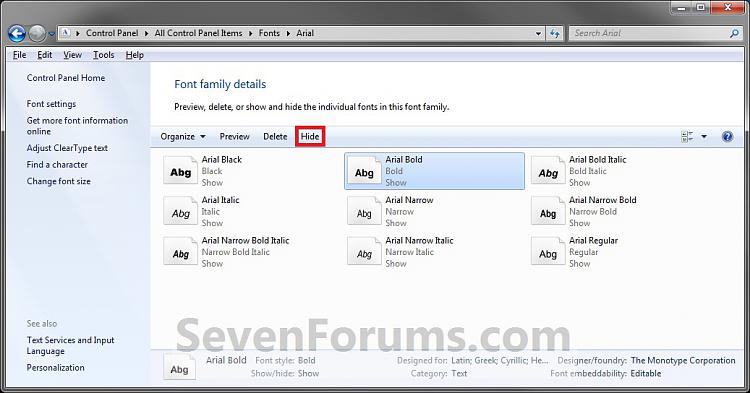
NOTE: You can also right click on the font and click on Hide. If you do this on a font family, then you will set of all the individual fonts in that font family to Hide instead. If you have both the Show and Hide option available, then that means that the individual fonts in the font family have some fonts set to Hide and Show and not just one or the other.
OPTION THREETo Restore the Default Show and Hide Settings
NOTE: This will show you how to restore all of the fonts back to their default Show and Hide settings. This will also turn on OPTION ONE above.
1. Open the Control Panel (icons view) in Windows 7 or Windows 8.That's it,
2. Click/tap on the Fonts icon.
3. Click/tap on the Font settings link in the left pane. (See screenshot below)
4. Click/tap on the Restore default font settings button. (See screenshot below)
5. Close the Font settings window. (See screenshot above)
Shawn
Fonts - Show and Hide
-
-
-
-
-
New #5
Oh I have problem when hiding some font in windows 7, it were showed the following error:
Although I’ve closed all programs, What should I do?Fonts are currently used by another program
-
New #6
Hello Trương Quốc Hùng,
It could also be a font currently in use by Windows, or reserved by another program (even if not open) has that font set to be used in it. Double check each program that uses the fonts from Windows to see if they have the font selected that you want to hide.
Hope this helps,
Shawn
-
-
-
New #9
show and hide problem
Hi Brink - I read you posting and have a different issue. My view of the fonts does not show individual font families. as you can see from the image.
how can i get my folder to show me the actual fonts so that i may remove them and stop clogging up my system?
thanks
olivia


 Quote
Quote

Related Discussions