

How to Create a New Partition or Volume in Windows 7
InformationThis will show you how to create a new primary partition using Disk Management or Diskpart in Windows 7 from a empty unallocated partition or volume.NoteA primary partition is a type of partition created on a hard drive that can have a operating system installed on it. A primary partition functions as though it were a physically separate hard drive.
By default on a basic MBR disk, you can create a maximum of 4 Primary partitions, or 3 Primary partitions and 1 Extended partition with up to 128 logical volumes in the extended partition on a single hard disk.
*You must be logged on in an administrator account to be able to do this tutorial.
WarningIf you disable the Disk Defragmenter service, then you will get the error below when you try to do anything in Disk Management. If you get this error, then make sure that the Disk Defragmenter service is set to only Manual.
OPTION ONECreate Primary Partition using Disk Management
1. You will first need to shrink a partition or volume from the free space on a disk to create unallocated space on that disk to use to create the new partition or volume with on the same disk.
NoteIf this is a disk that is unallocated, then skip this step and go straight to step 2.
2. Open the Control Panel (icons view), and click on the Administrative Tools icon. then close the Control Panel window.
3. Click on Computer Management in Administrative Tools, then close the Administrative Tools window.
4. In the left pane under Storage, click on Disk Management. (See screenshot below)5. In the middle pane, right click on the empty unallocated partition or volume and click on New Simple Volume. (See screenshot above)
6. Click on the Next button. (See screenshot below)7. Type in how many MB (1 GB = 1024 MB) you want to use from the unallocated partition to create the new partition with, then click on the Next button. (See screenshot below)
NOTE: If you want to use all of the unallocated partition to create the new partition with, then type all of the maximum disk space shown for the unallocated partition. If you do not use all of the maximum disk space, then you can use the left over space from the unallocted partition to create another new partition with.8. Select an available drive letter that you want to be assigned to the new partition in Computer, then click on the Next button. (See screenshot below) 9. Type in a volume label name that you want for the new partition, check the Perform a quick format box, and click on the Next button. (See screenshot below)
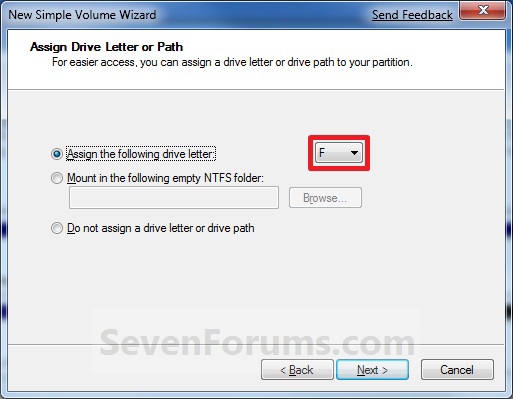 10. Click on the Finish button. (See screenshot below)
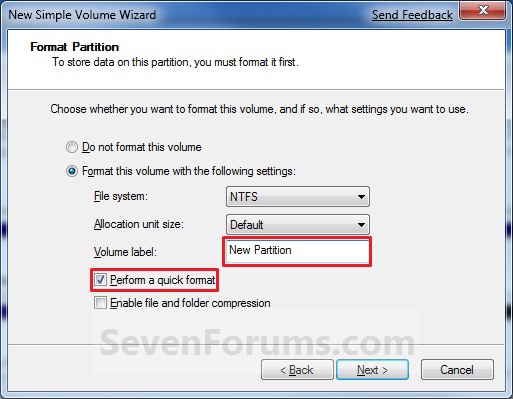
WarningIf you get a pop-up with the message below, then click on No. You DO NOT want to convert the disk to dynamic. Doing so could render Windows 7 unbootable. A clean install of Windows 7 would be the only way to fix this afterwards if you were to click on Yes.
The operation selected will convert the disk to dynamic... are you sure you want to continue?11. The new primary partition or volume has now been created with the assigned unallocted partition space (step 7). (See screenshot below) 12. Close the Computer Management window. (See screenshot above)
OPTION TWOCreate Primary Partition using Diskpart in Elevated Command Prompt
1. You will first need to shrink a partition or volume to create a unallocated partition to use to create the new partition or volume with.That's it,
2. Open an elevated command prompt, or a command prompt at boot.
3. In the elevated command prompt, type diskpart and press Enter. (See screenshot below)4. In the elevated command prompt, type list disk and press Enter. (See screenshot below)
NOTE: This is to help you ID the disk number that has Free unallocated space that you want to create a new partition with. For example, Disk 1 with 80 GB of free space.5. In the elevated command prompt, type select disk # and press Enter. (See screenshot below)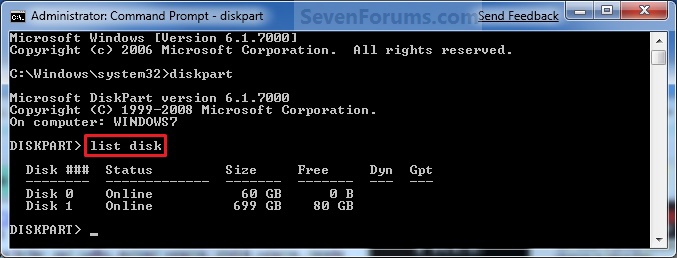
NOTE: You would substitute # for the disk number listed that you want to create a new partition with the free unallocated space there. For example, I want to create a new partition with the 80 GB of free space, so I would type select disk 2 and press Enter.6. In the elevated command prompt, type create partition primary and press Enter. (See screenshot below)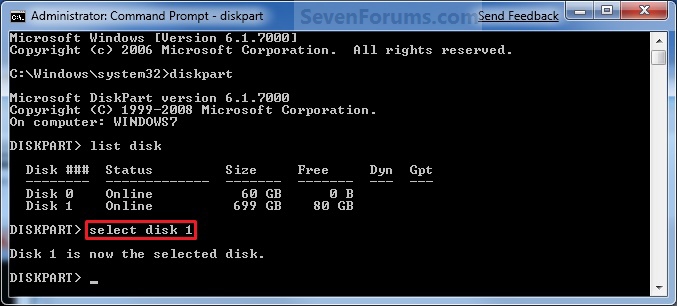
NOTE: This will create a new blank RAW partition with selected disk (step 5) that contains the unallocated partition free space.7. In the elevated command prompt, type list volume and press Enter. (See screenshot below)
NOTE: Look for the volume number that has the same Size as from the Free space in step 4. For example, Volume 3.8. To Format the Partition or Disk as a NTFS File System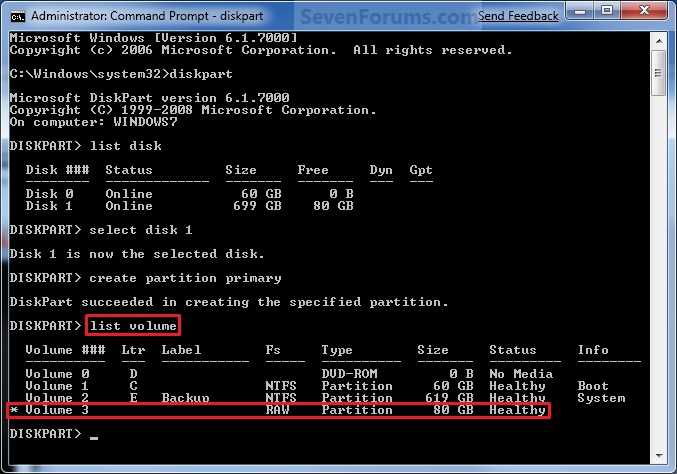
NOTE: This would be good for using with a HDD as an example.A) In the elevated command prompt, type format fs=ntfs quick and press Enter. (See screenshot below)9. To Format the Partition or Disk as a FAT32 File System
NOTE: Having quick added at the end of the command will do a quick format instead of a full format on the new blank RAW partition (step 6) to make it a new partition.B) Go to step 10.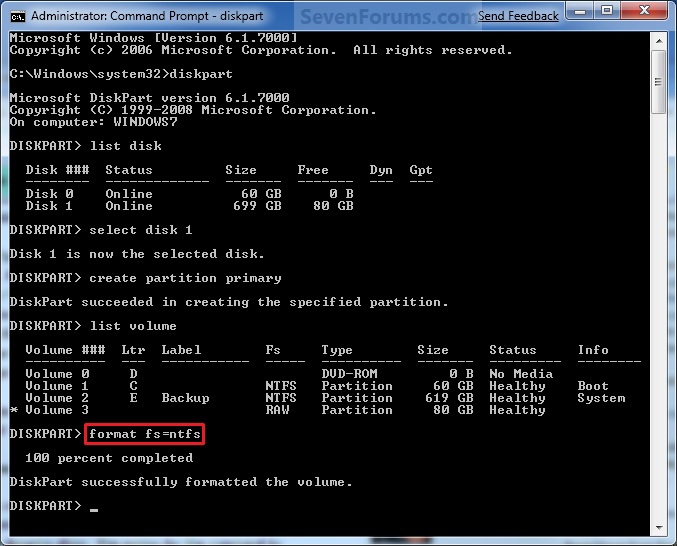
NOTE: This would be good for using with a USB key drive as an example. The FAT32 file system has size limitations. You cannot create a FAT32 partition greater than 32 GB. In addition, you cannot store a file larger than 4 GB on a FAT32 partition. For more information, see Comparing NTFS and FAT file systems.A) In the elevated command prompt, type format fs=fat32 quick and press Enter. (See screenshot below)10. When it is finished formatting, type exit in the elevated command prompt and press Enter. (See screenshot below)
NOTE: Having quick added at the end of the command will do a quick format instead of a full format on the new blank RAW partition (step 6) to make it a new partition.11. Close the elevated command prompt.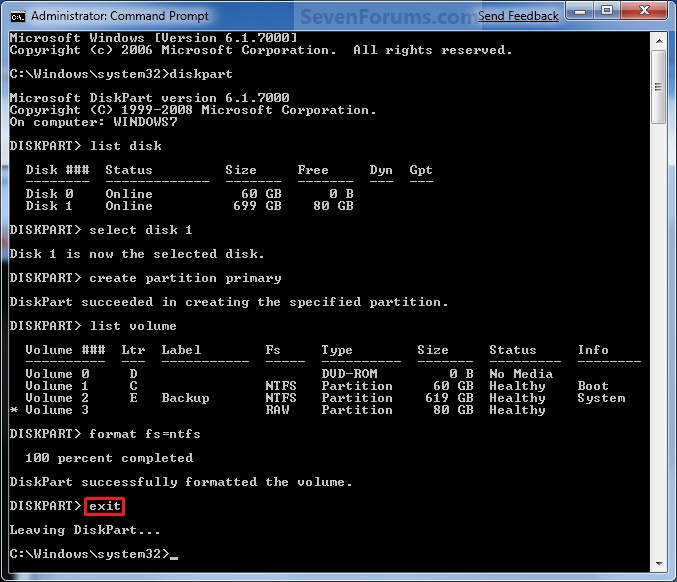
12. The new primary partition has now been created. You can now see the new partition in Computer with a drive letter.
Shawn
Related Tutorials
- How to Create Extended Partition / Logical Drives Where Needed
- Data Partition
- How to Shrink a Partition or Volume in Windows 7
- How to Extend a Partition or Volume in Windows 7
- How to Delete a Partition or Volume in Windows 7
- How to Create and Attach a Virtual Hard Disk in Windows 7
- How to Unattach and Delete a Virtual Hard Disk in Windows 7
- How to Setup Windows 7 to Boot from a VHD (Virtual Hard Disk)
- How to Do a Clean Installation with Windows 7
- How to Fix Missing Vista Hard Disk Partition Letter in Windows 7
- How to Convert a FAT or FAT32 Volume to NTFS in Windows 7
- How to Convert a MBR Disk to a GPT Disk
- How to Convert a GPT Disk to a MBR Disk
- How to Convert a Basic Disk to a Dynamic Disk
- How to Convert a Dynamic Disk to a Basic Disk
- How to Clean or Clean All a Disk with the Diskpart Command
- How to Quick Format a HDD or USB Drive
- How to Mark a Partition as Active in Windows 7
- How to Mark a Partition as Inactive in Windows 7 and Vista
Partition or Volume - Create New
-
-
New #2
thanks man, i needed partition to flash bios and this helped a lot
-
-
New #4
i got a question mate... i tried your steps but in the end i only got Logical Drive instead of Primary Partition?? Care to enlighten me?
-
New #5
Hello Khmak, and welcome to Seven Forums.
It sounds like you may have 3 primary partitoins on that disk already then. A MBR disk will only support 3 primary partitions, then any new partitions will be logical instead.
If this is not the case, then could you post a screenshot of your Disk Management to see if something in the drive layout may be the problem?
Shawn
-
New #6
firstly thank you shawn for ur reply.. i am actually quite confused with whats going on as I wanted to do a dual boot of vista and windows 7 together... as u see from my specs i am using ASUS F80Q... I have ended with the C:/ recovery.dat error when the windows 7 installation was about to finish..
this is my screenshot of my disk management.. is there something wrong? please advise... cheers from brisbane =)

-
New #7
Ok. You will need to add a drive letter to the first partition first, then try to install Windows 7 on the logical partition that you want to install it on to see if it will work for you this way instead.
-
New #8
.
Hello Brink and other Seven forums users
I have a little problem. I added a new hard disk for copying files off my old hard disk because of getting a new computer. Now I have the computer but it seems that I have accidentally pushed a jumper to wrong position at the back of my hard disk. So now my windows 7 rc is on a partition of a ide channel 0 slave disk. And keep getting unexpected i/o errors at startup. Im not so good with computers so I wouldn't like to try to change the jumper positions to the right ones, in case something could go wrong. Now this is my question, is there any possibility to make a new partition out of a disk that has a partition that takes all the space on it if there is free space. I'm not so good explaining this stuff so I'll attach a screenshot of my disk management. There isn't free space yet though, but I'll remove some useless stuff as soon as you reply, if that what I just asked is possible.
This is a good tutorial but it doesn't answer my question so I am waiting reply from you.
Thanks already.
Devil
-
New #9
Hello Devil,
Yes, as in step 1, you can just shrink a disk from it's free space to have the unallocated space needed to create the new partition with. :)
You should not have a problem though with changing or removing the slave/master jumper on the IDE drive though. Just be sure the computer is off and unplugged when doing so.
Hope this helps,
Shawn
Partition or Volume - Create New
How to Create a New Partition or Volume in Windows 7Published by Brink


 Quote
Quote
Related Discussions