

How to Add or Remove Notification Area from Taskbar in Windows 7 and Windows 8
InformationThe notification area is a part of the taskbar that provides a temporary source for notifications and status. It can also be used to display icons for system and program features that are not on the desktop.
The notification area (aka: system tray) is on the far right of the taskbar just to the left of the system clock. This includes the default Volume, Network, Power, Action Center, and Input Indicator (Windows 8) system icons in addition to all system tray icons added by installed programs.
This tutorial will show you how to add or remove the notification area from the taskbar for all or specific users in Windows 7 and Windows 8.
You must be logged in as an administrator to be able to do this tutorial.
NoteIf you remove the notification area, then the taskbar displays only the Start button, pinned taskbar buttons, custom toolbars (if any), and the system clock.
You will also no longer be able to set the Notification Area Icons and System Icons settings as well since the notifcation area is no longer there to display them and their balloon messages on.

EXAMPLE: Notification Area on Taskbar Added and Removed

OPTION ONEUsing a REG File Download
1. To Add Notification Area to All Users Taskbar
NOTE: This is the default setting.
A) Click on the Download button below to download the file below, and go to step 3 below.2. To Remove Notification Area from All Users Taskbar
Add_Notification_Area.reg
A) Click on the Download button below to download the file below, and go to step 3 below.3. Save the .reg file to your desktop.
4. Double click/tap on the downloaded .reg file to merge it.
5. Click/tap on Run, Yes (UAC), Yes, and OK when prompted.
6. Log off and log on, or restart the computer to apply.
7. When finished, you can delete the downloaded .reg file if you like.
OPTION TWOThrough the Local Group Policy Editor
1. Open the all users, specific users or groups, or all users except administrators Local Group Policy Editor for how you want this policy applied.That's it,
2. In the left pane, click/tap on to expand User Configuration, Administrative Templates, and Start Menu and Taskbar. (see screenshot below)
3. In the right pane, double click/tap on Hide the notification area to edit it. (See screenshot above)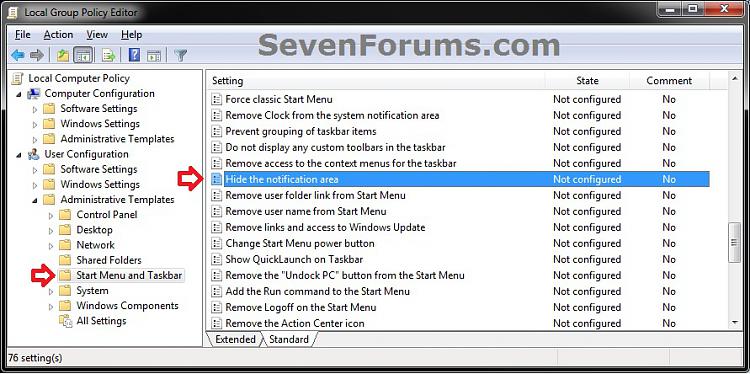
4. To Add Notification Area to Taskbar
A) Select (dot) either Not Configured or Disabled, and go to step 6 below. (see screenshot below step 6)5. To Remove Notification Area from Taskbar
NOTE: Not Configured is the default setting.
A) Select (dot) Enabled, and go to step 6 below. (see screenshot below step 6)6. Click/tap on OK. (see screenshot below)
7. Close the Local Group Policy Editor window.
8. Log off and log on, or restart the computer to apply.
Shawn
Related Tutorials
- How to Open the Taskbar in Windows 8.1
- How to Move Taskbar Location in Windows 8 and 8.1
- How to Hide or Show System Icons and Notifications in Windows 7 and Windows 8
- How to Turn System Icons On or Off in Windows 7 and Windows 8
- How to Create a "System Icons" Settings Shortcut in Windows 7 and Windows 8
- How to Change the Action Center Message Settings in Windows 7
- How to Turn On or Off Action Center Messages in Windows 8 and 8.1
- How to Change How Long Notifications Stay Open in Windows 7
- How to Enable or Disable Balloon Notifications in Vista, Windows 7, and Windows 8
- How to Reset the Notification Area Icons Cache in Vista, Windows 7, and Windows 8
- How to Enable or Disable Notification System Icons in Windows 7 and Windows 8
- How to Create a "Notification Area Icons" Shortcut in Windows 7 and Windows 8
- How to Customize the Notification Area Icons in Windows 7
- How to Enable or Disable Changing "Notification Area Icons" Settings in Windows 7
- How to Hide or Show Intel Rapid Storage Technology Notification Area Icon in Windows
- Enable or Disable Automatic Promotion of Notification Area Icons to Taskbar in Windows 7 and 8
Notification Area - Add or Remove
-
New #1
Nice one Shaun not something i would use but im sure people who need the real estate on the taskbar will be glad of this
Danny
-
-
-
-
-
-
New #7
Just wanted to say...
This is by far the best forum I have found for Win 7. So far, with your excellent instructions, I have cleared my NC of old programs I uninstalled, deleted my library and re-formatted my user folder.
I am not an IT person at all, and was afraid to edit my registry, but with your help all operations have been successful!
Many Thanks for helping me solve these issues. :)
-
New #8
You're most welcome Dapa, and welcome to Seven Forums. I'm happy to hear that they were all able to help. :)
-
Notification Area - Add or Remove
How to Add or Remove Notification Area from Taskbar in Windows 7 and Windows 8Published by Brink


 Quote
Quote


Related Discussions