How to Delete a Virtual Machine Created with Windows Virtual PC
InformationThis will show how to delete or uninstall a Virtual Machine created with Windows Virtual PC.NoteThis will delete the .vmcx (Virtual Machine settings) and .vhd (Virtual Hard Drive) files to completely remove the virtual machine and regain the hard drive space used by it.WarningBe sure to back up anything that you do not want to lose in the virtual machine first. When you delete the virtual machine, it will be gone for good.
Here's How:
1. If you have the virtual machine that you want to delete running, then you must close or shut down the virtual machine first.That's it,
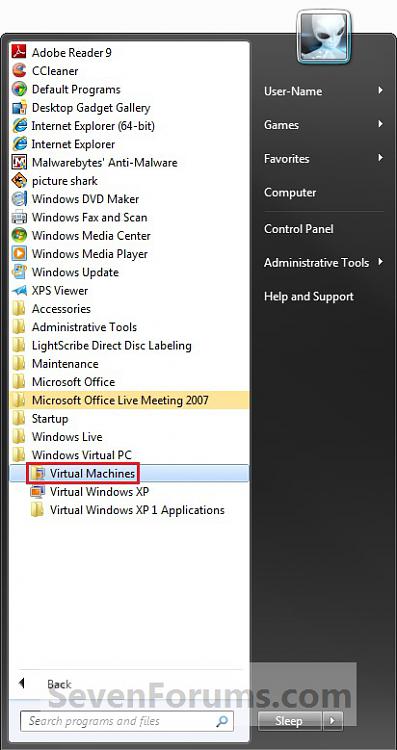
2. Open the Windows 7 Start Menu, and click on All Programs, expand Windows Virtual PC folder, and double click on the Virtual Machines shortcut. (See screenshot below)
NOTE: You can also open the Virtual Machines folder at C:\Users\(User Name)\Virtual Machines.
3. Right click on the virtual machine that you want to delete, then click on Settings. (See screenshot below)
4. In the left pane, click on the Hard Disk (ex: Hard Disk 1) that has a .VHD file (ex: Vista SP2.vhd) listed under "Current Value" to select it. (See screenshot below)
5. In the right pane, click on the Browse button. (See screenshot above)
NOTE: You could also just navigate to that location for the .vhd file in Windows Explorer.
6. Right click on the .vhd file (ex: Vista SP2.vhd) for the virtual machine that you want to delete, and click on Delete. (See screenshot below)
7. Click on Yes to approve. (See screenshot below)
8. Close the window under step 6 and under step 5.
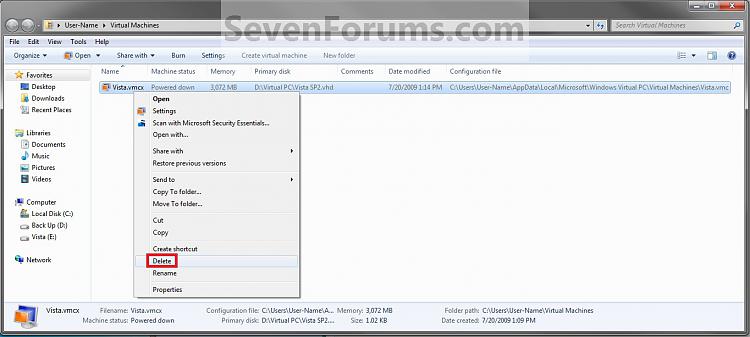
9. Right click on the .vmcx file for the virtual machine that you want to delete, then click on Delete. (See screenshot below)
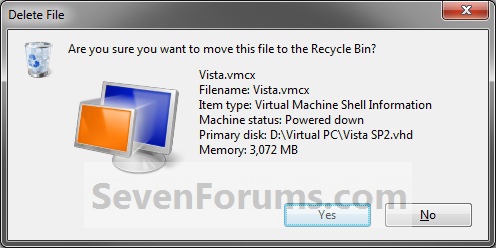
10. Click on Yes to approve. (See screenshot below)
11. Close the window under step 9.
12. Empty the Recycle Bin.
Shawn
Related Tutorials
- How to Create a Virtual Machine in Windows Virtual PC
- How to Install and Setup Virtual Windows XP Mode in Windows 7
- How to Enable the Built-in Administrator Account in Windows XP Mode
- How to Change Virtual Machine Settings in Windows Virtual PC
- How to Create Differencing Disks in Windows Virtual PC
- How to Copy a Virtual XP Machine in Windows 7
- How to Add Limited User Accounts to Windows Virtual PC XP Mode
- How to Boot from a CD or DVD in a Windows Virtual PC
- How to Install, Enable, and Disable Windows Virtual PC Integration Features
- How to Select Host Devices to Share with Virtual Machines in Windows Virtual PC
Windows Virtual PC - Delete a Virtual Machine
-
New #1
Thanks for the tutorial very nicely done.
Greg
-
-
New #3
When i try your instructions i have the following problem
When i click on Settings as you indicate i am presented with the windows that says choose the program you want to open this file (Typical windows when a file is not associated with a program). I dont know what to choose there. Can you help me plz?
Regards,
Dionisis Falireas
-
-
New #5
You could pretend that it was a bit more complicated than this, so that i dont feel like an idiot.. Probably i am getting old. In my defence i was confused because when i run Windows XP mode i was presented with the logon screen so i assumed everything was installed... Thank you very much, i will proceed!
-
New #6
There's nothing to feel silly about. There's an issue with the association of that context menu and Windows Virtual PC. Reinstalling Windows Virtual PC should restore the association without to much fuss for you. :)
-
New #7
Repairing Windows Virtual PC administrator
Brink thank you very much for the answer.
I would like to ask you one more question, but please instruct me wether i should open a new thread / question as it is idirectly related to my problem.
On the 2 virtual machines i have created (XP with i.e 8 and the 2nd is XP with i.e 7), i deleted the user accounts i had created thinking i could log in as administrator. The result is that i can no longer log in. i think this is a common problem with virtuale machines created with windows virtual pc.
My question is wether it is easier to fix this by some way, or to completely uninstall the whole Windows Virtual PC in and reinstall it, or just the virtual machines, or anything else you might propose.
Can you help me with this? What should i do?
Regards,
Dionisis Falireas
-
New #8
Dionisis,
A virtual machine, like any other installed Windows, will require an user account to be able to log on to it.
Unless you have something in the virtual machines you really need, it may be best to delete the virtual machines, uninstall and reinstall Windows Virtual PC, then create new virtual machines.
-
New #9
If the built-in administrator account is active (enabled) but has no password set, you can login to it by first disabling Integration Features.
When Integration is enabled you cannot login to a VPC virtual machine to an account which has no password but this is possible when Integration is disabled.
Kari

Windows Virtual PC - Delete a Virtual Machine
How to Delete a Virtual Machine Created with Windows Virtual PCPublished by Brink
Related Discussions


 Quote
Quote