

How to Install and Uninstall Display Languages in Windows 7 Ultimate and Enterprise
InformationThis will show you how to install and uninstall a Language Interface Pack (LIP) in the Windows 7 Ultimate and Windows 7 Enterprise editions. These can be used to change the display language Windows 7 uses to display text in wizards, dialog boxes, menus, and other items in the user interface.
By default Windows 7 uses the language selected during it's installation.NoteWhen you install a language pack and change the display language to it, this will also automatically add a keyboard input language for this language in the Language bar.
OPTION ONEInstall a Language Pack (LIP)
1. Open the Control Panel (icon view), and click on the Windows Update icon.
A) Go to step 3.OR
2. Open the Control Panel (icon view), and click on the Region and Language icon.
A) Click on the Keyboards and Languages tab, then click on the Install/uninstall languages button. (see screenshot below)3. In Windows Update, click on the view optional updates are available link. (see screenshot below)
B) If prompted by UAC, click on Yes (if administrator) or type in the administrator's password (if standard user).
C) If you see this screen, click on Next. (see screenshot below)
D) Click on Install display languages. (see screenshot below)
E) Click on Launch Windows Update. (see screenshot below)
NOTE: If you do not see this link, then click on the Check for updates link.
4. Select and check the language pack(s) that you want to install, then click on OK. (see screenshot below)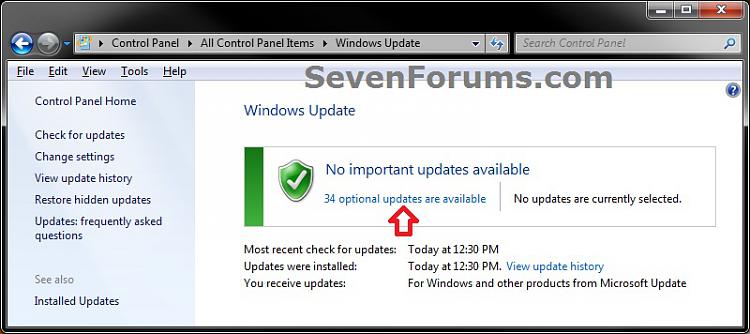
NOTE: If the language packs are missing and not hidden, then resetting the Windows Update history will also restore the default language packs in Windows 7 Ultimate and Enterprise editions after you Check for updates next after resetting.
5. Click on the Install updates button. (see screenshot below)
6. If prompted by UAC, click on Yes (if administrator) or type in the administrator's password (if standard user).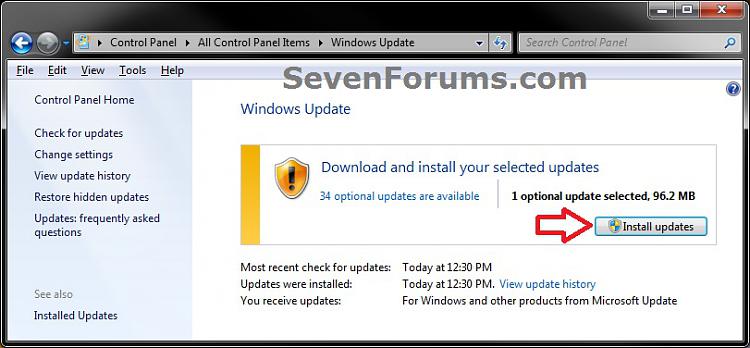
7. When finished downloading and installing, you can close Windows Update. (see screenshot below)
8. You will now be able to use the installed language pack(s) to change the display language with.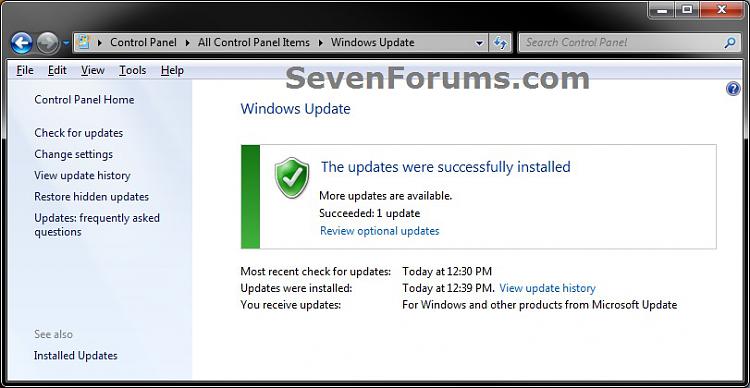
OPTION TWOUninstall a Language Pack (LIP)
NOTE: You will need to make sure that you do not have the same display language set to the language pack that you want to uninstall. If it is, then you will need to change the display language to another language first.
1. Open the Control Panel (icon view), and click on the Region and Language icon.That's it,
2. Click on the Keyboards and Languages tab, then click on the Install/uninstall languages button. (see screenshot below)
3. If prompted by UAC, click on Yes (if administrator) or type in the administrator's password (if standard user).
4. Click on Uninstall display languages. (see screenshot below).
5. Select and check the language pack(s) that you want to uninstall, then click on Next. (see screenshot below)
NOTE: You will not be able to uninstall a language pack that is set as your current default display language.
6. When finished uninstalling, click on Restart now. (see screenshot below)
WARNING: This will restart the computer immediately. Be sure to save and close all work and open programs first.
Shawn
Related Tutorials
- How to Change the Display Language in Vista and Windows 7 Ultimate and Enterprise
- How to Add or Remove a Keyboard Input Language in Windows 7
- How to Create a Region and Language Shortcut in Windows 7
- How to Change the Keyboard Layout in Windows 7
- How to Hide or Show the Language Bar in Windows 7
- How to Create a "Install or Uninstall Display Languages" Shortcut in Windows 7
- How to Overwrite the Display Language of All Users with the System Display Language
Display Language Packs - Install and Uninstall
-
New #1


strange scenario!
installed language packs don't appear in the uninstall list
couldn't install or uninstall language packs (MUI)
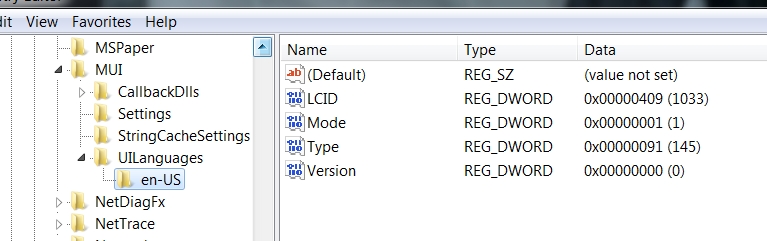
a screenshot of the registry attached for reference
any suggestions how to force uninstall already installed language packs and start all over again?
William
Hongkong
1 August 2012
-
New #2
Hello William,
I noticed in your first screenshot to install, that you manually browsed to a locaton on E. Did you install those language packs using the same method in OPTION ONE? If not, then you might see if you may be able to install them using this method instead.
Do you have the Choose a display language drop down menu in the screenshot under step 2 of OPTION TWO, and are the missing installed languages listed here?
-
New #3
thankyou for your reply
i solved the problem
i for some reason deleted the thing under "UIlanguages" so all the language pack references except en-us are gone
i imported back that .reg thing
all came back
========================
Windows Registry Editor Version 5.00
[HKEY_LOCAL_MACHINE\SYSTEM\CurrentControlSet\Control\MUI\UILanguages]
[HKEY_LOCAL_MACHINE\SYSTEM\CurrentControlSet\Control\MUI\UILanguages\en-US]
"LCID"=dword:00000409
"Type"=dword:00000091
"Version"=dword:00000000
"Mode"=dword:00000001
[HKEY_LOCAL_MACHINE\SYSTEM\CurrentControlSet\Control\MUI\UILanguages\ja-JP]
"LCID"=dword:00000411
"Type"=dword:00000091
[HKEY_LOCAL_MACHINE\SYSTEM\CurrentControlSet\Control\MUI\UILanguages\zh-CN]
"LCID"=dword:00000804
"DefaultFallback"="en-US"
"en-US"=hex(7):00,00,00,00
"Type"=dword:00000092
[HKEY_LOCAL_MACHINE\SYSTEM\CurrentControlSet\Control\MUI\UILanguages\zh-HK]
"LCID"=dword:00000c04
"DefaultFallback"="zh-TW"
"zh-TW"=hex(7):65,00,6e,00,2d,00,55,00,53,00,00,00,00,00
"Type"=dword:00000092
[HKEY_LOCAL_MACHINE\SYSTEM\CurrentControlSet\Control\MUI\UILanguages\zh-TW]
"DefaultFallback"="en-US"
"en-US"=hex(7):
"LCID"=dword:00000404
"Type"=dword:00000112
===========================
-
-
New #5
language packs
I have a computer which has Windows 7 Professional installed but the system is in Polish. Going to settings and trying to change the language doesnt seem to work. As its the system language I need to change, is there a pack i can download?
-
New #6
Hello Mike,
You can use option 2 in the tutorial below to change the System UI display language.
Display Language - Change
-
New #7
Thanks but bear in mind I have win 7 pro not ultimate. Is that OK?
-

Display Language Packs - Install and Uninstall
How to Install and Uninstall Display Languages in Windows 7 Ultimate and EnterprisePublished by Brink


 Quote
Quote
Related Discussions