How to Enable or Disable a User Account in Windows 7 and Windows 8
InformationThis tutorial will show you how to enable (unlock) or disable (lock) a domain, local, or Microsoft user account in Windows 7 and Windows 8.
You must be logged in as an administrator to be able to do the steps in this tutorial.
Note
When a user account is disabled, the user account will no longer be listed in User Accounts in the Control Panel, Parental Controls, log on screens, and can no longer be logged in to.
An administrator account will still be able to navigate to and access the contents of the C:\Users\(user-name) folder of a disabled user account using Windows Explorer.
OPTION ONEEnable or Disable User Account in "Local Users and Groups"
1. Open Local Users and Groups, and click/tap on the Users folder in the left pane to open it. (see screenshot below)
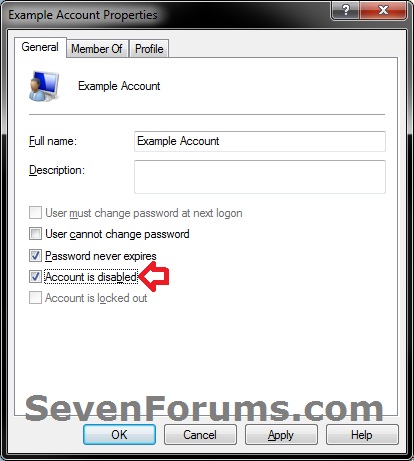
2. In the middle pane of Users, double click/tap on the user account name (ex: Example-Account) that you want to enable or disable. (see screenshot above)
3. Do step 4 or 5 below depending on if you would like to enable or disable the user account.
4. To Enable and Unlock a User Account
NOTE: This is the default setting.
A) In the General tab, uncheck the Account is disabled box, click/tap on OK, and go to step 6 below. (see screenshot below)5. To Disable and Lock a User Account
A) In the General tab, check the Account is disabled box, click/tap on OK, and go to step 6 below. (see screenshot above)6. When finished, close the Local Users and Groups window.
OPTION TWOEnable or Disable User Account in an "Elevated Command Prompt"
NOTE: This option will use the net user command to enable or disable a user account or domain account.
1. Open an elevated command prompt in Windows 7 or Windows 8.That's it,
2. To See if a User Account is Disabled or Enabled in a Command Prompt
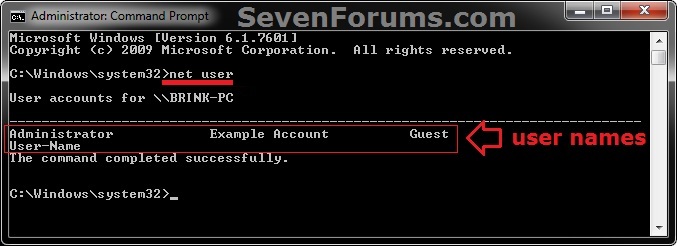
A) In the elevated command prompt, type either command below and press Enter.3. Do step 4 or 5 below depending on if you would like to enable or disable the user account.
NOTE: This will give you a list of all users accounts either on your local computer or on the domain.
B) In the elevated command prompt, type either command below for the user account (ex: Example Account) that you want to see is enabled or disable, and press Enter.
NOTE: This will allow you to see the Account active details and more of the user account. Yes = enabled and No = disabled. Substitute User Name in the command below with the user name (ex: Example Account) of the user account (ex: Example Account) within quotes.
4. To Enable a Local or Domain User Account
NOTE: This is the default setting.
A) In the elevated command prompt, type either command below for the user account (ex: Example Account) that you want to enable, and press Enter.5. To Disable a Local or Domain User Account
NOTE: Substitute User Name in the command below with the user name (ex: Example Account) of the user account (ex: Example Account) within quotes.
(Enable local account)
Net user "User Name" /active:yes
(Enable domain account)
Net user "User Name" /active:yes /domain
A) In the elevated command prompt, type either command below for the user account (ex: Example Account) that you want to disable, and press Enter.6. When finished, close the elevated command prompt.
NOTE: Substitute User Name in the command below with the user name (ex: Example Account) of the user account (ex: Example Account) within quotes.
(Disable local account)
Net user "User Name" /active:no
(Disable domain account)
Net user "User Name" /active:no /domain
Shawn
Related Tutorials
- How to Enable or Disable the Built-in Administrator Account in Windows 7
- Enable or Disable Built-in Elevated "Administrator" Account in Windows 8 and 8.1
- How to Enable the Built-in Administrator Account from WinRE
- How to Turn the Guest Account On or Off in Windows 7
- How to Turn On or Off Guest Account in Windows 8 and 8.1
- How to Delete a User Account in Windows 7 and Windows 8
- How to Create a User Account in Windows 7
- How to Add a New User Account in Windows 8 and 8.1
- How to Add or Remove User Accounts from Groups in Windows 7 and Vista
- How to Close Your Microsoft Account
- How to View Detailed Information About All User Accounts on a Windows PC
User Account - Enable or Disable

User Account - Enable or Disable
How to Enable or Disable a User Account in Windows 7 and Windows 8Published by Brink
Related Discussions


