How to Create a Backup Script using ROBOCOPY Command
InformationThere are many paid and free software solutions available to backup critical data and files on a computer system. Many users, however, are unaware of an inbuilt Windows 7 command called ROBOCOPY (Robust File Copy) that allows users to create simple or highly advanced backup strategies.
In its simplist form, ROBOCOPY can be likened to an extension of XCOPY on steroids. Some of the more important features that make ROBOCOPY an attractive backup alternative are:
The examples shown below are primarily geared towards less experienced users, especially those that are unfamilar with batch file creation and running. More experienced users, however, are welcome to explore some of the advanced functionality offered by ROBOCOPY here:
- multi-threaded copying
- mirroring or synchronisation mode between the destination and source
- automatic retry and copy resumption
http://technet.microsoft.com/en-us/library/cc733145(WS.10).aspx
and also here:
http://www.theether.net/download/Mic...s/robocopy.pdf
or by simply typing robocopy /? at a cmd window prompt.
NoteROBOCOPY is a FOLDER copier, not a FILE copier - the source and destination syntax arguments in ROBOCOPY can only be folder names.
Creating a BACKUP strategy
The easiest way to use the ROBOCOPY command to create a backup strategy is by creating a batch (.BAT) file. A batch file is a simple text file, that when executed, runs several commands one after the other.
Step 1
Clickand in the search box, type notepad. Select Notepad to open up a new blank Notepad document.
Step 2
Type the ROBOCOPY commands into the Notepad document, save it as a .BAT file, and then execute it.
In the example below, I have 3 folders (Data1, Data2, and Data3) containing some data that I wish to backup. One folder is located on E: drive and the other two are located on F: drive. I wish to back these up as follows:
Data1 folder on E: backup to a folder called Backups on G: (external USB drive)
Data2 folder on F: backup to a folder called Backups on G: (external USB drive)
Data3 folder on F: backup to a folder called Backups on Q: (network storage drive)
The general format of the ROBOCOPY command is:
In the empty Notepad document, the simplist form of the command would look like this:Code:robocopy <source> <destination> <options>
Code:robocopy E:\Data1 G:\Backups\Data1 robocopy F:\Data2 G:\Backups\Data2 robocopy F:\Data3 Q:\Backups\Data3 pauseTipIf source or destination paths contain spaces in them, enclose these in double quotes e.g. "C:\My Data\My Music"
Only the source
and the destination
- E:\Data1
- F:\Data2
- F:\Data3
are mandatory inputs into the ROBOCOPY command.
- G:\Backups\Data1
- G:\Backups\Data2
- Q:\Backups\Data3
TipThe PAUSE command at the bottom of the .BAT file allows the cmd window to stay open after it has completed to allow me to see the output from ROBOCOPY.
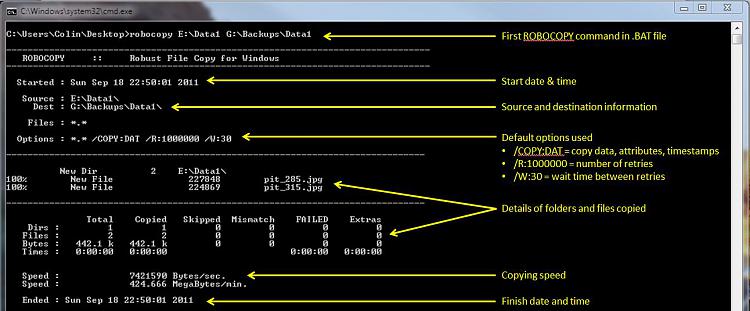
If I save the .BAT file to my Desktop, and run it by double-clicking it, then a cmd window is opened and the .BAT file executes the three ROBOCOPY commands as shown below.
The same information is repeated for every ROBOCOPY line in the .BAT file.
In order to utilise some of the powerful functionality in ROBOCOPY, I need to utilise some options in the ROBOCOPY command line. In this next example I want to edit my existing backup strategy such that:In order to do this, I need to specify some additional options in my ROBOCOPY commands like this:
- All sub-folders within my data folders are backed up, even if they are empty.
- The backup only copies newer files to my existing backup - this means a faster backup time.
- The percentage progress counter for copying is not shown - this neatens the overall appearance of the ROBOCOPY information, and creates a smaller log file.
- The information normally echoed to the cmd window is saved to a log file that I can examine at a later stage.
Where:Code:robocopy E:\Data1 G:\Backups\Data1 /e /mir /np /log:backup_log.txt robocopy F:\Data2 G:\Backups\Data2 /e /mir /np /log+:backup_log.txt robocopy F:\Data3 Q:\Backups\Data3 /e /mir /np /log+:backup_log.txt pause
/e = copy all sub-folders, even empty ones
/mir = mirror (check the files in the destination, and only copy newer files)
/np = no progress counter
/log: = create a logfile
Tip
Note the use of the /log+: option in the 2nd and 3rd line of the .BAT file. This option ensures that the results of the 2nd and 3rd ROBOCOPY are appended to the log file created in the 1st ROBOCOPY line, meaning I only need one log file to capture all the information I backup.
The log file is always saved to the same folder as the .BAT file - in my case, the folder is saved to my Desktop.
Since the output from ROBOCOPY is written to the log file, the cmd window will not display the output from ROBOCOPY. If I wish to have this information written to both the log file and the cmd window for visual tracking of the backup process, then I can add the /tee option to each line in the .BAT file, as shown below.
This is an example of the typical output to the the log file - it looks exactly the same as what is echoed to the cmd window.Code:robocopy E:\Data1 G:\Backups\Data1 /e /mir /np /tee /log:backup_log.txt robocopy F:\Data2 G:\Backups\Data2 /e /mir /np /tee /log+:backup_log.txt robocopy F:\Data3 Q:\Backups\Data3 /e /mir /np /tee /log+:backup_log.txt pause
Since one of the data folders I am backing up is being copied across a network, I want to ensure that any possible network outages do not cause some critical files to be skipped in the backup. To do this, I can make use of the /z option in the 3rd line of my .BAT file (backup to my network storage) as shown below.Code:------------------------------------------------------------------------------- ROBOCOPY :: Robust File Copy for Windows ------------------------------------------------------------------------------- Started : Sun Sep 18 23:35:01 2011 Source : E:\Data1\ Dest : G:\Backups\Data1\ Files : *.* Options : *.* /S /E /COPY:DAT /PURGE /MIR /R:1000000 /W:30 ------------------------------------------------------------------------------ 2 E:\Data1\ ------------------------------------------------------------------------------ Total Copied Skipped Mismatch FAILED Extras Dirs : 1 0 1 0 0 0 Files : 2 0 2 0 0 0 Bytes : 442.1 k 0 442.1 k 0 0 0 Times : 0:00:00 0:00:00 0:00:00 0:00:00 Ended : Sun Sep 18 23:35:01 2011
This option implements a "retry" for the copying. If I were part way through the copying process, and I lost connection with the network, then ROBOCOPY would automatically restart the copying at the point of failure once the network connection was re-established. It would retrying a million times every 30 seconds (the default settings shown in the image above). The only drawback with this option, is that it can significantly increase the backup time.Code:robocopy E:\Data1 G:\Backups\Data1 /e /mir /np /tee /log:backup_log.txt robocopy F:\Data2 G:\Backups\Data2 /e /mir /np /tee /log+:backup_log.txt robocopy F:\Data3 Q:\Backups\Data3 /e /mir /np /z /tee /log+:backup_log.txt
ROBOCOPY also has the ability to perform faster multi-threaded copying by simply using the option /mt. I can choose the number of threads to use by specifying a number between 1 and 128 after the /mt option, or if I just specify /mt without a number then the it will use 8 threads by default. In the example below, I use 4 threads to copy to my USB drive, and 8 threads (no number) to copy to my network drive.
Below is a template that you can use to create your own backup strategy using ROBOCOPY. Simply copy and paste the lines into a blank text document, and then edit as appropriate.Code:robocopy E:\Data1 G:\Backups\Data1 /e /mir /np /tee /mt:4 /log:backup_log.txt robocopy F:\Data2 G:\Backups\Data2 /e /mir /np /tee /mt:4 /log+:backup_log.txt robocopy F:\Data3 Q:\Backups\Data3 /e /mir /np /z /tee /mt /log+:backup_log.txt
Code:rem --- Edit the lines below to create your own backup strategy rem --- The /mir option has been left out for safety sake rem --- Add more lines for each new folder requiring backup rem --- Specified 4 threads to use for multi-threaded copying rem --- The results of the backup can be found in my_backup_log.txt robocopy <source> <destination> /e /np /tee /mt:4 /log:my_backup_log.txt robocopy <source> <destination> /e /np /tee /mt:4 /log+:my_backup_log.txt robocopy <source> <destination> /e /np /tee /mt:4 /log+:my_backup_log.txt pauseTip
The can automate your backup's by using the Windows 7 Task Scheduler to run the .BAT file at specific times.
For more information please refer to this tutorial by Orbital Shark:
Task Scheduler - Create New Task
I hope this brief tutorial helps you access the power and simplicity of ROBOCOPY to create some effective backup strategies.
Regards,
Golden
ROBOCOPY - Create Backup Script
-
New #1
Bravo! Well done, Golden!
-
-
New #3
Good article, but note that the URL for technet should not have "www." in front of it. The link should be to http://technet.microsoft.com/en-us/library/cc733145(WS.10).aspx.
-
New #4
Thanks Guy. I've been having some formatting "issues" with http's recently - links corrected.
-
New #5
winscp also provides handy automated backups
Came across this forum while looking for alternative backup strategies. I've found Dropbox and Mozy quite useful, but also winscp (with a bit of work). The first two do continuous backup but winscp is ideal if you want an in-house solution.
-
-
-
New #8
Very Nice , But a person like me who is very new at this computer stuff how can i restore my files from this operation ?? and where can i see them ???
-
New #9
Hi Mick,
Thanks for the comment. ROBOCOPY is designed to backup/copy folders to another destination (different disk, external USB drive). The idea is that if the original files are accidently deleted or damaged, you can simply copy the required from the backup location to where you need them.
If you need help setting up a robocopy script to backup your data, then let me know and I'll write one for you.
Regards,
Golden

ROBOCOPY - Create Backup Script
How to Create a Backup Script using ROBOCOPY CommandPublished by Golden
Related Discussions


 Quote
Quote