

Add "Enable/Disable Thumbnails" to Context Menu in Vista, Windows 7, and Windows 8
InformationThis tutorial will show you how to add or remove Enable/Disable Thumbnails to the desktop, library, and folder window context menu for users to be able to toggle their explorer thumbnail previews on or off with a single click in Vista, Windows 7, and Windows 8.
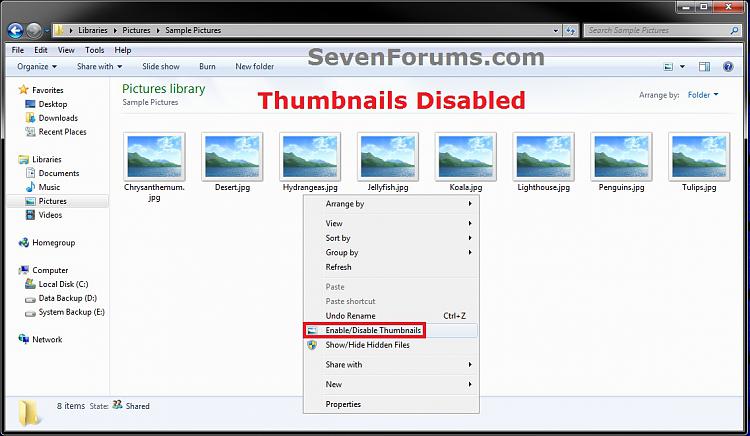
NoteWhen you right click or press and hold on an empty area of your Desktop and click/tap on Enable/Disable Thumbnails, the thumbnail previews will instantly show as turned on or off. You will need to refresh (F5) any other currently opened inactive window to have the thumbnail previews show as on or off.
When you right click or press and hold on an empty area in the main window of a library or folder and click/tap on Enable/Disable Thumbnails, the thumbnail previews will instantly show as turned on or off in that window. You may need to refresh (F5) any other currently opened inactive window to have the thumbnail previews show as on or off.
EXAMPLE: "Enable/Disable Thumbnails" Added to Context Menu
OPTION ONETo Add "Enable/Disable Thumbnails" to Context Menu
1. Do either step 2 or 3 below for what you would like.
2. To Toggle Thumbnails Enabled or Disabled with Notify Sound Played
NOTE: When you click on the Enable/Disable Thumbnails context menu item using this option, you will hear the notify.wav file play only if Window Media Player is set as the default program for .wav files. If you do not have Window Media Player turned on in Windows Features, then you will get an error instead of the sound playing.
A) Click on the Download button below to download the file below, and go to step 4 below.3. To Toggle Thumbnails Enabled or Disabled without any Sound
NOTE: This includes all "hidden files, folders, or drives" and "hidden protected operating system files".
NOTE: This option is if you did not want to have the Notify.wav play when you use the Enable/Disable Thumbnails context menu item, or if you get an error from using step 2 since you have Windows Media Player turned off in Windows Features.
A) Click on the Download button below to download the file below, and go to step 4 below.
NOTE: This includes all "hidden files, folders, or drives" and "hidden protected operating system files".
4. Save the .zip file to your desktop.
5. Open the downloaded ZIP file, and extract (drag and drop) both the .reg and .vbs files to your desktop.
6. Right click on the extracted .vbs file, click/tap on Properties, click/tap on the General tab, and unblock it.
NOTE: If you do not see a Unblock button, then the file is already unblocked.
7. Right click on the extracted and unblocked .vbs file on your desktop, and click/tap on Copy.
8. In Windows Explorer, navigate to and open the C:\Windows folder. Right click on an empty area in the C:\Window folder, click/tap on Paste, then click/tap on Continue and Yes (UAC) if prompted. Close the Windows Explorer window.
9. Double click/tap on the extracted .reg file on your desktop to merge it.
10. Click/tap on Run, Yes (UAC-Windows 7/8) or Continue (UAC-Vista), Yes, and OK when prompted.
11. Enable/Disable Thumbnails has now been added to the context menu.
12. You can now delete the downloaded files left on your desktop if you like.
OPTION TWOTo Remove "Enable/Disable Thumbnails" from Context Menu
NOTE: This is the default setting.
1. Click/tap on the Download button below to download the file below, and save it to your desktop.That's it,
2. Double click/tap on the downloaded .reg file to merge it.
3. Click/tap on Run, Yes (UAC-Windows 7/8) or Continue (UAC-Vista), Yes, and OK when prompted.
4. Enable/Disable Thumbnails has now been removed from the context menu.
5. In Windows Explorer, navigate to and open the C:\Windows folder, right click on the file below, click/tap on Delete, and Yes (if prompted).
Toggle-Thumbnails-ON-OFF.vbs6. You can now delete the downloaded reg file if you like.
OR
Toggle-Thumbnails-ON-OFF_with_Sound.vbs
Shawn
Thumbnails - Enable or Disable - Add to Context Menu
-
New #1
truly amazing stuff love it thanks for the help matty
-
-
New #3
Got this error in Windows7 Ultimate x86. Can you help me? Thanks
C:\WindowsToggle-Thumbnails-ON-OFF.vbs
7
1
Permission denied
800A0046
VBScript run-time error
-
New #4
Hello Yanez, and welcome to Seven Forums.
Did you unblock the Toggle-Thumbnails-ON-OFF.vbs file before moving it to the C:\Windows folder?
-
New #5
Thanks. I think the file was already unblocked because i didn't find anu Unblock botton.
-
New #6
Is it working for you now?
If not, then are you logged in as an administrator to be able to move the .vbs file into the C:\Windows folder?
-
New #7
Of course. I have also other vbs script for toggling exstension or file visibility.
And all these works. Only Toggle-Thumbnails-ON-OFF get the error.
In past i have installed the same script in a pc with W7 professional without issues.
-
New #8
As a test of the .vbs file itself, run the .vbs file on your desktop to see if it will toggle thumbnails on and off for you.
-
New #9
Thanks.
I copied the vsb in the desktop and i run it by contextual menu Open.
First time i got the same error, but i also got a msg that Comodo Antivirus had isolated it in the sandbox.
So I click "don't isolate it anymore" on Comodo msg windows.
Then when i run the script in desktop i get a icons blink but it doesn't toggle icon/thumbnails.
So i moved the vbs script back from desktop to Windows folder
overwriting the old one and now it seem work!
Mysteries!
Thanks for your help!Last edited by yanez; 03 Apr 2013 at 03:32.
Thumbnails - Enable or Disable - Add to Context Menu
Add "Enable/Disable Thumbnails" to Context Menu in Vista, Windows 7, and Windows 8Published by Brink


 Quote
Quote
Related Discussions