


How to Use Problem Steps Recorder in Windows 7
InformationYou can use Problem Steps Recorder to automatically capture the steps you take in Windows 7, including a text description of where you clicked and a screen shot during each click. Once you capture these steps, you can save them to a .zip file containing a .mht (MHTML) file of them. This file can then be used by a support professional or someone else helping you with a computer problem. If you like you can use it as a sort of Slide Show type demo to.NoteWhen you record steps on your computer, anything you type will not be recorded. If what you type is an important part of recreating the problem you're trying to solve, use the Add Comment button (step 6) while recording to add text to highlight where the problem is occurring.WarningSome programs, like a full-screen game, might not be captured accurately.
Here's How:
1. Open the Start Menu.That's it,
2. In the search line, type psr.exe and press Enter. (See screenshot below)
3. To Adjust the Settings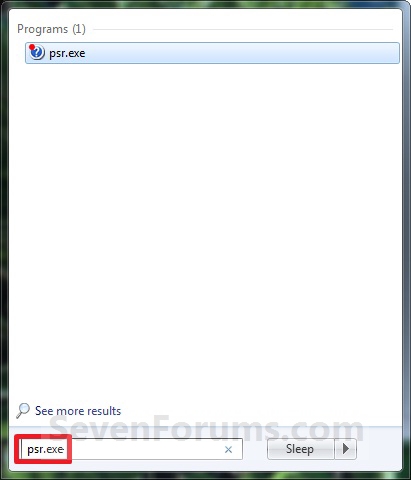
A) Click the help down arrow, and then click on Settings. (See screenshot below)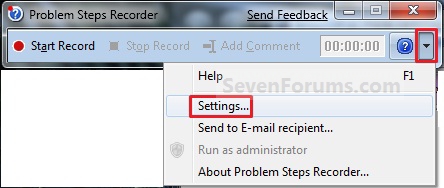 4. To Start Recording Screenshots
B) You can change the following settings for Problem Steps Recorder: (See screenshot below)
C) When done, click on OK. (See screenshot below)
- Output Location - To make it easier to find the files you save, click the Browse button to set a default location for the Problem Steps Recorder files.
- Enable screen capture - If you don't want to capture the screen shots along with the click information, select No. This might be a consideration if you are taking screen shots of a program that contains personal information, such as bank statements, and you are sharing the screen shots with someone else.
- Number of recent screen captures to store - While the default is 25 screens, you can increase or decrease the number of screen shots. Problem Steps Recorder only records the default number of screen shots. For example, if you took 30 screen shots during a recording but only had 25 screen shots as the default, you would be missing the first five screen shots. In this case, you would want to increase the number of default screen shots.
A) When ready to record, click on the Start Record button. (See screenshot below)5. On your computer, go through the steps to reproduce the problem. You can pause the recording at any time, and then resume it later.
NOTE: As you click screenshots are being recorded. You will see a red dot while you click to indicate this.
6. To Add a Comment
A) Click on the Add Comment button. (See screenshot below)7. To Stop Recording
B) Use your mouse to highlight the part of the screen that you want to comment on, type your text in the Highlight Problem and Comment box, and then click OK. (See screenshot below)
A) When you are done recording, click on the Stop Record button. (See screenshot below)8. To Save the Recording
A) In the Save As dialog box, navigate to where you want to save the .zip file containing the .mht (MHTML) file of your recording. Type in a name for the file, and then click on Save. (See screenshot below)9. When done close the Problem Steps Recorder window. (See screenshot below)
Shawn
Problem Steps Recorder
-
-
-
New #3
Wow! Thanks for sharing Brink! This thing could also be used to make great PC Guides or tutorials! The thing PWNS!
-
-
New #5
Thanks Brink for this one.
I used the recorder for the first time yesterday. I am having problems with one of my many fantasy football games. I struggled to use it but got it done and sent it as feedback to said fantasy site. Got a email back last night saying thanks costumer service is looking at this. Today I logged in and big sign says, site down due to maintenance. I think my feedback worked. Came here to find out if you had a tut for the recorder and next time I will be able to refine my recording. One question, is this available in all editions of Seven? :) LarryLast edited by myzr7; 02 Sep 2009 at 09:13. Reason: spelling
-
New #6
Hello Larry,
I'm happy to hear that it helped you out. Yes, it's available in all editions of Windows 7. :)
-
New #7
-
New #8
Thought I'd stop by to say "Thanks for another excellent tutorial!"
I'll be sure to link some future posts to here :)
-


 Quote
Quote
Related Discussions